This post contains affiliate links. As an Amazon associate, I earn from qualifying purchases. This means that I make a small commission at no extra cost to you. You can read my full disclosureHERE.
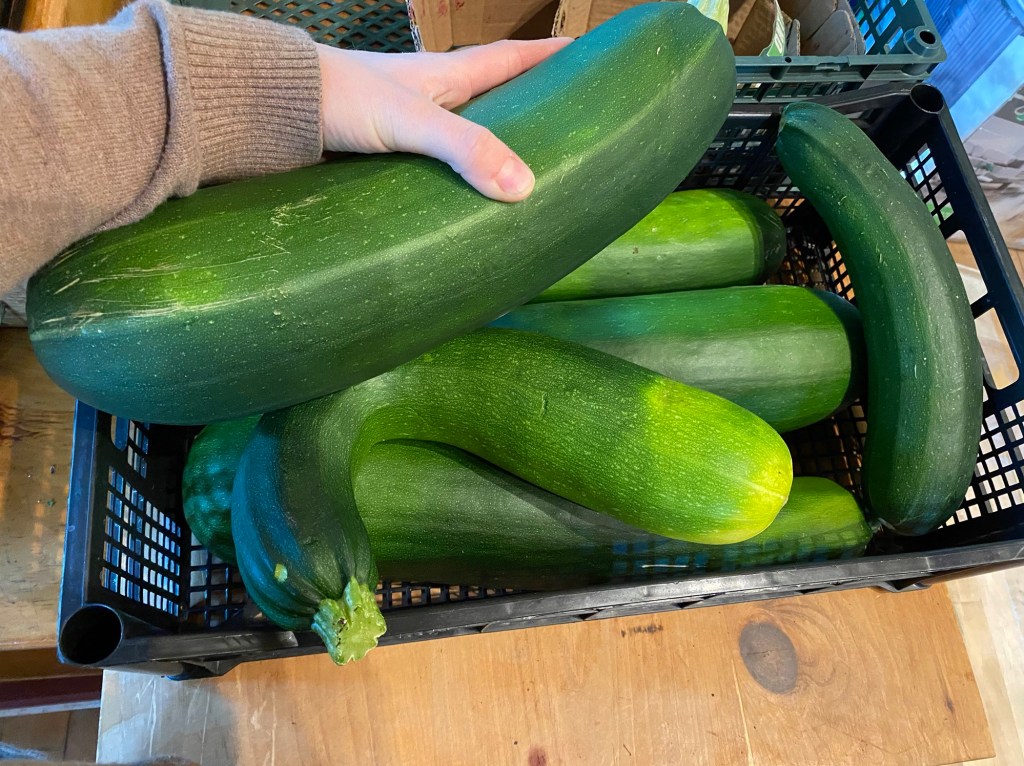
Have you ever had an abundance of really robust zucchini’s growing in your garden?! And then had no idea of what to do with them?!
A few summers ago while helping to plant out my parents garden, “someone” decided that since we had the space and enough happy seedlings, we should plant over 20 zucchini plants.
The vision was to have enough zucchinis harvested throughout the summer to not only be used in stirfrys and other meals, but to make some tasty zucchini chips to dehydrate. In this way, we could have a crunchy, homemade snack to enjoy for the long winter months. (Or at least that was the intention behind planting so many zucchini plants!)
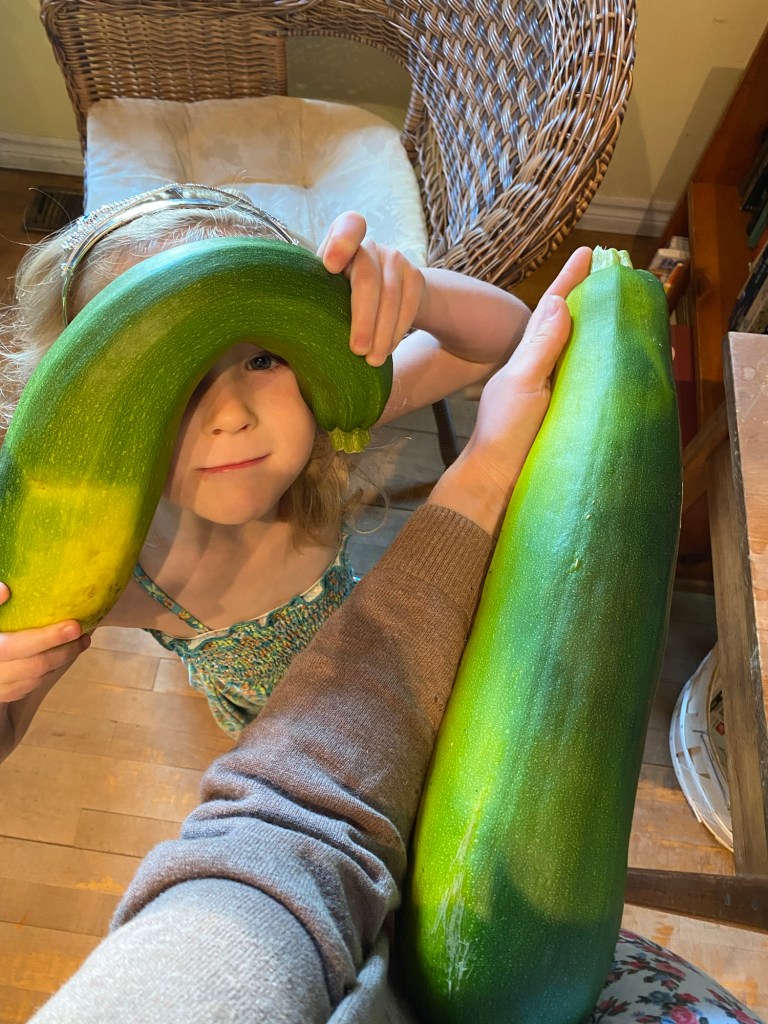
Did this happen? Did the zucchinis grow as expected? Well yes they did grow, so much in fact that it turned into a daily game of “twister” in the jungle of giant zucchini plants to find them!
We harvested many delicious and delicate normal-sized zucchinis, and they were enjoyed very much. But what happened when we forgot to go on our jungle zucchini adventure for a few days?!
Yup.
And with 20 zucchini plants, I’m sure you can imagine how fun it was for the kids to discover all of these monstrous vegetables that became somewhat of a nightmare for my mother and I to figure out what to do with.
So what can you do with large zucchinis? The taste is certainly not as flavourful as the delicate petite ones, because they are much more watery inside.
We ate them anyway in so many different ways until we got SO BORED OF EATING ZUCCHINI!
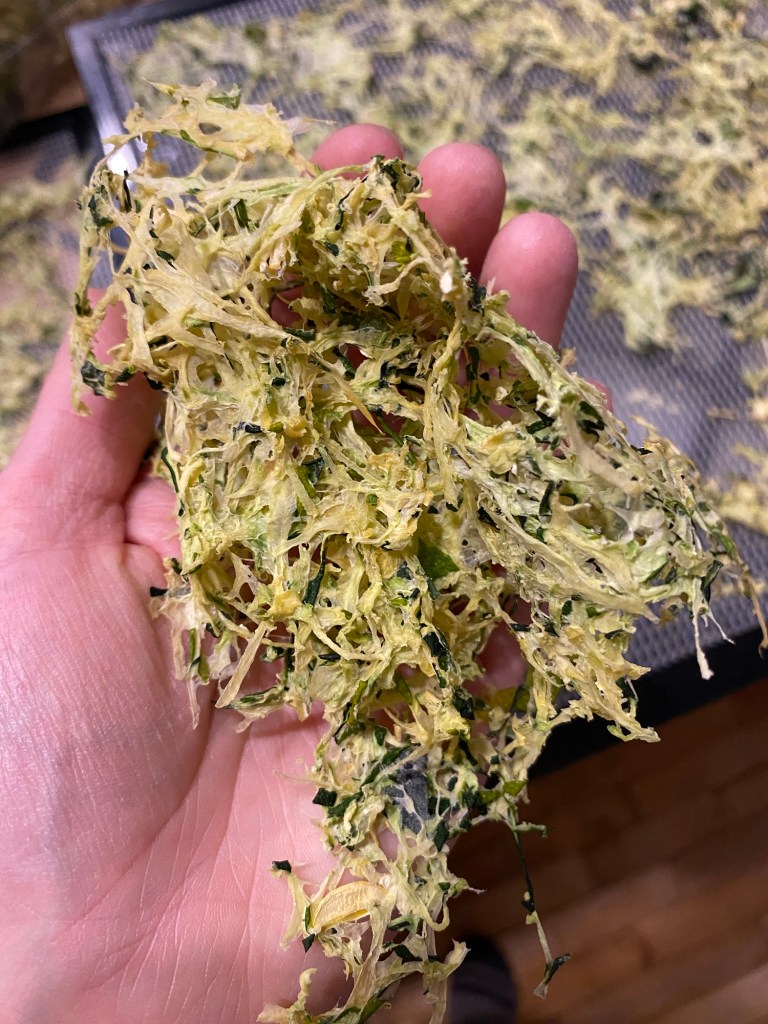
Thankfully, I found somewhere online about dehydrating shredded zucchinis as a form of preserving them to enjoy at our leisure, and this became our solution.
I have since then dehydrated shredded zucchini multiple times, and successfully re-hydrated them to use in soups, frittatas, and baking.
I have also used this recipe and subbed in the asparagus with a few handfuls of re-hydrated shredded zucchini and it tastes DELICIOUS.
Nutrition:
Zucchini is a wonderful garden vegetable that is packed full of important antioxidants, vitamins and minerals. It is high in fibre, which helps to regulate your digestion and keep you feeling “full” longer.
Zucchini is also low in calories, which makes it valuable to those trying to lose weight. I learned this summer that it is a staple for the keto diet (we subbed in zucchini noodles many times for regular pasta).
Studies have also shown that zucchini is beneficial to eye health, heart health, lowering risks of anaemia, regulating blood sugar levels, supporting the immune system, and assisting in muscle growth (to just name a few!).
Ways to Use Dehydrated Shredded Zucchini in Cooking:
Soups and Stews as a “filler”
Baking (breads, muffins, etc)
Omelettes and other egg dishes
Fried potato patties/ hashbrowns
Pancakes
I’m sure there are many more ideas and ways to get creative with shredded zucchini. When I learn some more, I’ll share on here with you!
How to Re-hydrate Zucchini?
Simply put a few handfuls of the shredded dried zucchini bits into a bowl of warm water and wait 5 minutes or so until it plumps up. Then you can squeeze out the excess water and use as normal.
How Long to Store Dehydrated Zucchini?
It is best if used up within a year, but I have also used some that is a few years old and it still re-hydrated fine and tasted the great!
Make sure it is properly stored in a cool, dark, dry place, in a sealed container to avoid any moisture seeping in to cause mold.
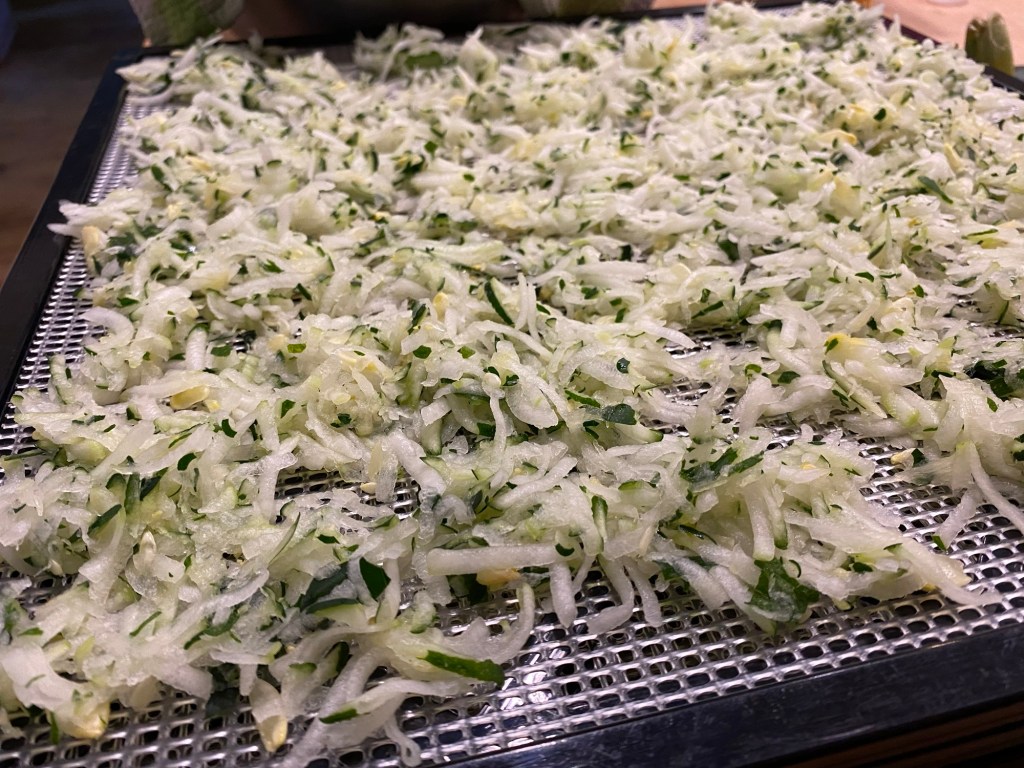
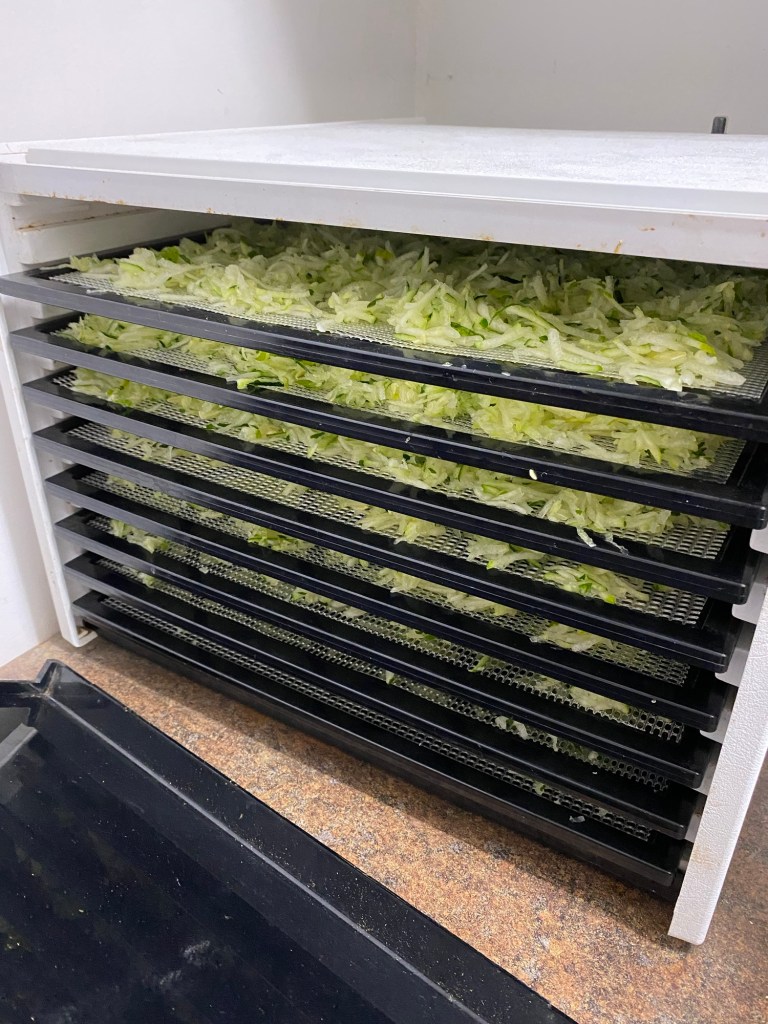
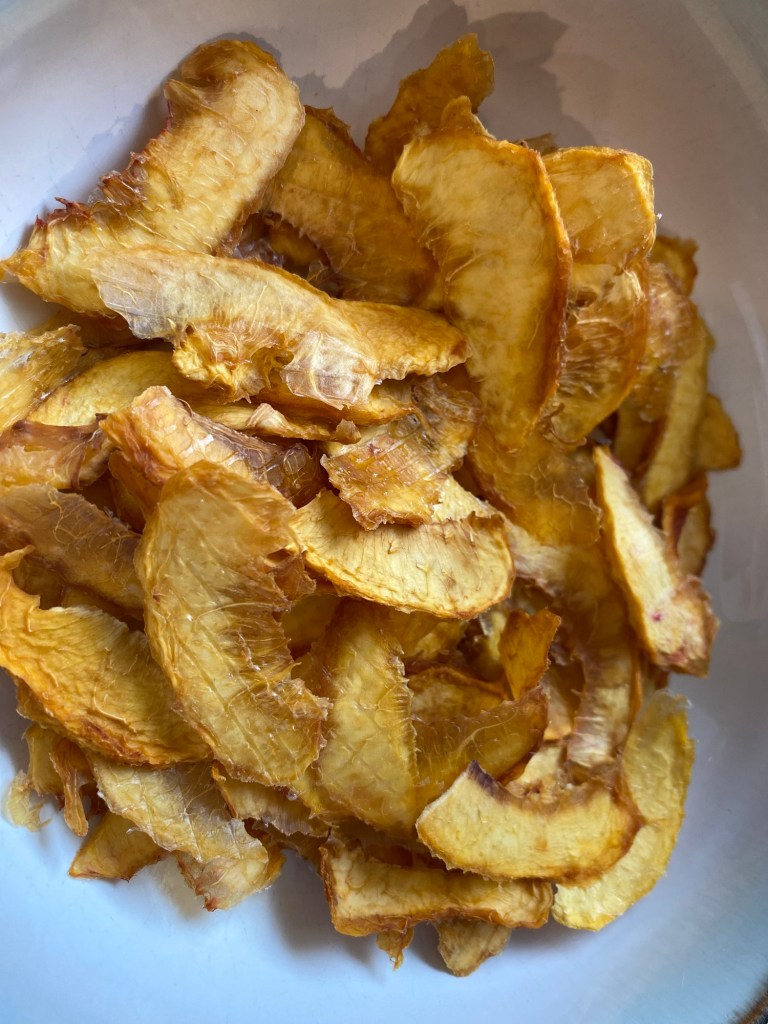
A quick visual of the harvesting process from start to finish!
Cut up zucchini into chunks that will easily fit in your food processor.
Use a shredding insert and shred zucchini until fine strings.
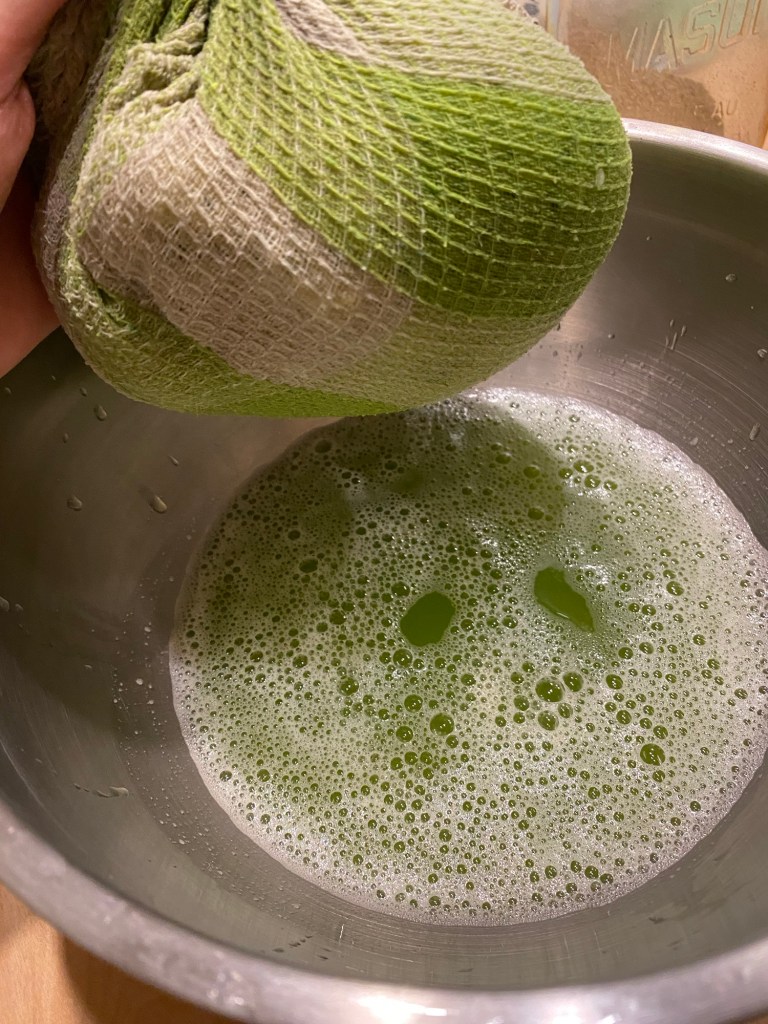
3. Place tea towel or large nut milk bag into a large bowl. Put the shredded zucchini into the towel, gather it up and squeeze out as much of the water as you can.
4. Place shredded zucchini evenly onto drying racks, leaving spaces for air to pass through.
5. Dehydrate at 125 degrees fahrenheit, for 8-12 hours until dry and brittle. Timing will depend on the humidity of your drying area, and how well you are able to squeeze out the water in the towel.
6. Remove and place in sealed containers, and store in a cool, dark and dry place. Best if used up within a year.
7. When ready to use in cooking or baking, simply put desired amount of dried zucchini in a bowl of warm water and let sit for 5 minutes. Drain and squeeze out extra water before use.
I’m a Wife and Homeschooling Mom living in a remote town in Northern Ontario, Canada.I love making wholesome meals for my family from scratch, homeschooling our girls and learning more about natural living.
Subscribe to Northbird’s email list to get weekly posts on: tasty recipes, activity ideas for kids, natural living tips, and some genuine mom thoughts and encouragement!
Cut up zucchini into chunks that will easily fit in your food processor.
Use a shredding insert and shred zucchini until fine strings.
Place tea towel or large nut milk bag into a large bowl. Put the shredded zucchini into the towel, gather it up and squeeze out as much of the water as you can.
Place shredded zucchini evenly onto drying racks, leaving spaces for air to pass through.
Dehydrate at 125 degrees fahrenheit, for 8-12 hours until dry and brittle. Timing will depend on the humidity of your drying area, and how well you are able to squeeze out the water in the towel.
Remove and place in sealed containers, and store in a cool, dark and dry place. Best if used up within a year.
When ready to use in cooking or baking, simply put desired amount of dried zucchini in a bowl of warm water and let sit for 5 minutes. Drain and squeeze out extra water before use.
Nutrition
Per 1 serving: 8 calories; 0.1 g fat; 1.7 g carbohydrates;
0.6 g protein.
This post contains affiliate links. As an Amazon associate, I earn from qualifying purchases. This means that I make a small commission at no extra cost to you. You can read my full disclosureHERE.
I LOVE this time of year! So many good things to harvest from your gardens, bushes, foraging, and fruit trees!
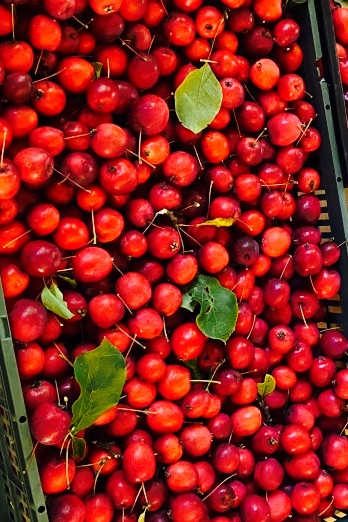
In southern Ontario, my parents have some wonderful neighbours that have an incredibly plentiful crabapple tree. Each year, some members of our family have spent an hour or two picking apples and then spent the next few days turning the thousands of tiny apples into delicious jellies, juice, and some deliciously tart pink applesauce.
The kids have always been particularly fascinated with the mini red apples, and our oldest was always taking a handful of them to snack on throughout her day!
Nutrition:
Did you know that crabapples contain high levels of vitamin C? As a result, they are a great source for keeping your immune system strong! They are also packed full of other essential vitamins and minerals that our bodies need such as: phosphorus, calcium, iron, magnesium and manganese.
Crabapples have naturally high levels of pectin, which not only helps the jelly to “set”, but also has numerous health benefits for our bodies (some of these I didn’t even know about until researching for this post!)
Another important thing to note about crabapples (and all apple varieties) is that the seeds contain amygdalin, which is a compound made of a mixture of sugars and cyanide. You definitely want to avoid eating apple seeds whenever possible!
Mini Jellies Make Great Gifts!
For a few years now, I have made numerous batches of crabapple jelly, apple butter, and other jams to give away at Christmas time to family and friends.
I love using these smaller 125ml jars for the various jars and then doing up little boxes from the dollarstore with a variety of preserves in each box.
Here’s a video showing each step in the process of making Crabapple Jelly!
Wash crabapples in cold water and remove any bad ones.
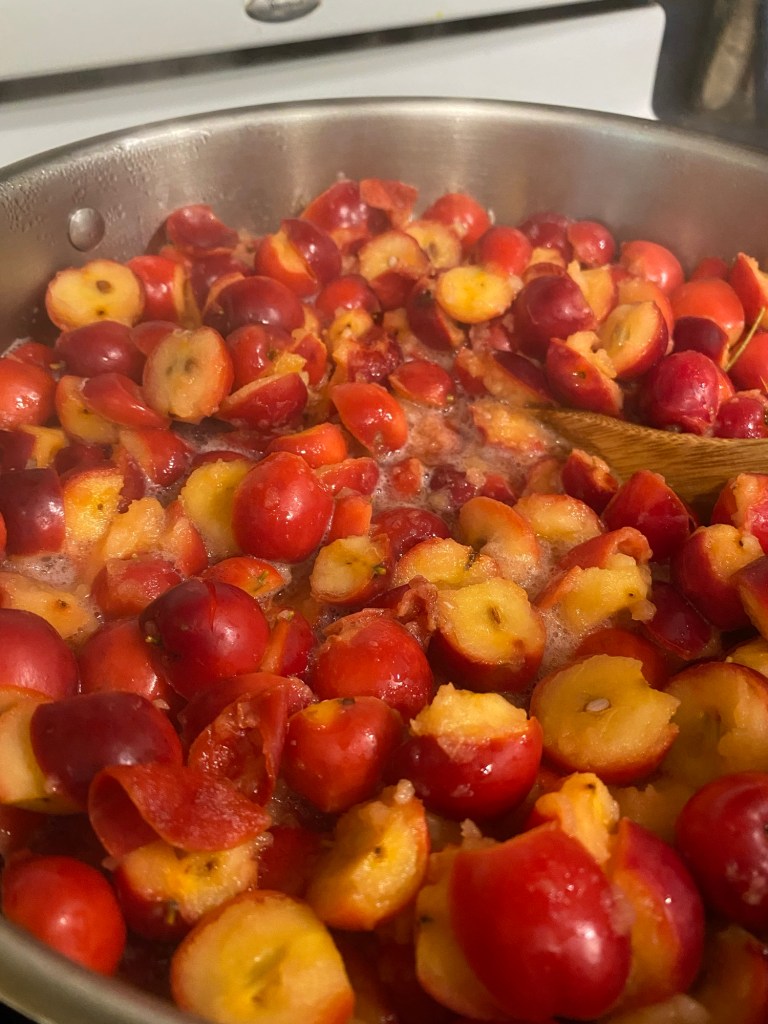
With paring knife, cut off stem and blossom ends, and cut in half. Put prepared pieces in large stock pot.
3. Add cold water to pot until you can see the water through the top layer of apples. Too much water will result in more watery jelly and might have trouble setting, and not enough water might make it too thick or the apples might burn while cooking down!
4. Cook for several minutes on medium, stirring frequently until you can mush the apples easily with a spoon.
5. Remove from heat and let it cool while you set up to strain the juice.
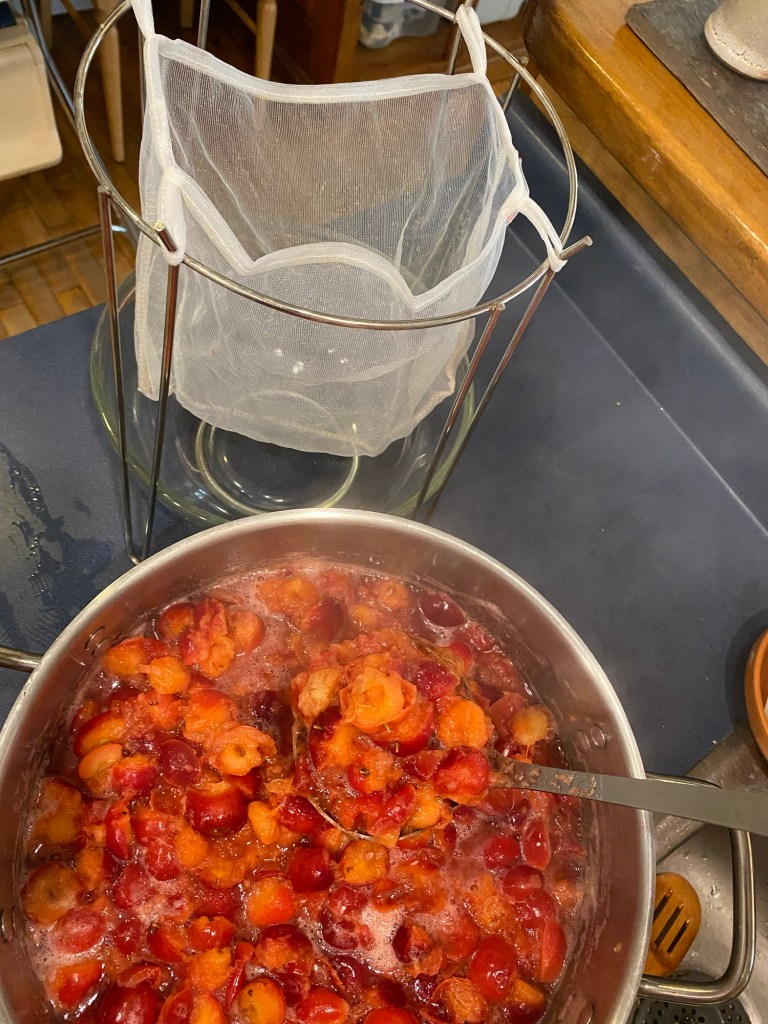
6. Carefully scoop out the cooked crabapples and let the juice slowly drain through a canning strainer. ***Do not squeeze the bag! See note below.
7. Leave for several hours or overnight to fully drain through. You can discard the remaining pulp or push it through into a separate bowl to make some crabapple sauce.
8. After your juice has been collected, you can either store it in a sealed container in the fridge for up to 3 days, or start the canning process below.
Additional Notes for Stage 1:
If you don’t have a canning strainer, you can also use a fine mesh colander or hang nut milk bags suspended over a bowl. Get creative with what you have!
It is important to let the juice drain through slowly on its own without being squeezed or hurried along. This will prevent the juice from becoming cloudy and instead have the beautiful clear dark red that every canner aims toward!
Sometimes I do the apples in batches over a few days, so its helpful to store the containers of crabapple juice in the fridge while I finish cooking the remaining crabapples. Then I like to do the canning all on one day since it takes so much work to set up everything needed!
Stage 2 Directions:Cooking the Jelly
Before you start: Begin by prepping and setting up for the canning process. (There’s nothing worse than being ready to pour into the canning jars and realizing that you are missing something!)
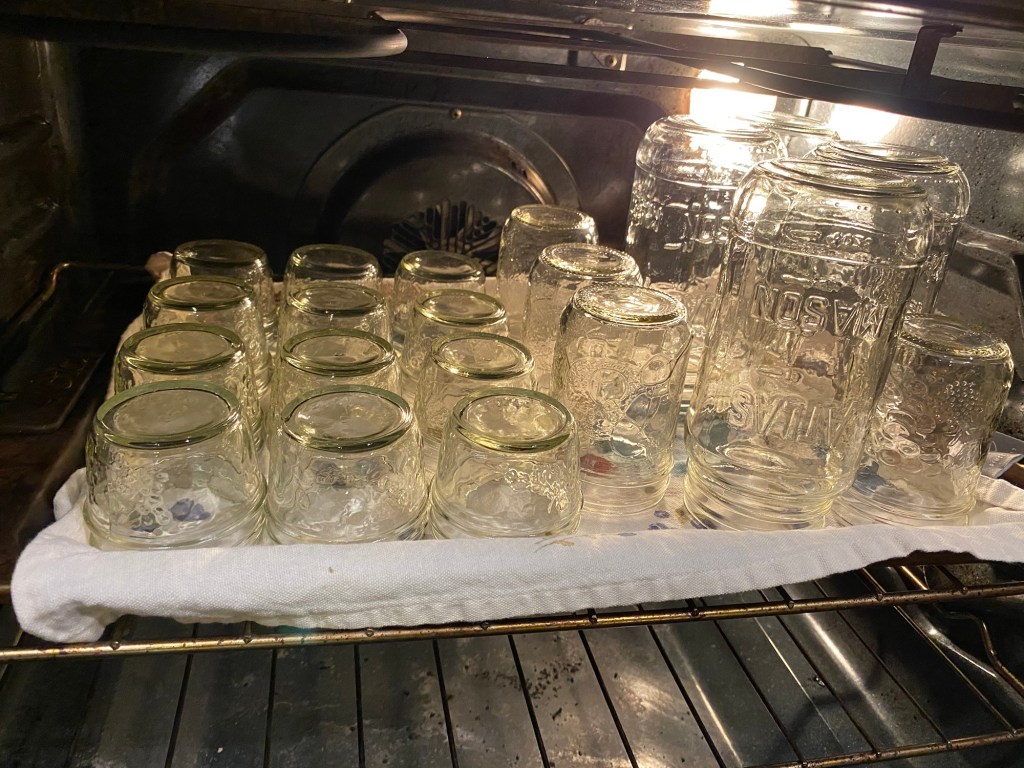
Clean your glass jars, lids and rings in hot soapy water and rinse thoroughly. Place jars upside down on a clean tea-towel covered baking sheet. Place in the oven, preheat oven to 180 degrees fahrenheit.
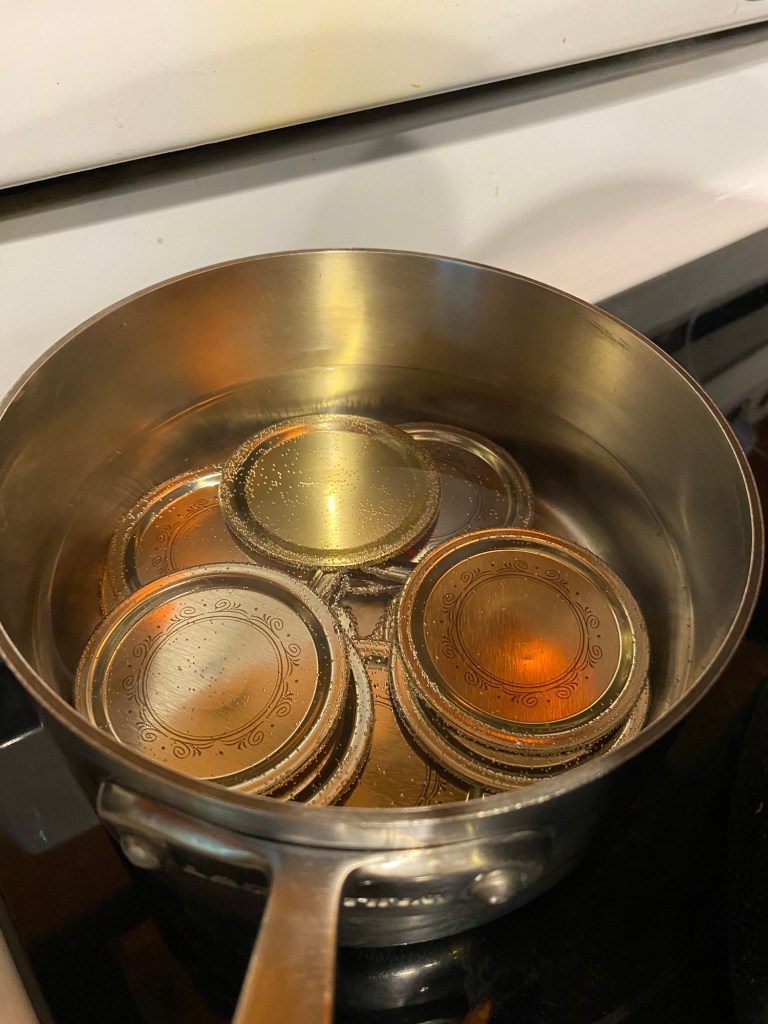
Place cleaned lids in a small saucepan and put on low/med on the stove.
Set out: canning tongs, paper towel, ladle spoon, non-metallic utensil, tongs or magnetic lid lifter, and lid rings.
Fill large water bath canner with cold water and set on stove, cover with lid. Bring to a boil then turn to low to simmer until ready.
If you don’t know already know this, research your current geographical altitude to see if you will need to modify some timing of this recipe. See notes below for testing for the jelly-set stage, as well as later on for the water bath canning stage.
2. Measure out prepared juice into large saucepan. The amount will depend on your pot size, I usually start with 4 cups.
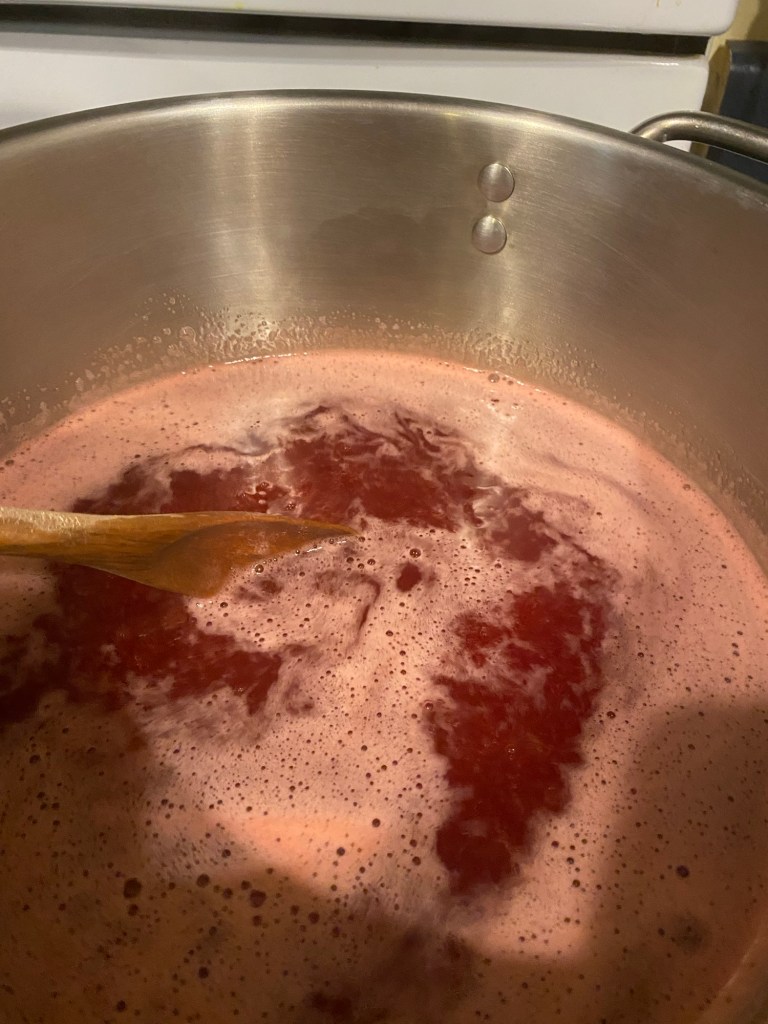
3. Boil the strained clear juice for 5 minutes, stirring frequently and skimming the foam off as needed.
4. Add sugar: The general rule is 3/4-1 cup of sugar per 1 cup of juice. So if you start with 4 cups of juice, you will need to add between 3-4 cups of sugar. This is based on personal preference of desired taste (how sweet you want your jelly to be!).
5. Return to a boil, stirring constantly, and after a minimum of 5 minutes, start testing for the jelly stage. If it is not ready yet, keep boiling and stirring constantly, checking every minute. Note: Timing of this will vary based on altitude, and also the quantity and ratio of juice/sugar in your pot. (See below). When I made this recipe in Southern Ontario, it took less time to reach the jell stage, than when I made it here in Northern Ontario, because the location at sea level affects the boiling point, (which in turn affects the jell stage).
6. Once the jelly stage has been reached, remove pot from heat, and lightly skim off any remaining foam.
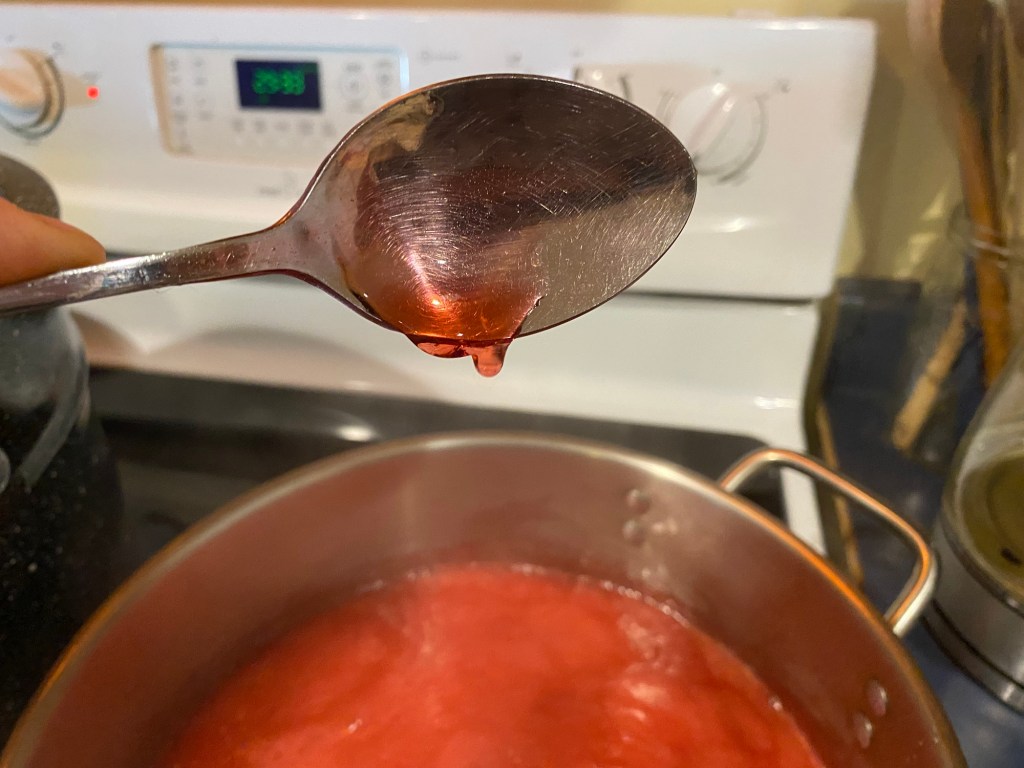
Testing for the Jelly Stage:
If you have a candy thermometer, the optimal temperature for jelly to set is 220 degrees fahrenheit, or 8 degrees fahrenheit above the boiling point of water if you are at sea level.
Note: For every 1000 feet above sea level, subtract 2 degrees fahrenheit to reach the stage for the jelly to set.
For example, at 1,000 feet above sea level, the setting stage is 218 degrees fahrenheit. At 2,000 feet above sea level, the setting stage is 216 degrees fahrenheit, etc.
If you don’t have a candy thermometer, you can use a few items in your kitchen to check with every minute or so after it has been boiling with sugar for 5 minutes. I have made jelly with each of these methods, but my favourite one is using a spoon.
Fork: Dip a fork into the boiling jelly and lift up vertically. The jelly will have a few drips then start to clump together within the spokes of the fork.
Spoon: Dip a spoon into the boiling jelly and lift up horizontally. The jelly will have a drip or two then start to hold in place.
Cold plate: Keep a few small saucers or ceramic plates in your freezer until you are ready to test. Spoon a tiny dab onto one of the cold plates and tilt the place horizontally to see if the dab of jelly starts to run. If it holds in place, then the jelly is done. If it runs, then wait another minute or so then test on another cold plate.
Stage 3 Directions: Water Bath
With canning tongs, pull out a few jars from the oven and make sure all supplies are ready for the canning stage.
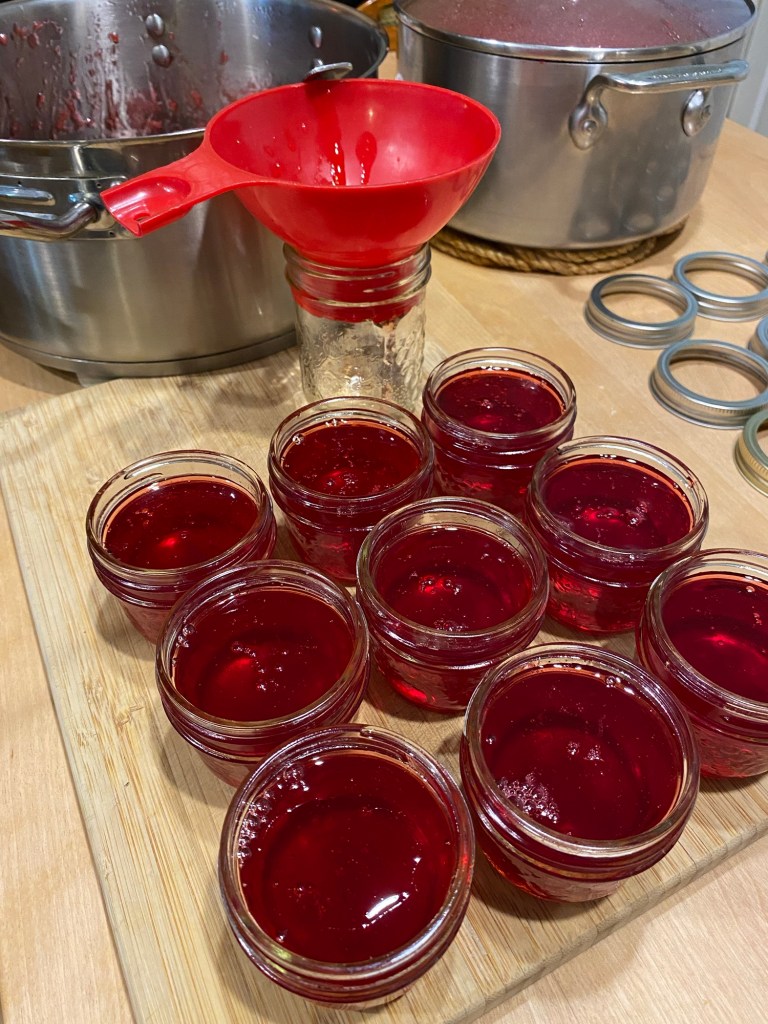
Carefully ladle the hot crabapple liquid into the jars through the funnel.
3. Gently stir each of the filled jars with a non-metallic utensil.
4. Wipe the tops of the filled jars with a clean/wet paper towel.
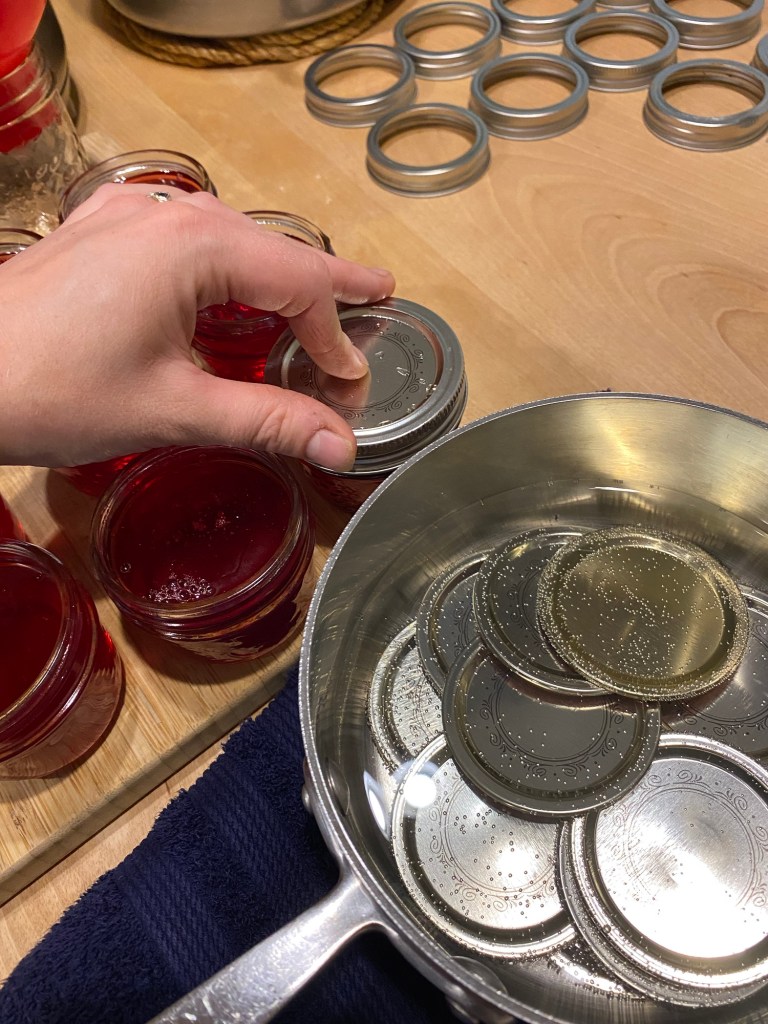
5. Put a warm canning lid on each one, pressing down while you twist on a screw band. Only tight enough to hold in place.
6. With canning tongs, put into water bath canner. When all the jars are filled and inside, return water to a boil.
7. Process jars in the water bath for 10 minutes, at sea level. See note below for altitudes above 1,000 feet.
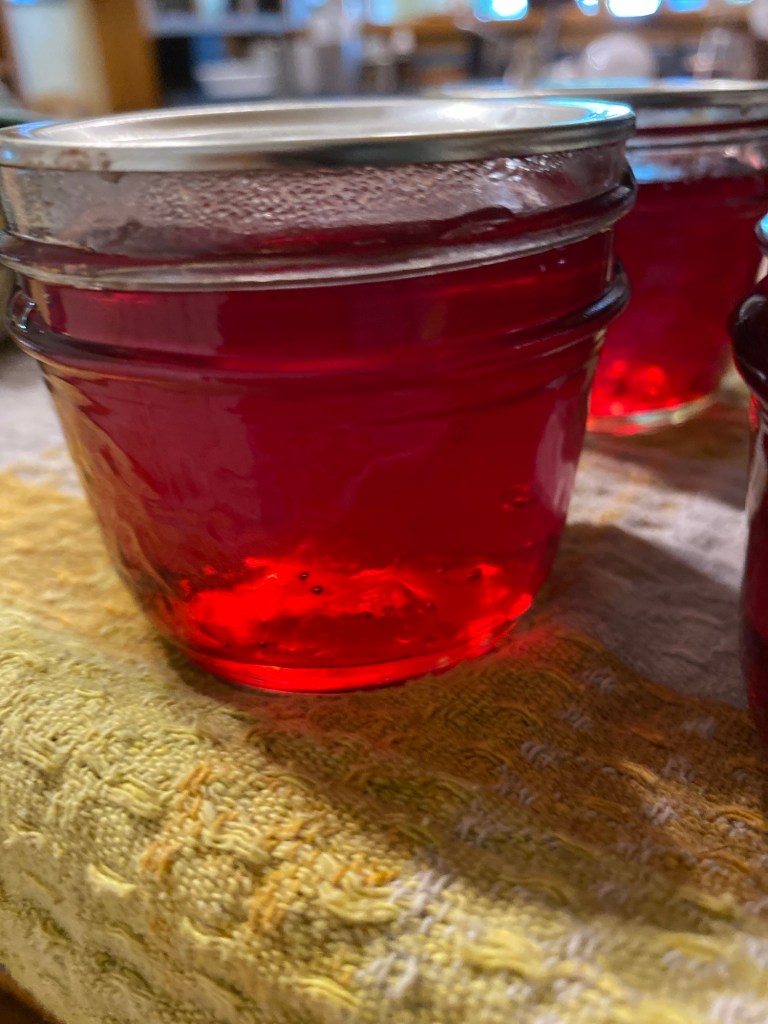
8. Lift jars from canner, being careful not to tilt. Place on towel-covered baking sheet and wait for the jar lids to start to “pop” as they naturally vacuum seal over the next little while.
9. When lids have finished “popping”, without lifting the jars you can gently remove the screw bands and wipe off any excess water.
10. Let sit for 24 hours undisturbed so the jelly can finish setting.
11. Store at room temperature for 12-18 months, refrigerate after opening.
12. Makes about 2 pints.
Water Bath Canner: Altitude Adjustments
Altitude in Feet:
Altitude in Meters:
Increase Processing Time
1,001-3,000
306-915
5 minutes
3,001-6,000
916-1,830
10 minutes
6,001-8,000
1,831-2,440
15 minutes
8,001-10,000
2,441-3,050
20 minutes
More Great Ideas for Your Homemade Pantry!
Hi, I’m Jessie!
I’m a Wife and Homeschooling Mom living in a remote town in Northern Ontario, Canada.I love making wholesome meals for my family from scratch, homeschooling our girls and learning more about natural living.
Subscribe to Northbird’s email list to get weekly posts on: tasty recipes, activity ideas for kids, natural living tips, and some genuine mom thoughts and encouragement!
Preserve the fresh taste of summer crabapples with this delicious homemade Crabapple Jelly Recipe (no added pectin), step-by-step instructions and visuals included for the beginner canner.
Wash crabapples in cold water and remove any bad ones.
With paring knife, cut off stem and blossom ends, and cut in half. Put prepared pieces in large stock pot.
Add cold water to pot until you can see the water through the top layer of apples. Too much water will result in more watery jelly and might have trouble setting, and not enough water might make it too thick or the apples might burn while cooking down!
Cook for several minutes on medium, stirring frequently until you can mush the apples easily with a spoon.
Remove from heat and let it cool while you set up to strain the juice.
Carefully scoop out the cooked crabapples and let the juice slowly drain through a canning strainer. ***Do not squeeze the bag! See notes above.
Leave for several hours or overnight to fully drain through. You can discard the remaining pulp or push it through into a separate bowl to make some crabapple sauce.
After your juice has been collected, you can either store it in a sealed container in the fridge for up to 3 days, or start the canning process below.
Stage 2 Directions: Cooking the Jelly
Before you start, begin by prepping and setting up for the canning process.
Clean your glass jars, lids and rings in hot soapy water and rinse thoroughly. Place jars upside down on a clean tea-towel covered baking sheet. Place in the oven, preheat oven to 180 degrees fahrenheit.
Place cleaned lids in a small saucepan and put on low/med on the stove.
Set out: canning tongs, paper towel, ladle spoon, non-metallic utensil, tongs or magnetic lid lifter, and lid rings.
Fill large water bath canner with cold water and set on stove, cover with lid. Bring to a boil then turn to low to simmer until ready.
Measure out prepared juice into large saucepan. The amount will depend on your pot size, I usually start with 4 cups.
Boil the strained clear juice for 5 minutes, stirring frequently and skimming the foam off as needed.
Add sugar: The general rule is 3/4-1 cup of sugar per 1 cup of juice. So if you start with 4 cups of juice, you will need to add between 3-4 cups of sugar. This is based on personal preference of desired taste (how sweet you want your jelly to be!).
Return to a boil, stirring constantly, and after a minimum of 5 minutes, start testing for the jelly stage. If it is not ready yet, keep boiling and stirring constantly, checking every minute. Note: Timing of this will vary based on altitude, and also the quantity and ratio of juice/sugar in your pot. For more information on testing the jelly stage (with and without a thermometer), see notes above.
Once the jelly stage has been reached, remove pot from heat, and lightly skim off any remaining foam.
Stage 3 Directions: Water Bath
With canning tongs, pull out a few jars from the oven and make sure all supplies are ready for the canning stage.
Carefully ladle the hot crabapple liquid into the jars through the funnel.
Gently stir each of the filled jars with a non-metallic utensil.
Wipe the tops of the filled jars with a clean/wet paper towel.
Put a warm canning lid on each one, pressing down while you twist on a screw band. Only tight enough to hold in place.
With canning tongs, put into water bath canner. When all the jars are filled and inside, return water to a boil.
Process jars in the water bath for 10 minutes, at sea level. See note above for altitudes above 1,000 feet.
Lift jars from canner, being careful not to tilt. Place on towel-covered baking sheet and wait for the jar lids to start to “pop” as they naturally vacuum seal over the next little while.
When lids have finished “popping”, without lifting the jars you can gently remove the screw bands and wipe off any excess water.
Let sit for 24 hours undisturbed so the jelly can finish setting.
Store at room temperature for 12-18 months, refrigerate after opening.
Nutrition
Per 1 serving: 94 calories; 0 g fat; 24 g carbohydrates;
0 g protein.
This post contains affiliate links. As an Amazon associate, I earn from qualifying purchases. This means that I make a small commission at no extra cost to you. You can read my full disclosure HERE.
The first time I created this recipe, it sort of happened accidentally…! We were all craving my special Oatmeal Chocolate Chip Cookie recipe that I’ve made probably hundreds of times and altered over the years. But after softening the butter and starting to get ingredients ready, I realized we had NO EGGS!
The past weekend had been very full with baking lots with eggs, making frittata one night for dinner, a homemade egg noodle dish another night, and having eggs in our lunches a few times too! The final lonely egg in the fridge was used in a homeschool science experiment.
(Now, I’m not usually one to run out of ingredients: I LOVE planning and being prepared with meals, making snacks, etc, so this threw me off a little! But honestly, sometimes simply good stuff can happen from situations such as this!)
Soooo…after slightly panicking and wondering if I could turn the ingredients into something else, I remembered hearing at some point that one could use sourdough starter discard as an egg replacement.
PERFECT.
Here is the general equation that I found online and that several seasoned “sourdoughers” agree on:
3 Tablespoons of Sourdough Starter Discard = 1 egg
So if you are a fellow “Sourdough-er” and in an egg emergency like I was, I hope this comes in handy for you!
EDIT: Here is my youngest cookie helper, looking a little grumpy because Mommy had to set her down to finish off the cookies! (It was one of those days where Little Miss wanted to be held ALL DAY. )
Why Sourdough? Here’s a few facts you might not have heard of:
Improves digestion
Sourdough gluten is easier to digest
Lowers chronic disease risks
Promotes healthy aging
Assists in stabilizing blood sugar levels
Helps with weight loss
Lower glycemic index
Has natural preservatives
Contains high levels of protein, fibre and nutrients
Interested in more info about Sourdough Starter? Click HERE
A simple video of making these delicious sourdough cookies!
How to Make Sourdough Starter Oatmeal Chocolate Chip Cookies:
Cream together the softened butter and both sugars.
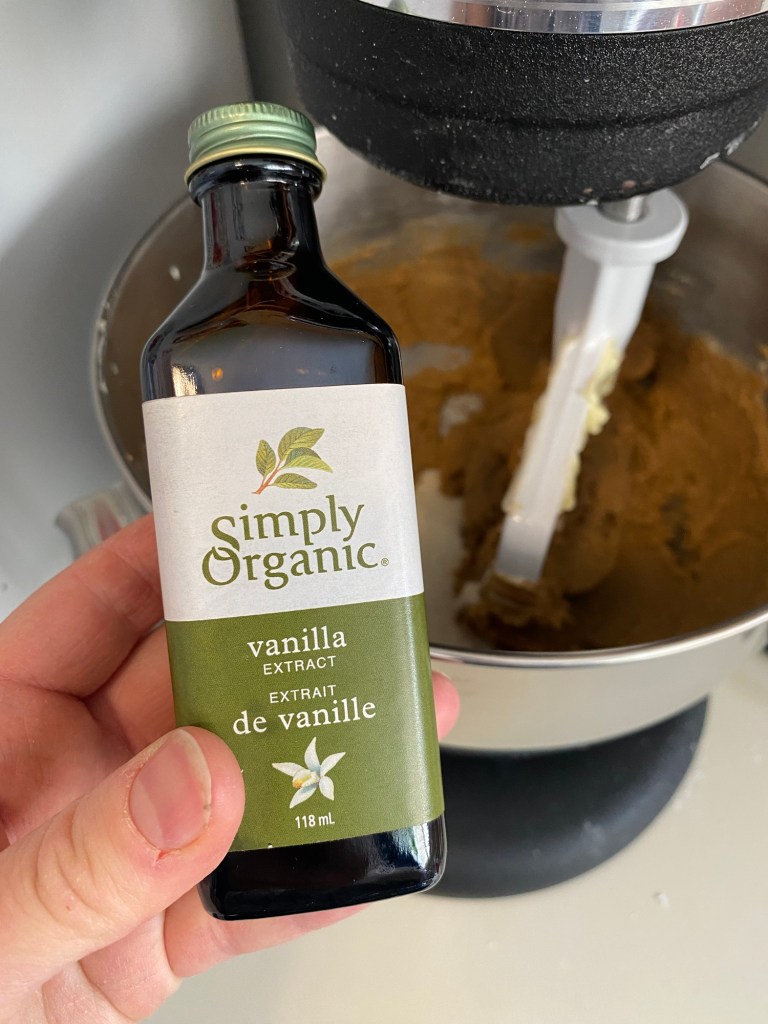
Add the sourdough starter and vanilla and mix until fully combined and smooth.
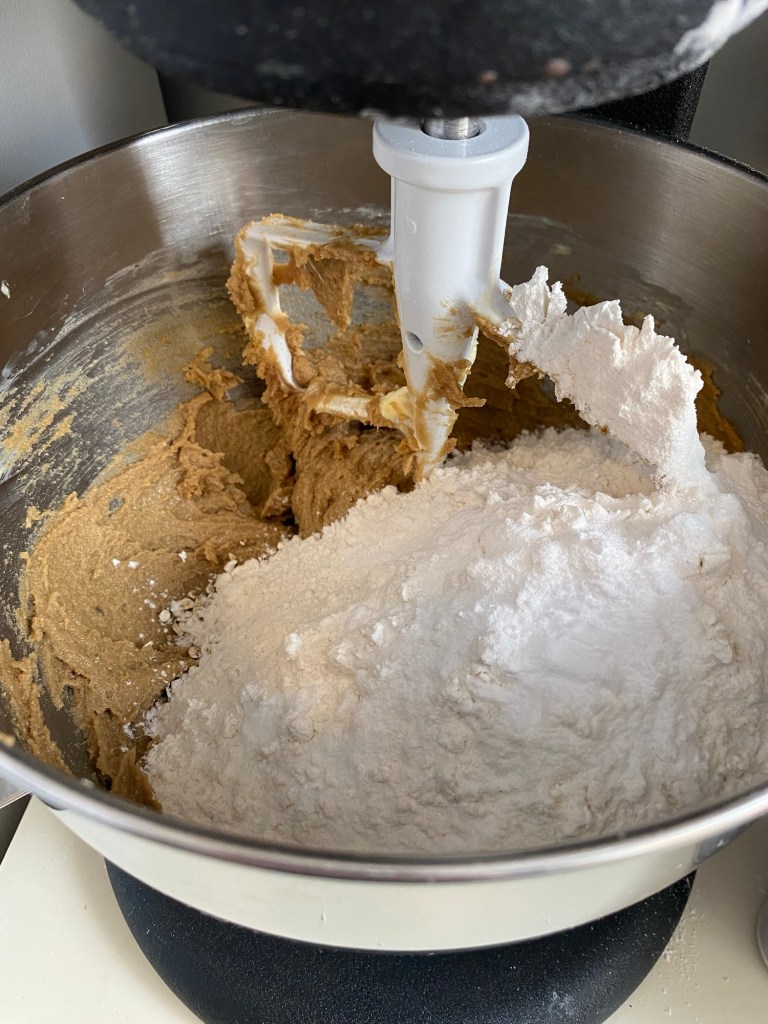
4. Add in the oats, flour, baking powder, baking soda and salt. Stir until all combined.
5. Add in desired amount of chocolate chips and stir until fully combined.
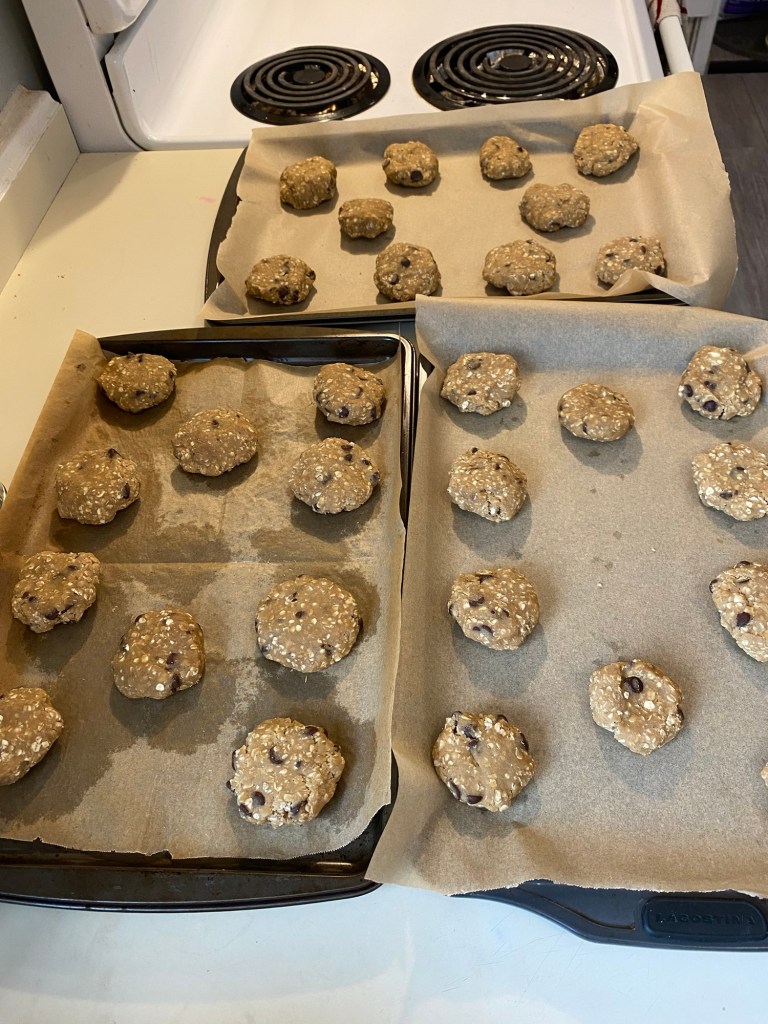
6. Drop by spoonfuls onto parchment lined cookie sheets, and slightly flatten the cookie dough.
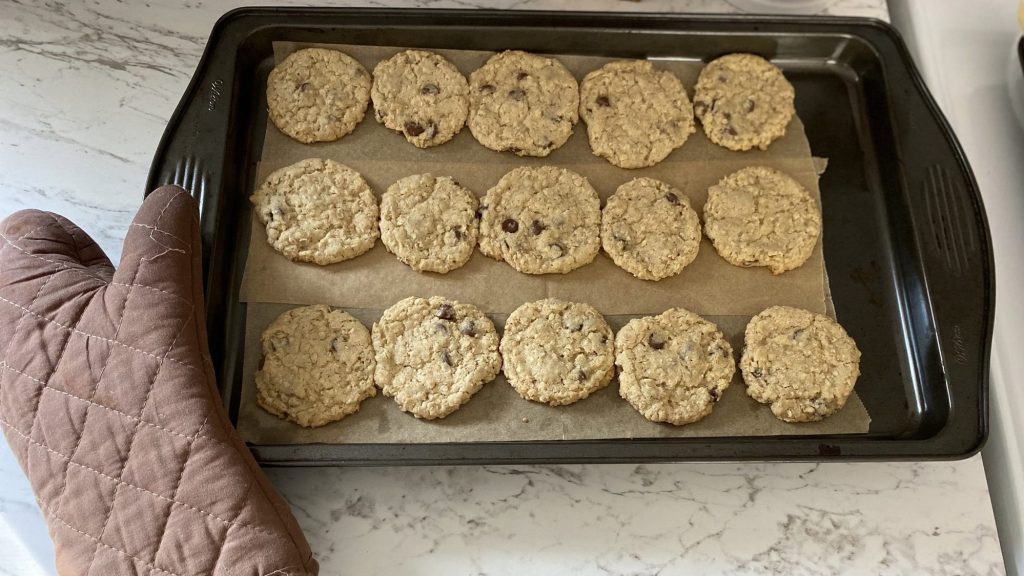
7. Bake 10-12 minutes on middle rack of oven.
8. Cool for 2 minutes on cookie sheets before transferring to a cooling rack.
9. Makes about 3 dozen medium sized cookies.
Note: This cookie dough freezes very well, so if 3 dozen is too much to enjoy all at once, you can simply put the extra dough amount in a sealed plastic container in the freezer until you are ready to bake it off. To thaw, simply put the whole container in a larger bowl of hot water until the dough becomes soft and palpable again.
I like to double this recipe, and then split up the dough into several leftover plastic yogurt containers and put them in the freezer. This makes it simple for baking off smaller batches of cookies without all the time it takes to mix it up!
I’m a Wife and Homeschooling Mom living in a remote town in Northern Ontario, Canada.I love making wholesome meals for my family from scratch, homeschooling our girls and learning more about natural living.
Subscribe to Northbird’s email list to get weekly posts on: tasty recipes, activity ideas for kids, natural living tips, and some genuine mom thoughts and encouragement!
A tasty spin on the classic oatmeal chocolate chip cookie, using sourdough starter discard as an egg replacement. Get your glass of milk ready!
This cookie dough freezes very well, so if 3 dozen is too much to enjoy all at once, you can simply put the extra dough amount in a sealed plastic container in the freezer until you are ready to bake it off. To thaw, simply put the whole container in a larger bowl of hot water until the dough becomes soft and palpable again.
This post contains affiliate links. As an Amazon associate, I earn from qualifying purchases. This means that I make a small commission at no extra cost to you. You can read my full disclosure HERE.
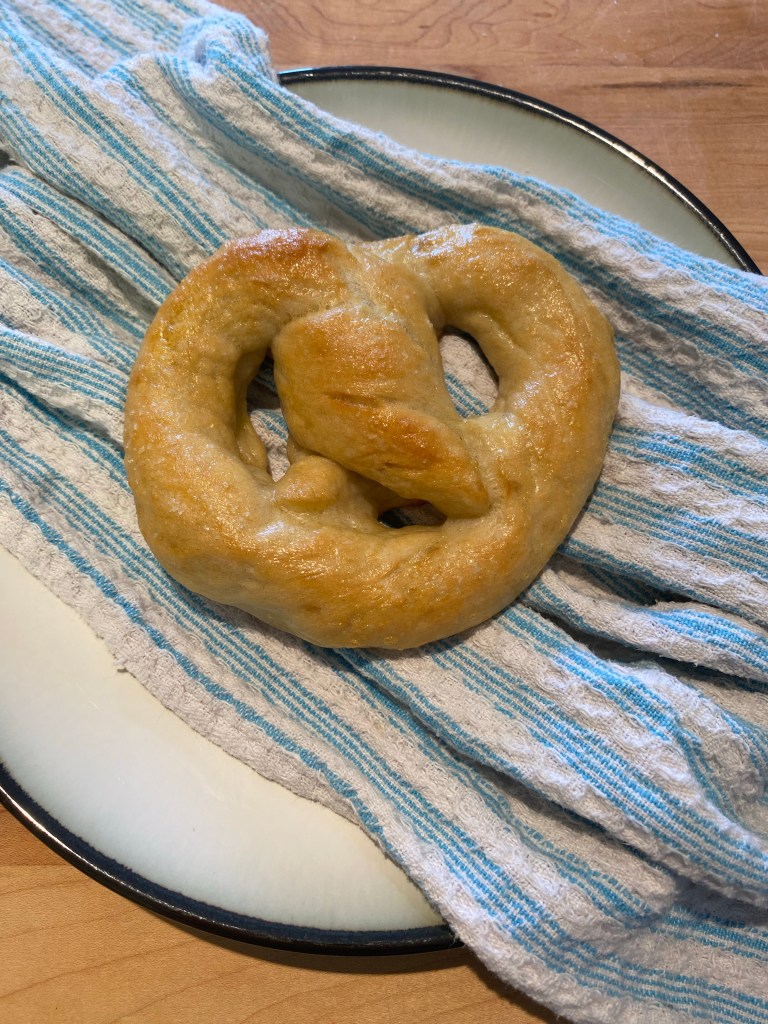
The ancestry of the soft pretzel can be found dating back to 610 AD. An Italian monk was recorded to have made a tasty, twisted dough incentive for little children learning their prayers, and calling it a “Pretiola“. However, the soft pretzel is more commonly thought to have come from southern Germany, where it began raising popularity around 1200 AD and it’s traditional twisted shape began to form in bakeries.
In the Catholic Church, the three intertwined holes in the soft pretzel were thought to represent a reminder for the Holy Trinity. Soft pretzels were made during Lent that only consisted of: flour, water and salt, because catholics could not eat any eggs, dairy or lard at Lent. At Easter, (in some areas of Europe) soft pretzels were hidden and found instead of an Easter egg hunt.
Today, the soft pretzel is thought of as a good luck symbol, and also a “tying the knot” symbol used at weddings.
What is Sourdough?
Sourdough is made using a fermented mixture of flour and water, called the “starter”, and mixed with more water, flour, and usually salt. The dough naturally rises as it ferments during resting stages. There is a lower amount of gluten in sourdough baking, which is why the dough needs to be “stretched” multiple times to help it expand and become fluffy.
Is Sourdough Good For You?
Sourdough is easier to digest than other traditional yeasted baking. The fermenting that takes place while making sourdough baking produces amino acids, which in turn produces enzymes that help to break down proteins and lower the overall gluten levels in the sourdough products (making it easier to digest).
Whole grain sourdough products have a lower glycemic index than other types of bread, (specifically white flour baking) that have been processed and are packed full of preservatives. This means that sourdough baking has less of a glycemic spike, and more of a gradual release on the glycemic scale, making it a healthier option for those struggling with balancing blood sugar levels.
Sourdough breads and baked goods contain higher levels of protein, fibre and nutrientsthan most traditional yeasted baking.
Sourdough baking still contains many of the natural nutrients that are processed out of the majority of other kinds of breads and baked goods.
Sourdough contains lower levels of phytate, which helps your body to absorb the nutrients easier than other breads.
Whole grain sourdough is considered a high-fiber food, which feeds the good bacteria in your gut and digestive system.
Common vitamins and minerals found in sourdough baking: Calcium, Iron, Manganese, B1-B6, B12, Potassium, Magnesium, Folate, Niacin, Zinc, Thiamin, Riboflavin, Selenium, Phosphorus, and Vitamin E.
Looking for more info on managing and growing your Sourdough Starter?
Click HERE and scroll down to see the section for Sourdough Starter.
Creative Soft Pretzel Ideas:
Use this one basic recipe to make many more kinds of pretzels! Just add the extra ingredients right before shaping and twisting into pretzels. I’ll post more pretzel recipes when I can, but until then have fun experimenting and trying some of these out!
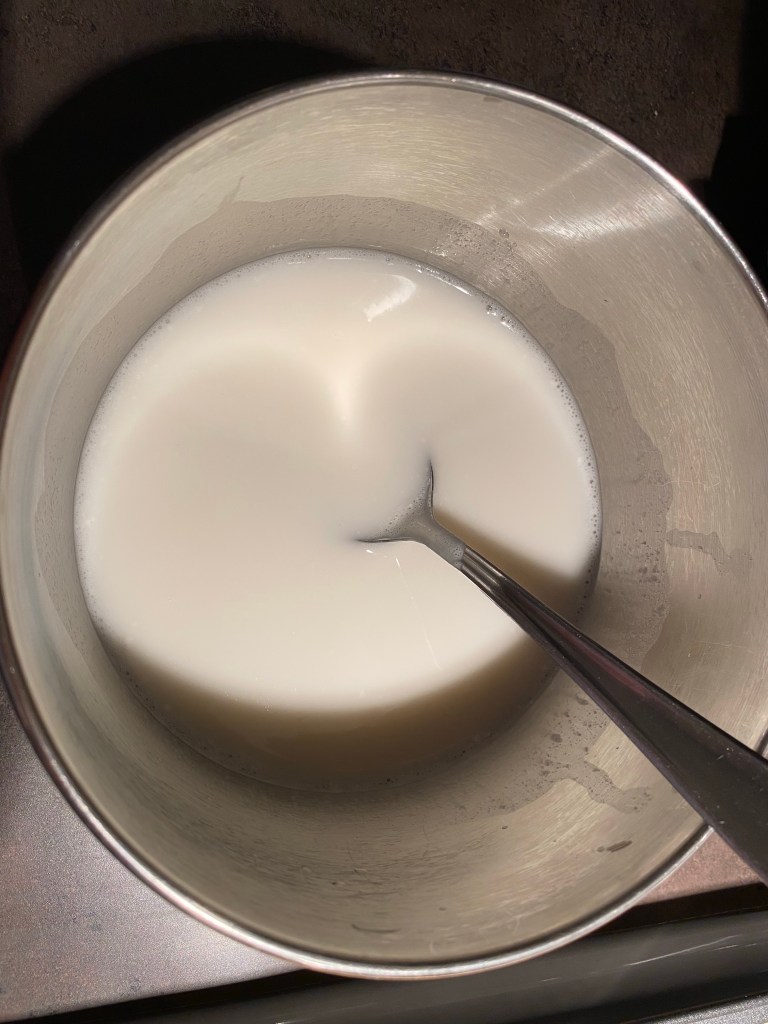
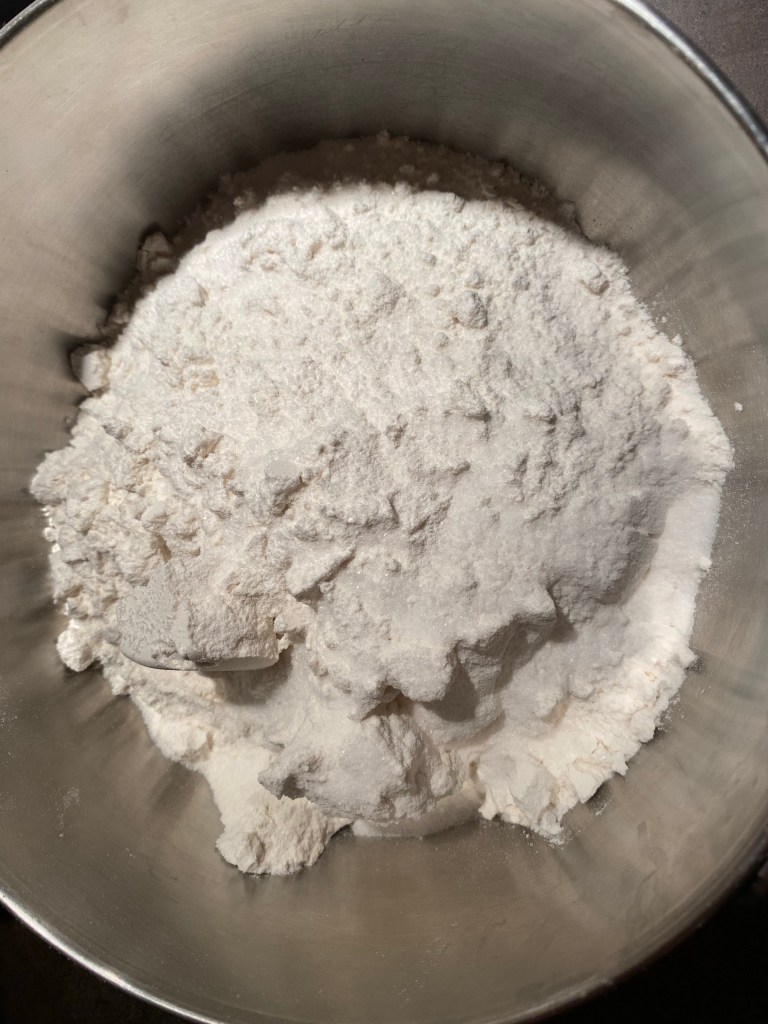
1. Mix your active sourdough starter with the water and honey. Mix the sea salt and flour together and add to the wet mixture. Mix all together well.
2. Cover with a beeswax food cover or a towel and plate over bowl and let rest overnight or for 8-10 hours. Dough will be moist and spongy and will have doubled in size.
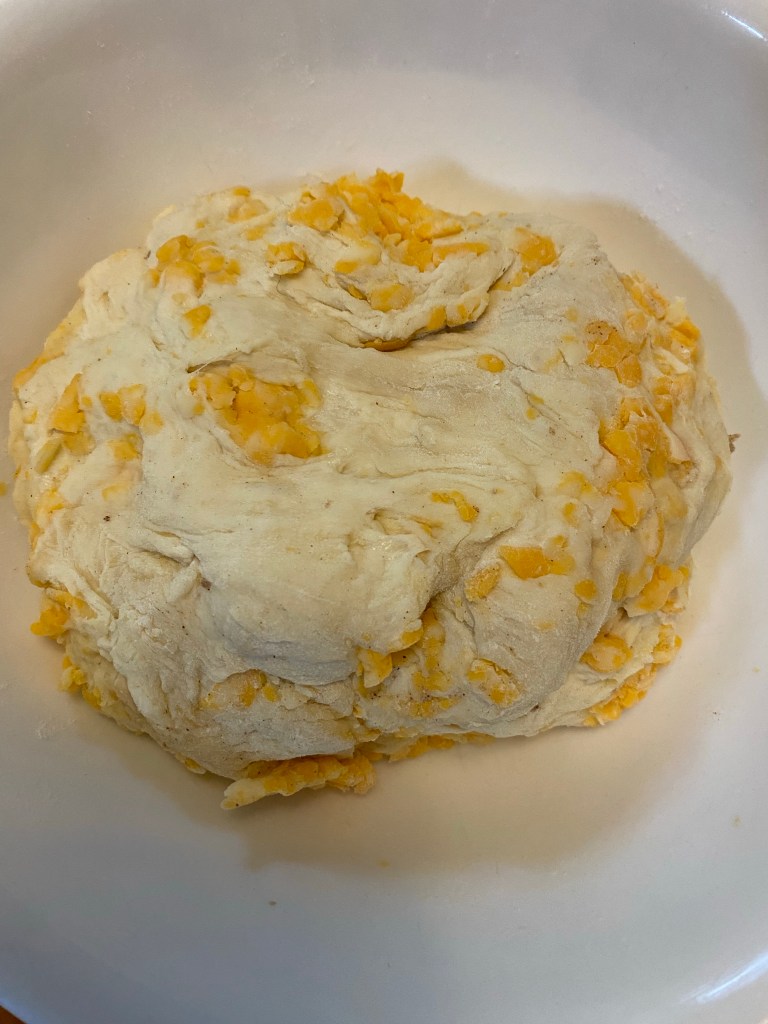
3. Add shredded cheese and knead dough on floured surface for 2 minutes until it is a soft dough ball. Form it into a “log” and divide and cut into 12 pieces.
4. Roll out a dough piece with your hands until it resembles a long string. (Make sure to not use too much flour, it is good to keep it slightly sticky.) Shape dough “string” into the letter “U”, then take the end pieces and double twist them. Lastly, take the end pieces and fold them down (See pictures above for reference). Pinch the ends into the pretzel body (this is why you want the dough to not be too dry).
5. Place on parchment-covered baking sheet and cover with a tea towel. Let rest for 1 hour. (Note that at this stage they will expand and puff up, so thinner is good prior to resting. You can always gently stretch them before putting in the water bath too.)
6. Preheat oven to 425 degrees Fahrenheit.
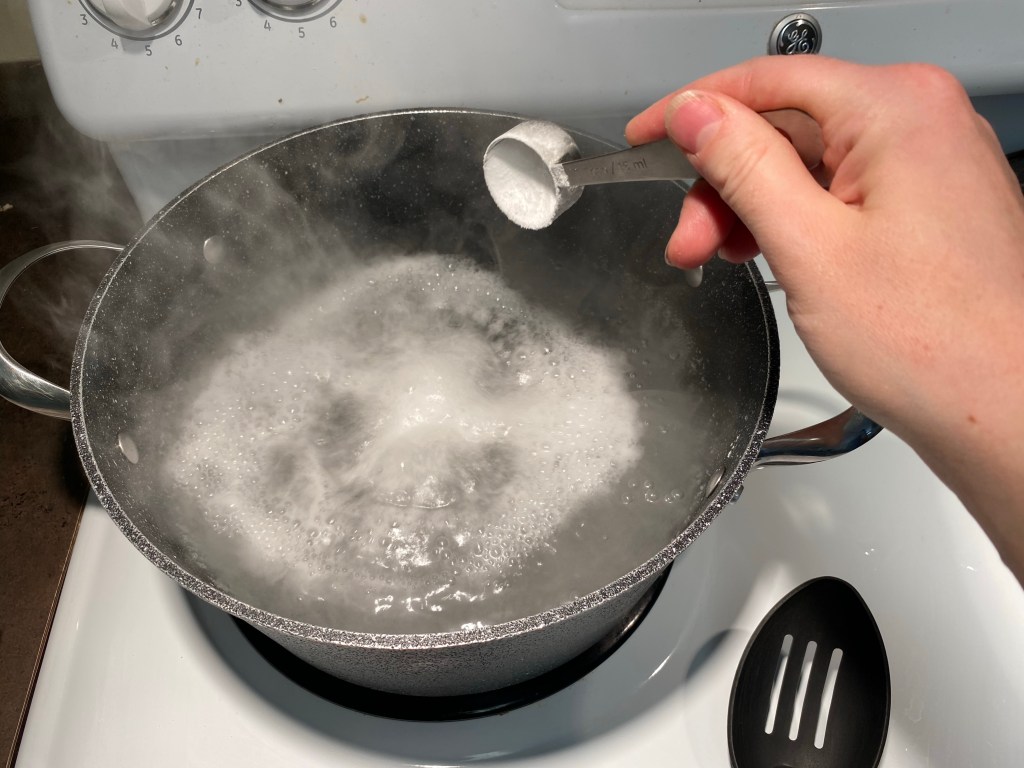
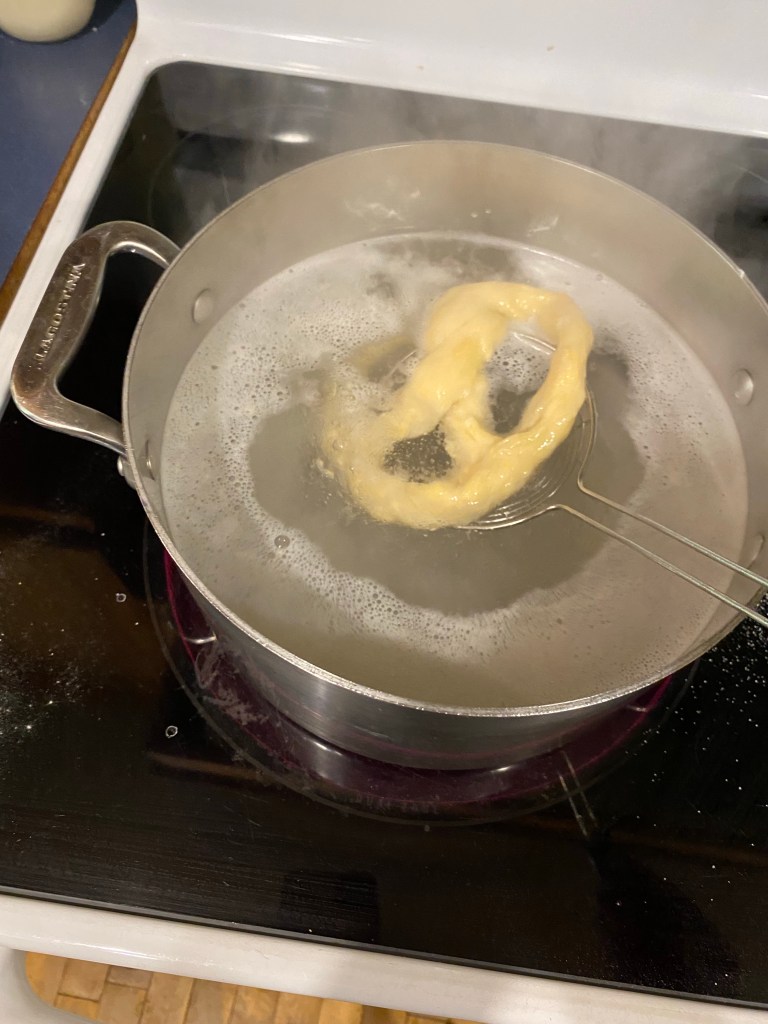
7. Boil 6 cups of water in a large pot and add baking soda and sugar. When it is a rolling boil, add 3-4 pretzels gently with a large slotted spoon.
8. Set the timer for 30 seconds, then turn them over for another 30 seconds on the other side. Transfer them back to the baking sheet.
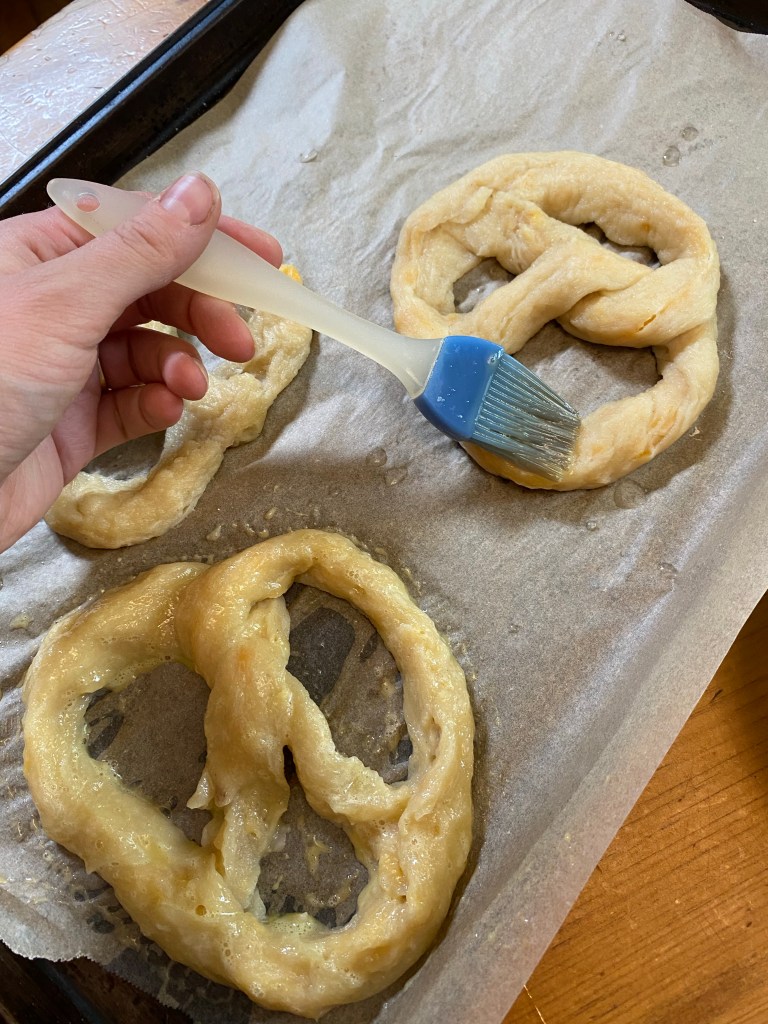
9. When all the pretzels are back on the baking sheets, whisk up an egg and paint the pretzels with a cooking brush. Sprinkle the tops with more shredded cheese.
10. Bake pretzels on middle rack in oven for 14-16 minutes or until golden brown on top and bottom. Let cool on baking sheets or rest at least 10 minutes before biting into. Enjoy!
11. Store at room temperature for 5 days in an airtight container, or freeze for up to three months in a freezer bag. Thaw in fridge then warm in the oven to freshen them up.
Other Tasty Sourdough Recipes to Check Out!
Hi, I’m Jessie!
I’m a Wife and Homeschooling Mom living in a remote town in Northern Ontario, Canada.I love making wholesome meals for my family from scratch, homeschooling our girls and learning more about natural living.
Subscribe to Northbird’s email list to get weekly posts on: tasty recipes, activity ideas for kids, natural living tips, and some genuine mom thoughts and encouragement!
Mix your active sourdough starter with the water and honey. Mix the sea salt and flour together and add to the wet mixture. Mix all together well.
Cover with a beeswax food cover or a towel and plate over bowl and let rest overnight or for 8-10 hours. Dough will be moist and spongy and will have doubled in size.
Add shredded cheese and knead dough on floured surface for 2 minutes until it is a soft ball. Form it into a “log” and divide and cut into 12 pieces.
Roll out a dough piece with your hands until it resembles a long string. (Make sure to not use too much flour, it is good to keep it slightly sticky.) Shape dough “string” into the letter “U”, then take the end pieces and double twist them. Lastly, take the end pieces and fold them down (See pictures above for reference). Pinch the ends into the pretzel body (this is why you want the dough to not be too dry).
Place on parchment-covered baking sheet and cover with a tea towel. Let rest for 1 hour. (Note that at this stage they will expand and puff up, so thinner is good prior to resting. You can always gently stretch them before putting in the water bath too.)
Preheat oven to 425 degrees fahrenheit.
Boil 6 cups of water in a large pot and add baking soda and sugar. When it is a rolling boil, add 3-4 pretzels gently with a large slotted spoon.
Set the timer for 30 seconds, then turn them over for another 30 seconds on the other side. Transfer them back to the baking sheet.
When all the pretzels are back on the baking sheets, whisk up an egg and paint the pretzels with a cooking brush. Sprinkle the tops with more shredded cheese.
Bake pretzels on middle rack in oven for 14-16 minutes or until golden brown on top and bottom. Let cool on baking sheets or rest at least 10 minutes before biting into!
Store at room temperature for 5 days in an airtight container, or freeze for up to three months in a freezer bag. Thaw in fridge then warm in the oven to freshen them up.
Nutrition
Per 1 Pretzel: 211 calories; 3.9 g fat; 36 g carbohydrates;
7 g protein;
This post contains affiliate links. As an Amazon associate, I earn from qualifying purchases. This means that I make a small commission at no extra cost to you. You can read my full disclosure HERE.
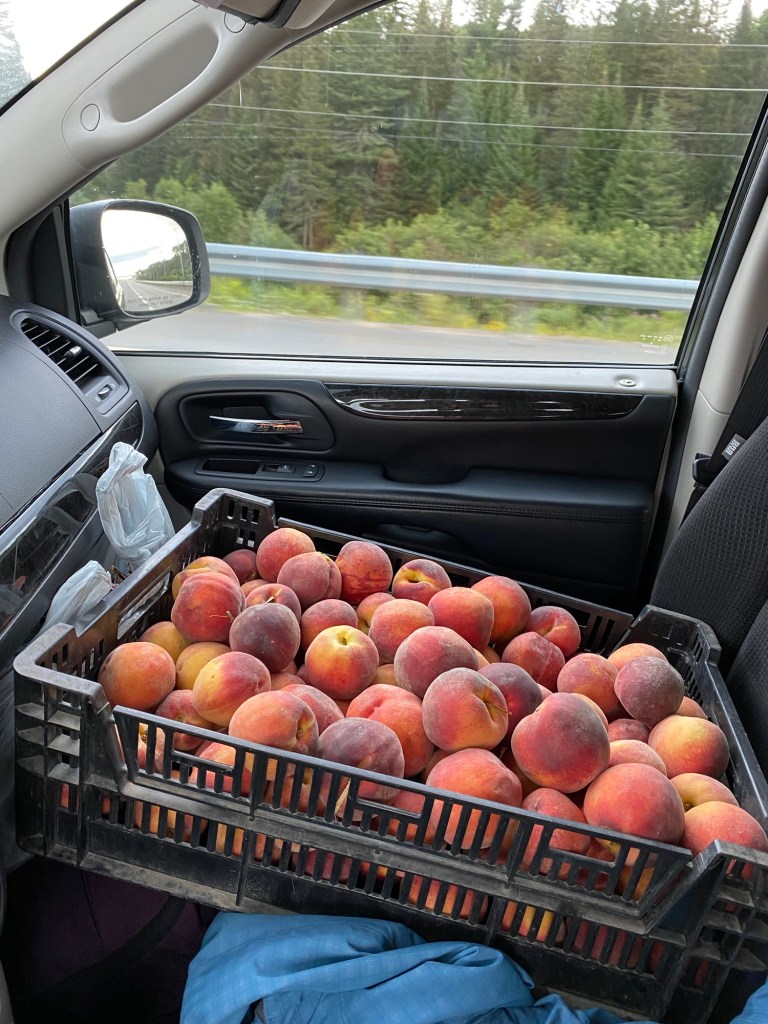
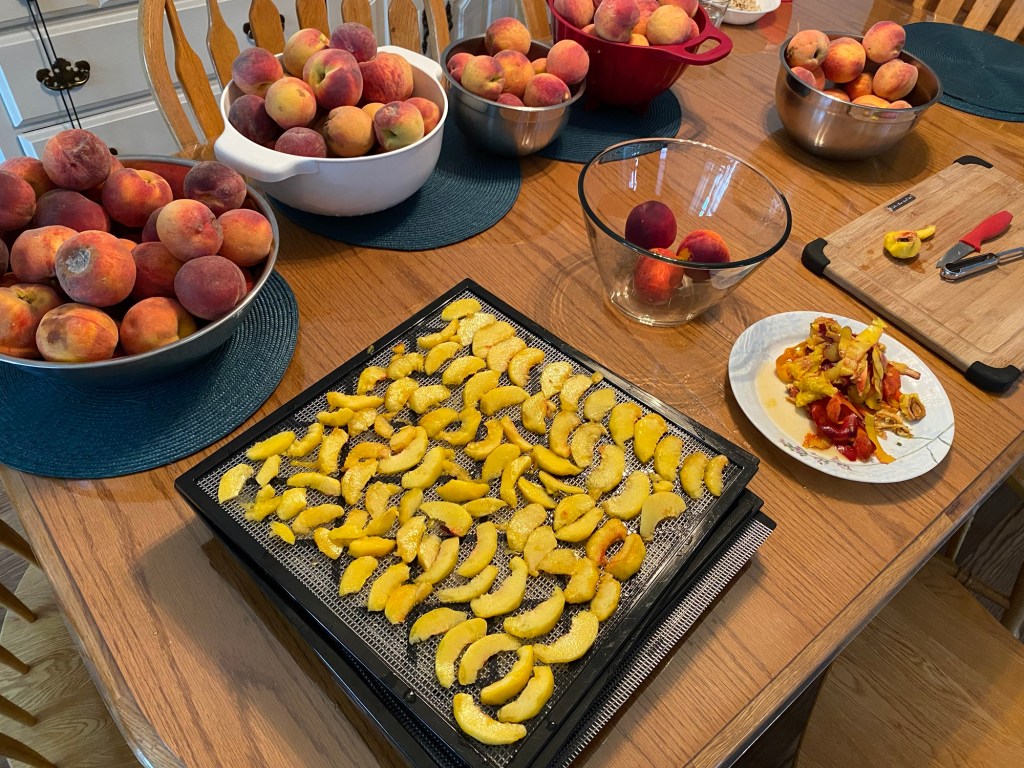
Yummmm….Honestly there’s not much that can beat fresh summer peaches! This is one reason I love visiting my family in southern ontario: buying peaches and other fruit directly from the farmers.
This past summer, I planned ahead and knew that I wanted to make several batches of peach jam, peach salsa, freeze peach slices for deserts, but most importantly: dehydrate lots of peaches!
On my way back north, I was able to buy two huge flats of “seconds” from a local farm that my aunt knew. The next few days were a little crazy as I preserved the peaches as soon as possible to maintain freshness. My kids and hubby loved hanging around to score all the little tastes and samples along the way!
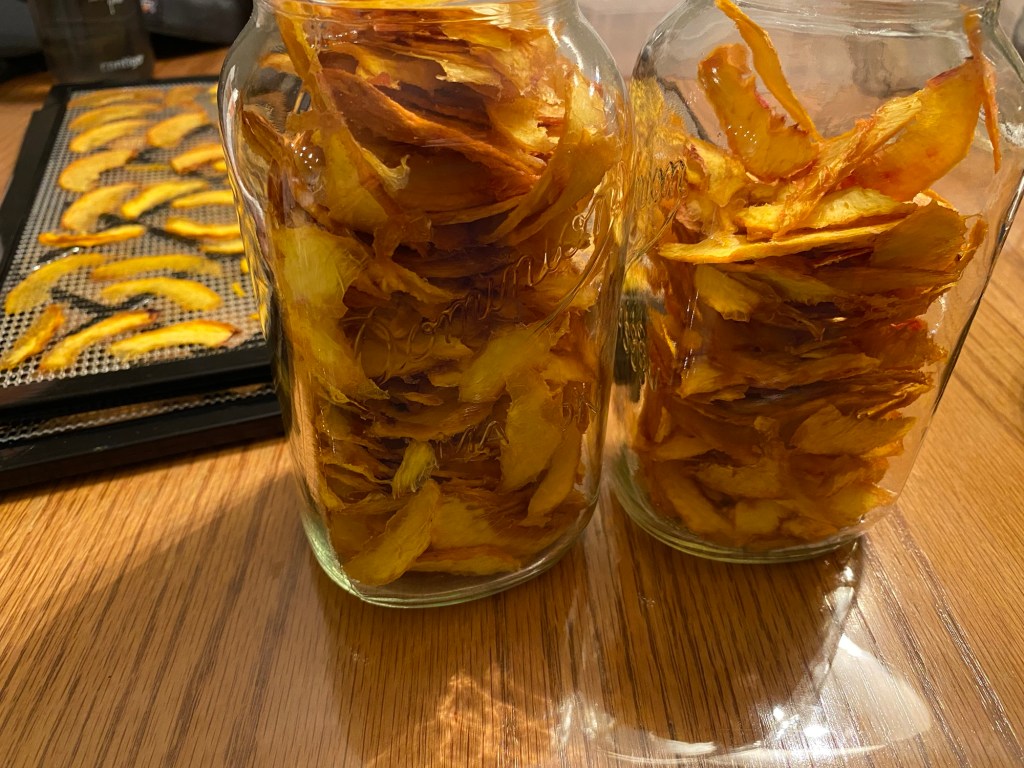
Now that it is the middle of winter, we still get to enjoy that wonderful taste of Ontario summer peaches through the dehydrated peach slices in our pantry. I had some fun recently with experimenting to create this yummy granola recipe, blending the sweet peach taste with crunchy pecans.
Ways to Eat Granola:
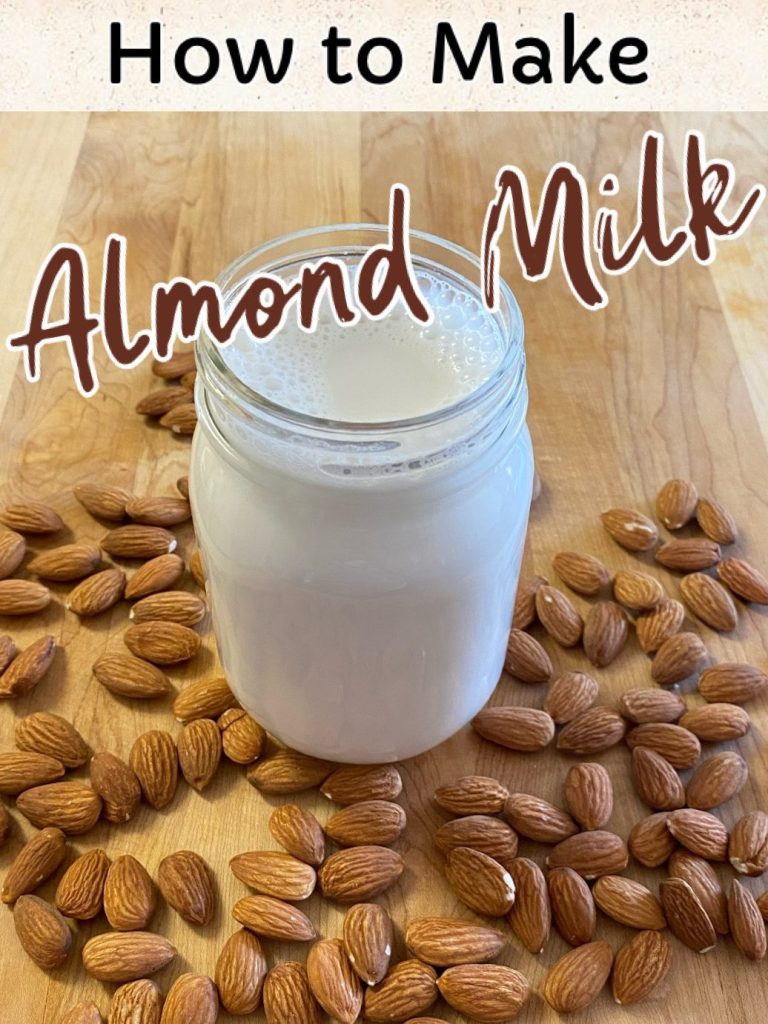
Breakfast bowl with regular milk, oat milk, soy, or nut milks (try it with Homemade Almond Milk!) and add some berries for fresh sweetness.
Take a baggie of granola for your next hike or camping trip and add some dried fruit or seeds and nuts for a delicious trail mix.
Make a Breakfast Parfait with frozen berries and yogurt!
Use it as a baked desert crumb topping (Apple Crisp recipe coming soon!)
Make granola bars from it! (Recipe being developed)
Health Benefits of Granola:
Healthy granola recipes are usually high in protein, fibre and healthy fats due to recipe variations that may include oats, nuts, seeds, dried fruits and organic unrefined oils. They are packed full of nutritious options that make a filling, on-the-go quick breakfast or a delicious snack option.
Protein is essential to the body for not only helping to build muscle mass and bones, but also very important for weight loss and regulating metabolism. Additional functions may consist of:
Slowing appetite and hunger cravings
Feel “full” for longer, less calories eaten
Helps with fat burning
Lowering blood pressure
Helps to maintain weight loss
Boosts metabolism
Builds muscle mass and strength
Lowers risk of osteoporosis and fractures
Helps to repair broken bones and tissues
High Protein Ingredients You can put in Granola:
Nuts
Walnuts, Almonds, Cashews, Peanuts, Pistachios, Brazil Nuts, Hazelnuts…
It is soooo easy! Chop… Melt… Mix… Spread… Bake… Eat!
Way less expensive than buying from the store.
Store-bought granolas are often made with lower quality ingredients and usually have more processed sugars and additives mixed in to prolong shelf life.
When you make your own granola you know exactly what ingredients you are eating!
Granola is a versatile recipe: You can add more nuts and seeds, and add dried fruits/berries at the end if desired.
Granola is one of those easy and quick breakfast solutions to help your day start smoothly!
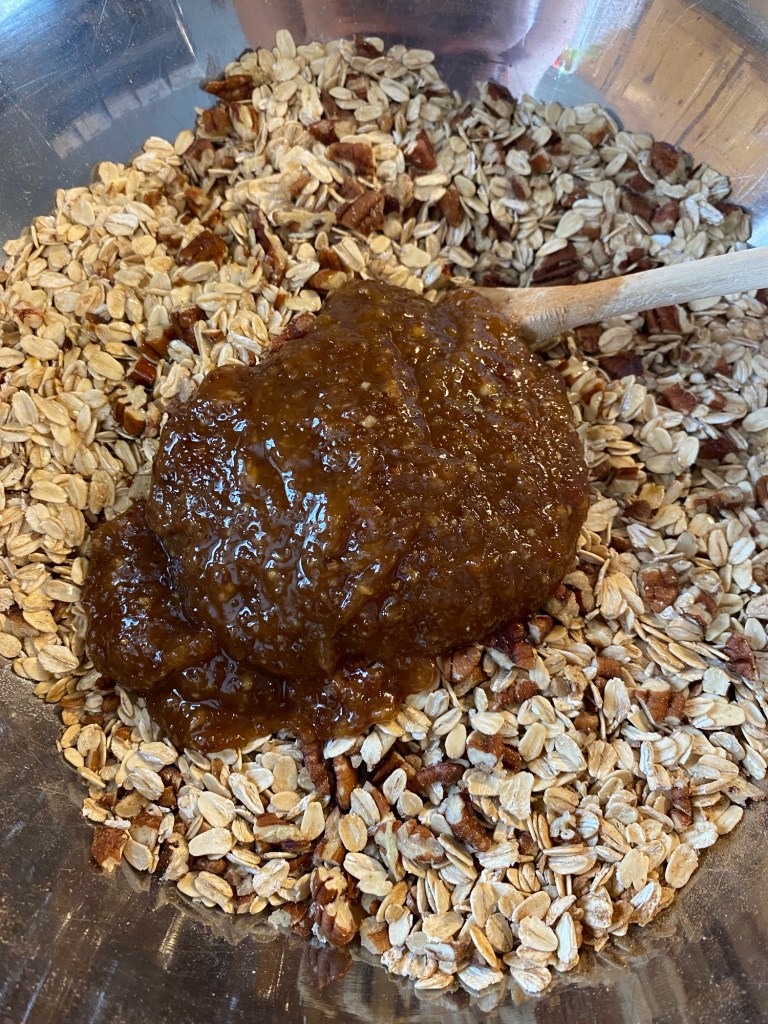
2. Mix the oats, chopped pecans and cinnamon together in a large bowl. Set aside.
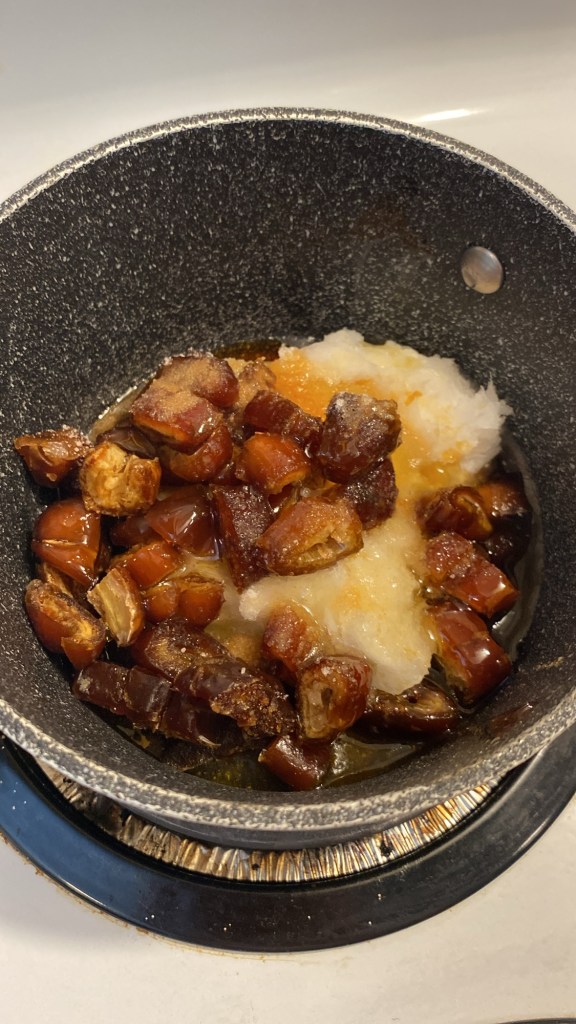
3. Melt the coconut oil in a small pot and add chopped dates, honey, sea salt and vanilla. Once the dates are softened, stir and mash or lightly blend with an immersion blender to puree.
4. Add the wet mix to dry mix and stir well. If it has cooled enough you can finish mixing with your hands (I always find this easiest, but be careful of the hot oil!)
5. Spread granola mix onto parchment covered cookie sheets. Granola should be in a single layer.
6. Bake for 30-35 minutes (depending on your oven), until golden.
7. Let cool and sit undisturbed for an hour, it will firm up as it cools down.
8. Break the granola into smaller pieces and add the dehydrated peach slices. (I prefer to lightly pulse the slices in a blender or chop into smaller pieces.)
9. Mix well and store granola in an airtight container for up to 1 month.
I’m a Wife and Homeschooling Mom living in a remote town in Northern Ontario, Canada.I love making wholesome meals for my family from scratch, homeschooling our girls and learning more about natural living.
Subscribe to Northbird’s email list to get weekly posts on: tasty recipes, activity ideas for kids, natural living tips, and some genuine mom thoughts and encouragement!
Mix the oats, chopped pecans and cinnamon together in a large bowl. Set aside.
Melt the coconut oil in a small pot and add chopped dates, honey, sea salt and vanilla. Once the dates are softened, stir and mash or lightly blend with an immersion blender to puree.
Add the wet mix to dry mix and stir well. If it has cooled enough you can finish mixing with your hands (I always find this easiest, but be careful of the hot oil!)
Spread granola mix onto parchment covered cookie sheets. Granola should be in a single layer.
Bake for 30-35 minutes (depending on your oven), until golden.
Let cool and sit undisturbed for an hour, it will firm up as it cools down.
Break into smaller pieces per preference, and add the dehydrated peach slices and store in airtight container for up to 1 month.
Nutrition
Per 1 Cup Serving: 431 calories; 26.9 g fat; 49.8 g carbohydrates;
6.8 g protein.
This post contains affiliate links. As an Amazon associate, I earn from qualifying purchases. This means that I make a small commission at no extra cost to you. You can read my full disclosure HERE.
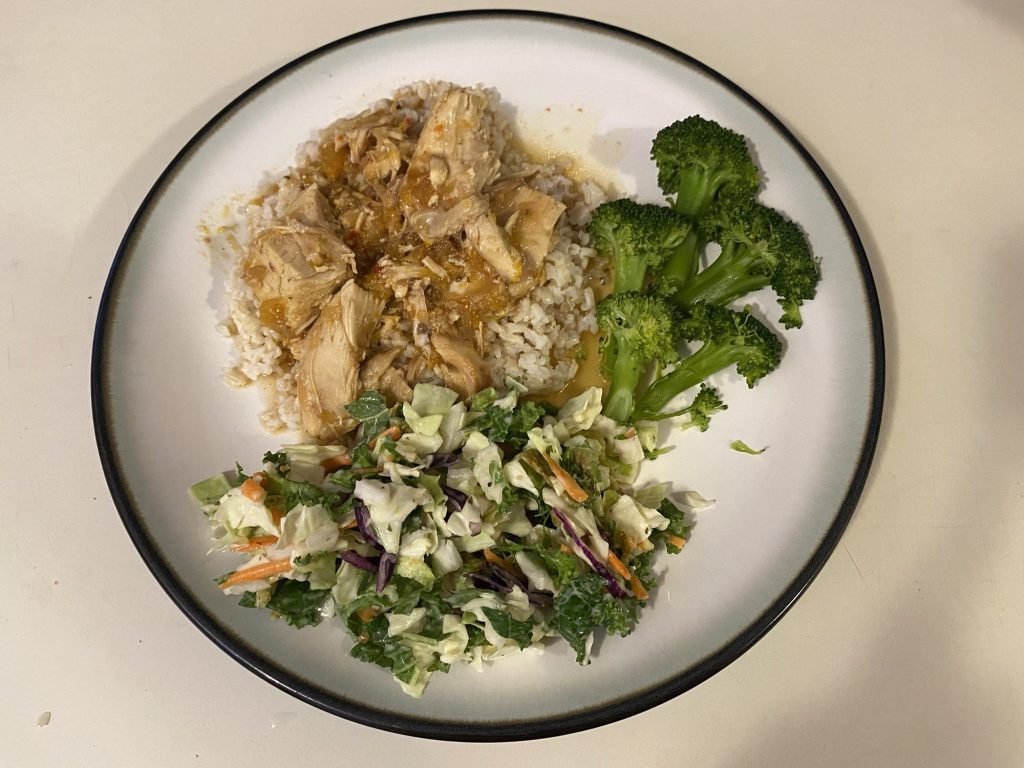
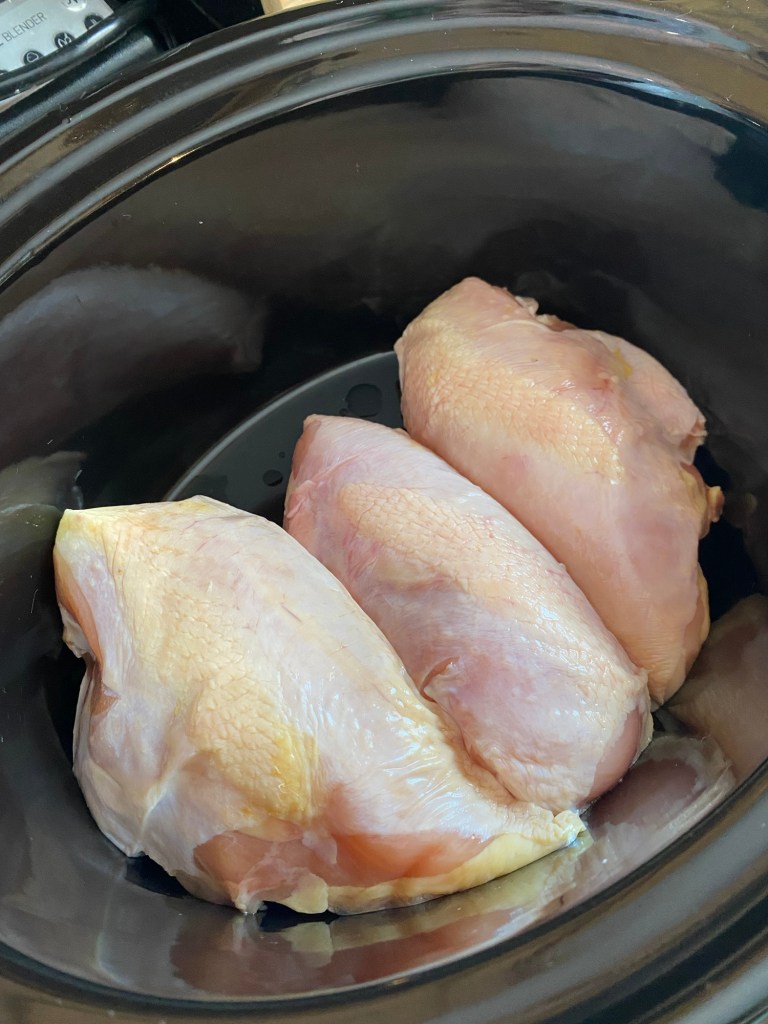
Need an easy crockpot chicken meal idea? This is it.
My mother used to make this delicious chicken meal a lot when I was growing up. I am not sure where the recipe actually came from, so I cannot truly give origin credit where it is due. However, it’s just one of those simple, easy, go-to meals that truly makes busy days easier.
I remember my mother making huge meals of this whenever she was hosting a large amount of people. She would double/triple this recipe and preferred to cook it in the oven in a large covered roasting pan.
We always served it with brown rice and a cooked vegetable and salad on the side. I have to say, I almost prefer eating just the sauce poured over the rice, it is SERIOUSLY that good.
This is a short visual of how to make this delicious crockpot chicken dinner!
How to Make Heavenly Crockpot Chicken
Supplies Needed:
Crockpot (or see note below for cooking in the oven)
Thaw chicken if frozen and wash with cold water. Place evenly in crockpot.
In a small bowl, mix together: onion soup mix, apricot, and 1 cup of Italian salad dressing.
Pour over chicken.
4. Cover and turn crockpot to high for 3-4 hours, or low for 6-8 hours. Baste chicken tops with sauce 1-2 times through cooking time.
In the oven: Preheat to 350 degrees fahrenheit and bake 2 hours covered, turning chicken once. Cook chicken to an internal temperature of at least 165 degrees fahrenheit.
5. Serve over rice (pairs well with brown rice), and generously drizzle the sauce! We like to add a salad and cooked vegetable on the side.
Additional Note: We have used boneless/skinless chicken breasts, chicken thighs, drumsticks, etc. If chicken used has bones, it’s nicest to take off meat once it is fully cooked and return to crockpot until ready to serve.
Edit: When we made this meal recently, I found out last minute that we didn’t have any canned apricots or apricot jam! So we subbed in fresh peaches and peach jam instead. It tasted quite similar and was just as good!
Other Soups and Entrees to Check Out:
Hi, I’m Jessie!
I’m a Wife and Homeschooling Mom living in a remote town in Northern Ontario, Canada.I love making wholesome meals for my family from scratch, homeschooling our girls and learning more about natural living.
Subscribe to Northbird’s email list to get weekly posts on: tasty recipes, activity ideas for kids, natural living tips, and some genuine mom thoughts and encouragement!
With only 4 ingredients, this delicious recipe proves the simplicity of crockpot meals for those busy weekdays!
Additional Note: We have used boneless/skinless chicken breasts, chicken thighs, drumsticks, etc. If chicken used has bones, it’s nicest to take off meat once it is fully cooked and return to crockpot until ready to serve.
Peaches and peach jam is also a nice alternative to apricots.
Supplies Needed:
Crockpot (or see note below for cooking in the oven)
Thaw chicken if frozen and wash with cold water. Place evenly in crockpot.
In a small bowl, mix together: onion soup mix, apricot, and 1 cup of Italian salad dressing.
Pour over chicken.
With lid on, turn crockpot to high for 3-4 hours, or low for 6-8 hours. Baste chicken tops with sauce 1-2 times through cooking time. In the oven: Preheat to 350 degrees fahrenheit and bake 2 hours covered, turning chicken once. Cook chicken to an internal temperature of at least 165 degrees fahrenheit.
Serve over rice (pairs well with brown rice), and generously drizzle the sauce! We like to add a salad and cooked vegetable on the side.
Nutrition
Per 1 serving: 332 calories; 22 g fat; 14.9 g carbohydrates;
17.8 g protein.
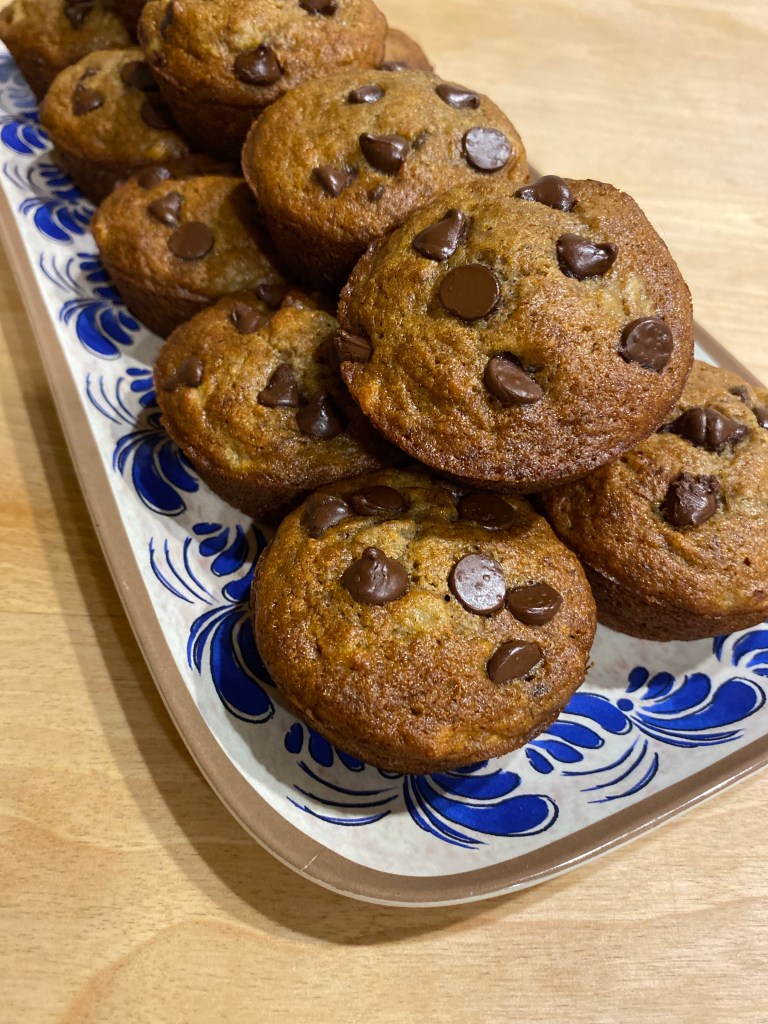
Every once in a while we do a purge and inventory of our freezers, and guess what we find?! Lots and lots of frozen bananas. Sometimes when our food order arrives off the train, the bananas look less than appealing. Especially if they’ve not been packaged properly (slightly squashed) or left in a cold area (slightly frozen). I really dislike wasting food, so as long as the bananas aren’t outright rotten, I’ll usually throw them into one of the freezers to be used later in baking.
This recipe was created from one such time, when we realized we were desperately running out of space in the fridge freezer, and also had an abundance of sourdough discard that I didn’t want to just toss out.
The amount of sourdough discard in this recipe is flexible, based on what you have available. That’s the beauty of muffin recipes: the batter consistency is usually not too different from a sourdough discard consistency, so anywhere up to 1 cup of sourdough discard would blend into this muffin batter quite well in my opinion. I have made it several times with varying amounts of discard and they all turn out great and tasty!
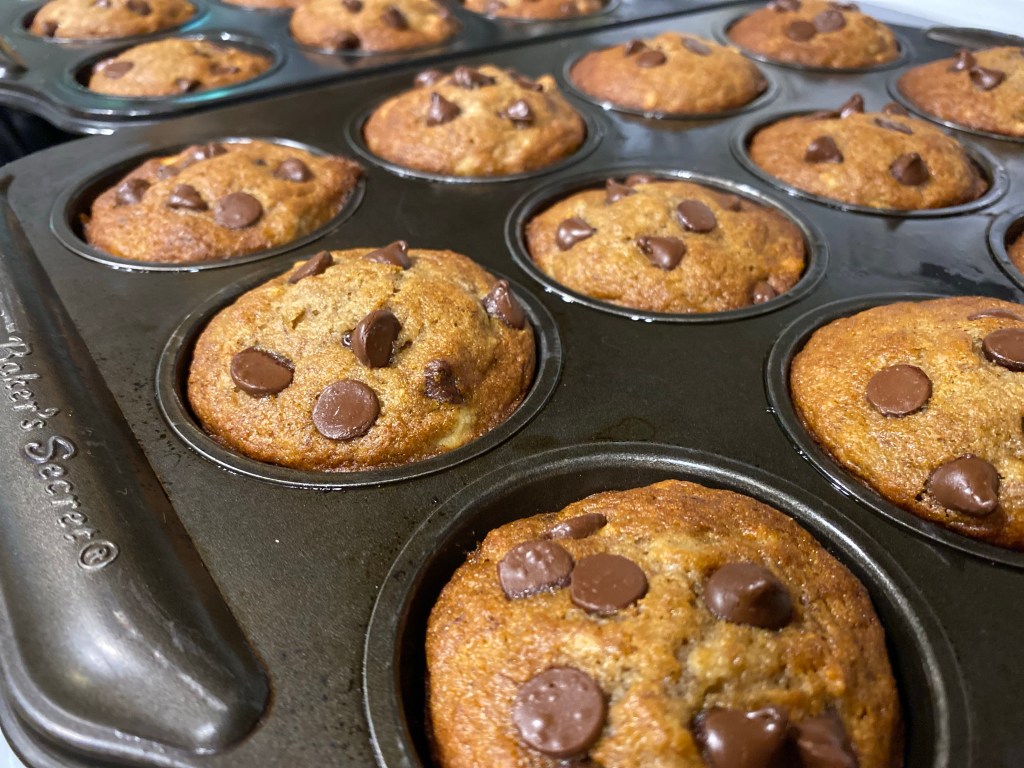
How to Make Banana Chocolate Chip Muffins (Sourdough Discard)
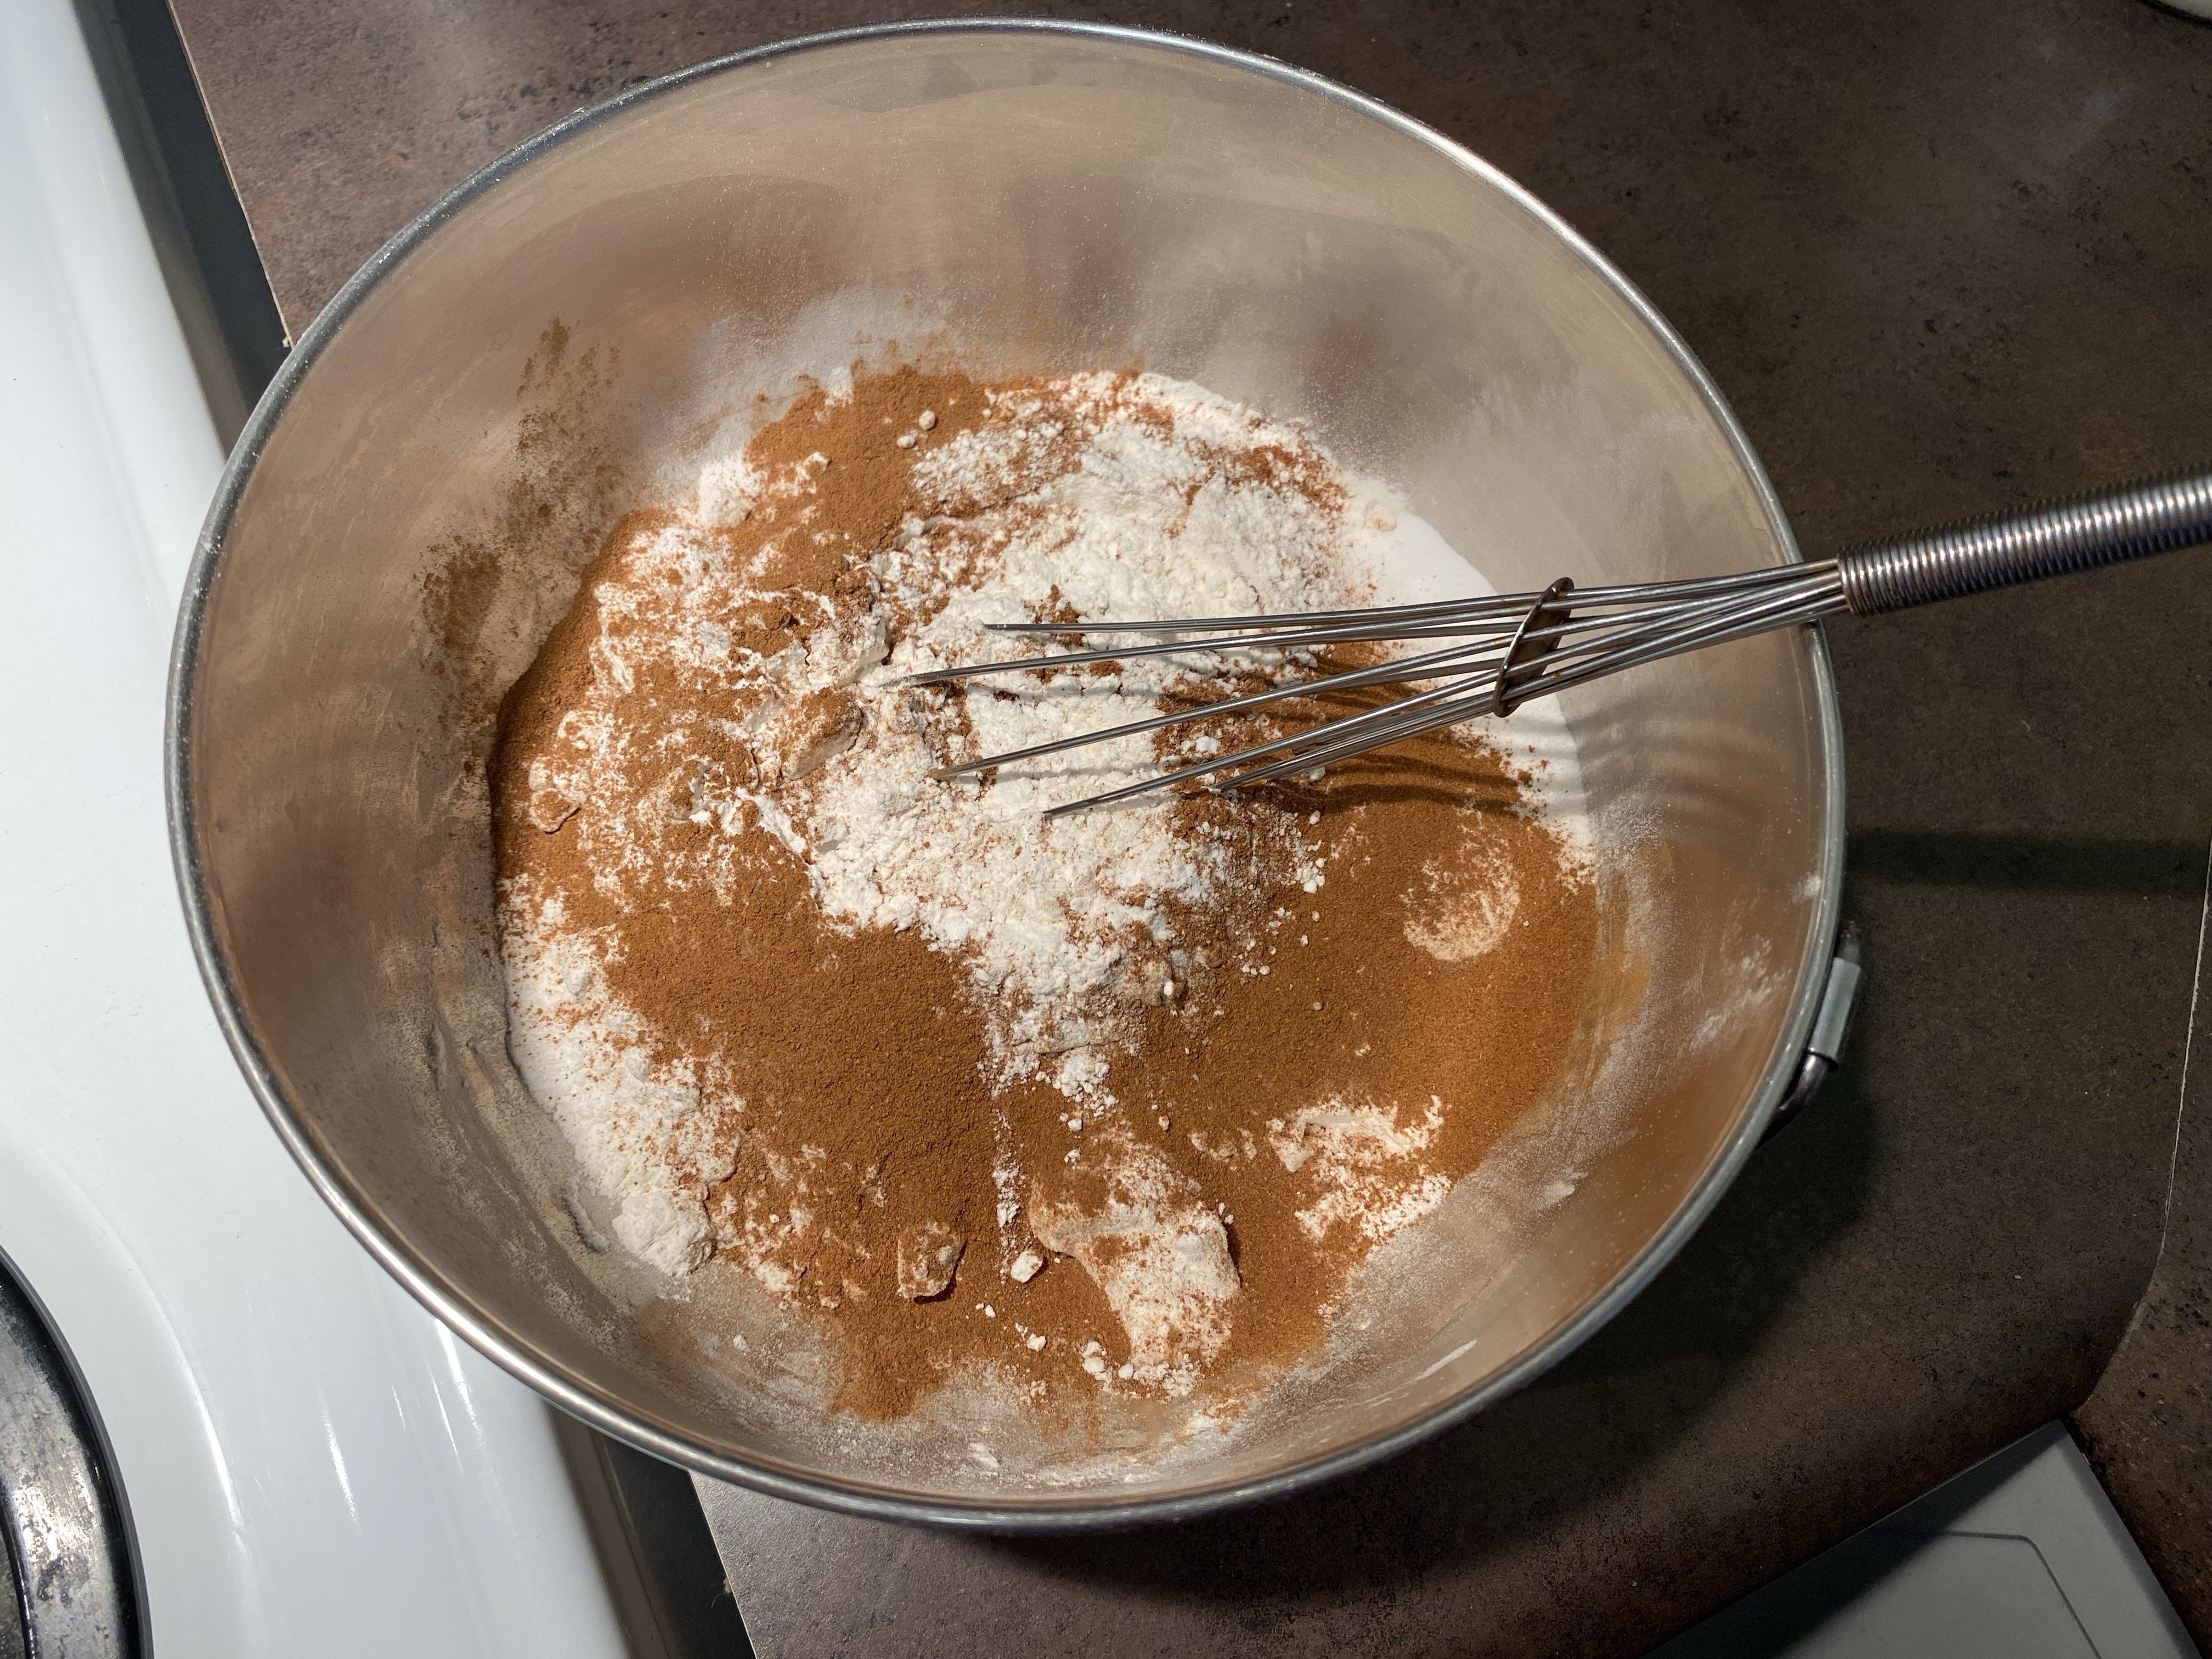
In a large bowl, mix the flour, baking soda, baking powder, salt, cinnamon, and nutmeg together
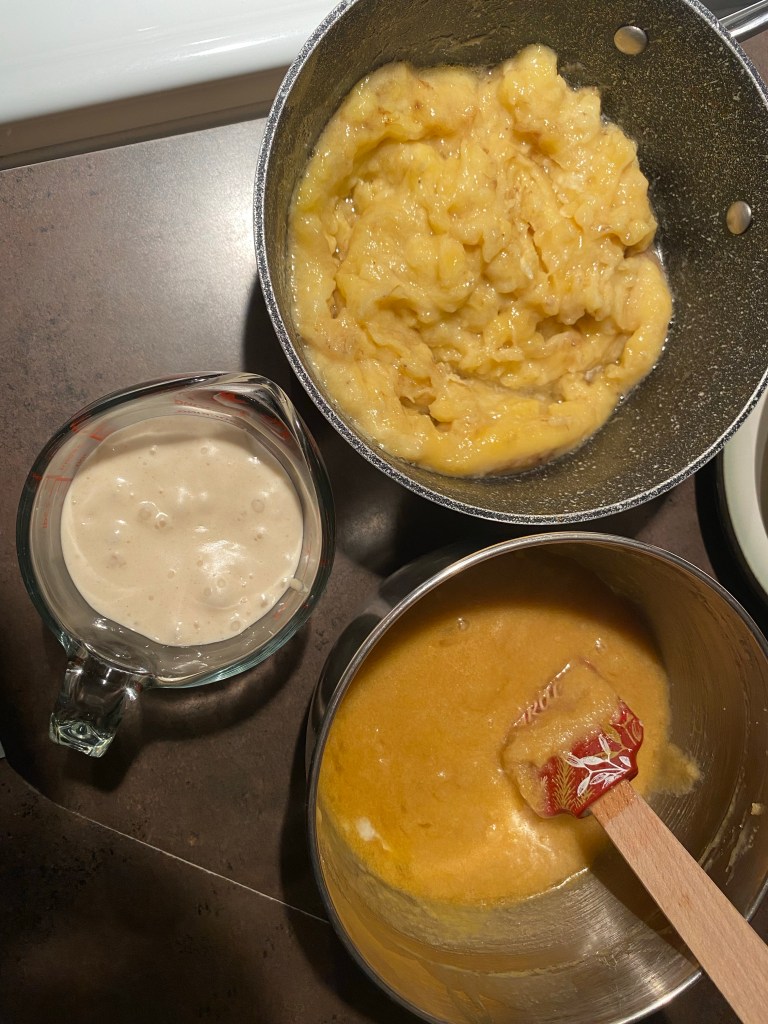
3. In another bowl, cream the butter and brown sugar together. Whisk in the eggs and add vanilla.
4. Add the mashed bananas, sourdough discard, and applesauce to the wet mixture and mix well together.
5. Make a “well” in the flour mix, and add the wet mixture to it. Mix until fully blended together, but do not “overmix” so that the muffins stay fluffy. Fold in the chocolate chips.
6. Grease muffin pans or use muffin cups. (I like greasing our muffin pans with coconut oil, works beautifully every time!)
7. Fill muffin cups 3/4 full and sprinkle more chocolate chips on the tops.
8. Bake at 425 F for 5 minutes, then turn the oven down to 350 until muffins are golden on top and a toothpick comes out clean when inserted. For large muffins this takes me about 12-15 minutes.
9. Let muffins cool in the pan for 5 minutes before moving to a cooling rack or inverting in the pan.
10. Store in a sealed container at room temperature for up to 5 days, refrigerate for 1 week, or freeze in a sealed freezer bag for up to 6 months.
Additional note: This recipe usually makes about 30 muffins, half of which we like to freeze and use within a few months. Freeze in a freezer-ziploc bag, remove air. Thaw overnight and pop in the oven or microwave to freshen up!
More Desert & Snack Recipes:
Hi, I’m Jessie!
I’m a Wife and Homeschooling Mom living in a remote town in Northern Ontario, Canada.I love making wholesome meals for my family from scratch, homeschooling our girls and learning more about natural living.
Subscribe to Northbird’s email list to get weekly posts on: tasty recipes, activity ideas for kids, natural living tips, and some genuine mom thoughts and encouragement!
In a large bowl, mix the flour, baking soda, baking powder, salt, cinnamon, and nutmeg together.
In another bowl, cream the butter and brown sugar together. Whisk in the eggs and add vanilla.
Add the mashed bananas, sourdough discard, and applesauce to the wet mixture and mix well together.
Make a “well” in the flour mix, and add the wet mixture to it. Mix until fully blended together, but do not “overmix” so that the muffins stay fluffy. Fold in the chocolate chips.
Grease muffin pans or use muffin cups. (I like greasing our muffin pans with coconut oil, works beautifully every time!)
Fill muffin cups 3/4 full and sprinkle more chocolate chips on the tops.
Bake at 425 F for 5 minutes, then turn the oven down to 350 until muffins are golden on top and a toothpick comes out clean when inserted. For large muffins this takes me about 12-15 minutes.
Let muffins cool in the pan for 5 minutes before moving to a cooling rack or inverting in the pan.
Store in a sealed container at room temperature for up to 5 days, refrigerate for 1 week, or freeze in a sealed freezer bag for up to 6 months.
Additional Notes:
This recipe usually makes about 30 muffins, half of which we like to freeze and use within a few months. Freeze in a freezer-ziploc bag, remove air. Thaw overnight and pop in the oven or microwave to freshen up!
Nutrition
Per 1 muffin: 179 calories; 5.8 g fat; 31 g carbohydrates;
2.6 g protein.
This post contains affiliate links. As an Amazon associate, I earn from qualifying purchases. This means that I make a small commission at no extra cost to you. You can read my full disclosure HERE.
This post contains affiliate links. As an Amazon associate, I earn from qualifying purchases. This means that I make a small commission at no extra cost to you. You can read my full disclosure HERE.
We LOVE curry night! Once a week we have either a stir fry or curry served with rice. My favourite is curry of course because it’s a little less work and can be easily made ahead and kept warm.
Before Jesse and I got married (or even met), I spent several months in a bible school that had an outreach focus in Asia. After training, my team and I lived in a missionary’s house in Tokyo, Japan, for a month, followed by another month in Southern Thailand. It was during this time that I grew to love eating different curries and of course rice.
There are hundreds of different curry recipes, originating from many different countries and cultures. I love trying different ones out and letting my somewhat enthusiastic family try them (they are not as excited to try anything remotely spicy!).
This Chickpea Coconut Curry has become my go-to recipe for last minute curry cooking. It may change week-to-week based on what vegetables I have available, but I love this particular mix of ingredients. It is generally easier on the more sensitive palate, making it a great choice on the menu for little ones.
Nutritional Benefits of Chickpeas:
Chickpeas are also known as garbanzo beans, and are widely used in many different cuisines. From falafel to curries to hummus, there are countless types of dishes that feature chickpeas.
They are high in protein, which makes them a favourite alternative for replacing meat protein. They are also high in healthy fats, carbs and fibre. Some other nutritional components include: Manganese, Folate (Vitamin B9), Copper, Iron, Zinc, Phosphorus, Magnesium, Thiamine, Vitamin B6, Selenium and Potassium.
Health Benefits May Include:
Help you to feel full longer
Weight management
Boosts bone & muscle health
Helps to regulate blood sugar levels
Assists with digestion
May reduce risk of chronic illnesses
Supports brain function
May help relieve anxiety and depression
Boosts red blood cell production (Iron deficiency)
You can read more HERE about why Chickpeas are an amazing addition to your diet.
Is Coconut Milk good for you?
Coconut milk is an amazing source of healthy saturated fats and high in calories. It is typically made from grinding the white flesh part of a matured brown coconut and then mixed with water. It is important to not confuse coconut milk with coconut water, which usually comes from an immature green coconut and is estimated 94% water.
The coconut milk has varying thickness of fat in it, and used for different dishes. In most cuisines, the thicker the milk is, the more likely it is used for deserts and creams. The thinner milk is usually used for making soups, curries and sauces.
My mother usually has at least one can of coconut milk buried at the back of her fridge. She chills the can so that the milk layers will separate and the thicker cream can be used as desert toppings.
I heard a story a while ago of how some babies that were born in the south pacific islands were given coconut milk when there was no baby formula or substitute nursing mothers available. And these babies thrived with no developmental concerns.
Perhaps one thing to note about drinking coconut milk, is that not all store bought brands are actually good for you. Many of them contain preservatives and added sugars, so it’s always a good idea to read the labels!
Here’s a short video of how to make Chickpea Coconut Curry…!
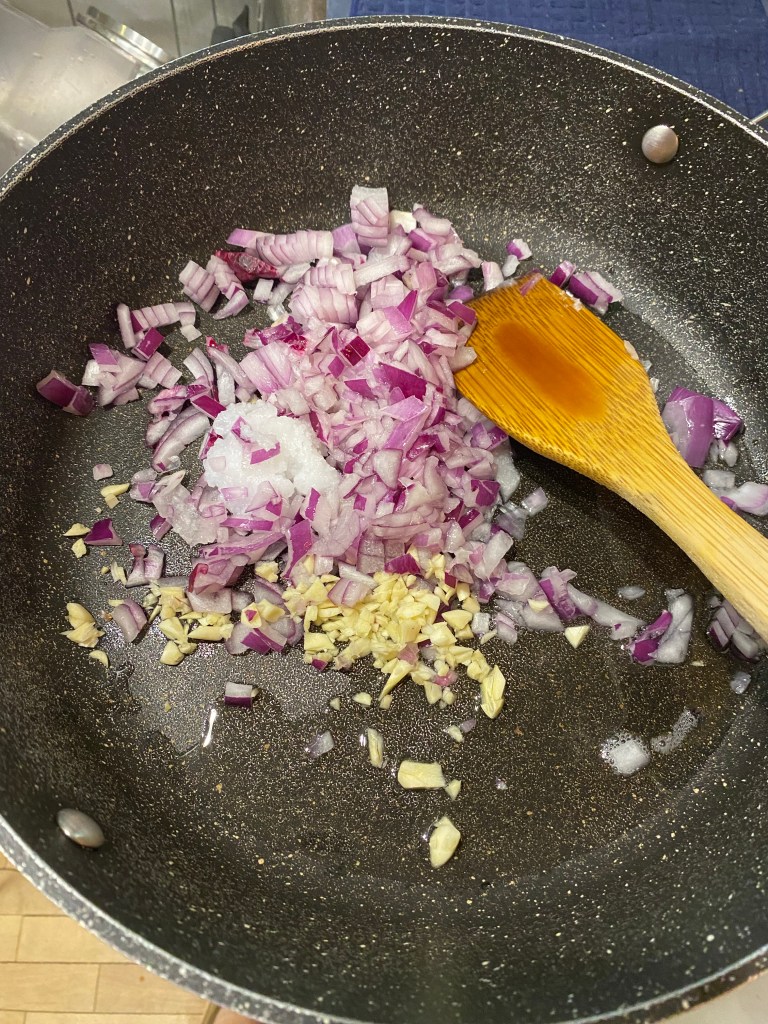
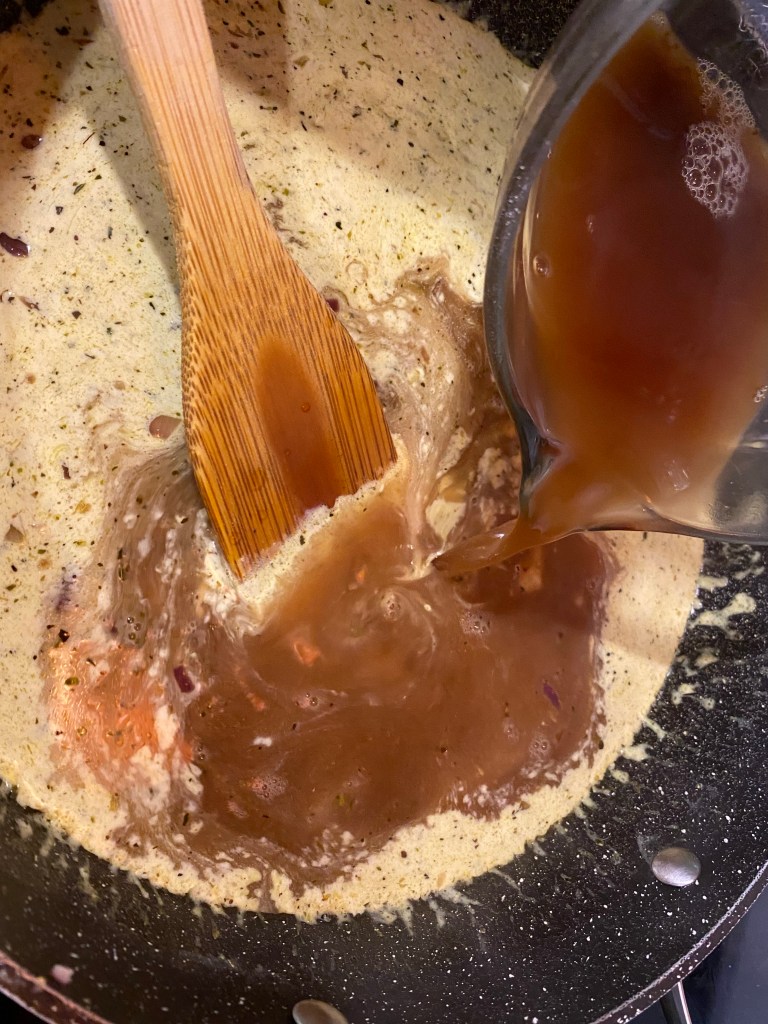
Melt the coconut oil in wok or large skillet over medium heat.
Add the onion, garlic and ginger. Cook for 2 minutes or until the onions have softened.
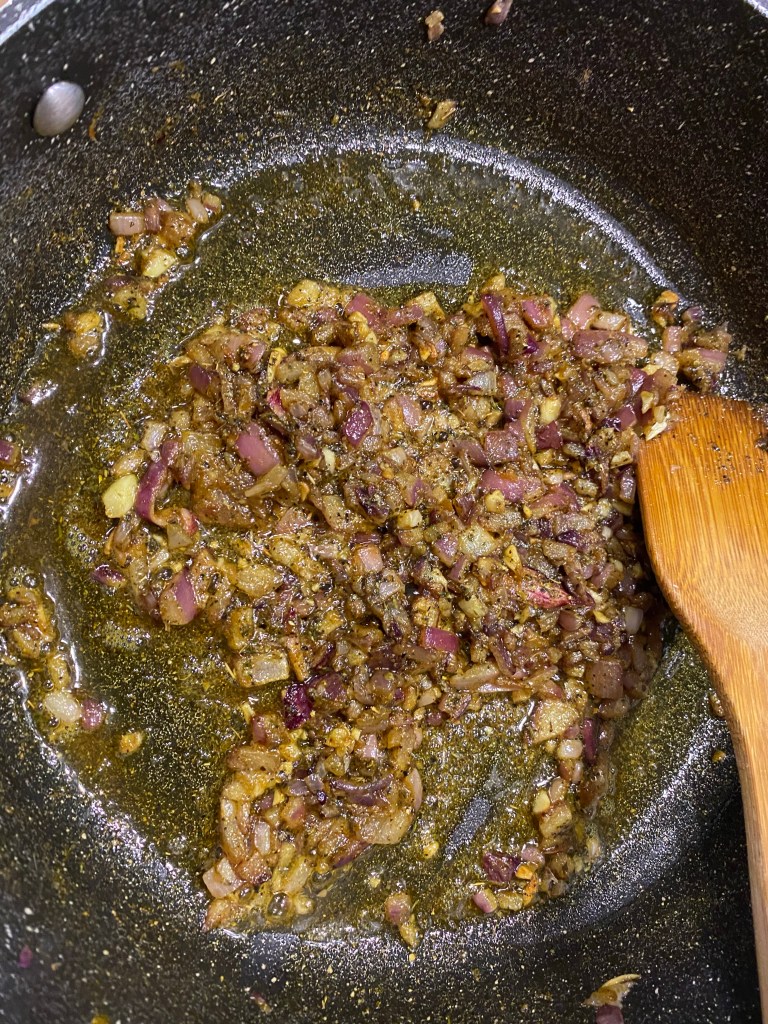
Add the spices/herbs: coriander, curry, salt, pepper, and Italian seasoning. Stir for 1 minute.
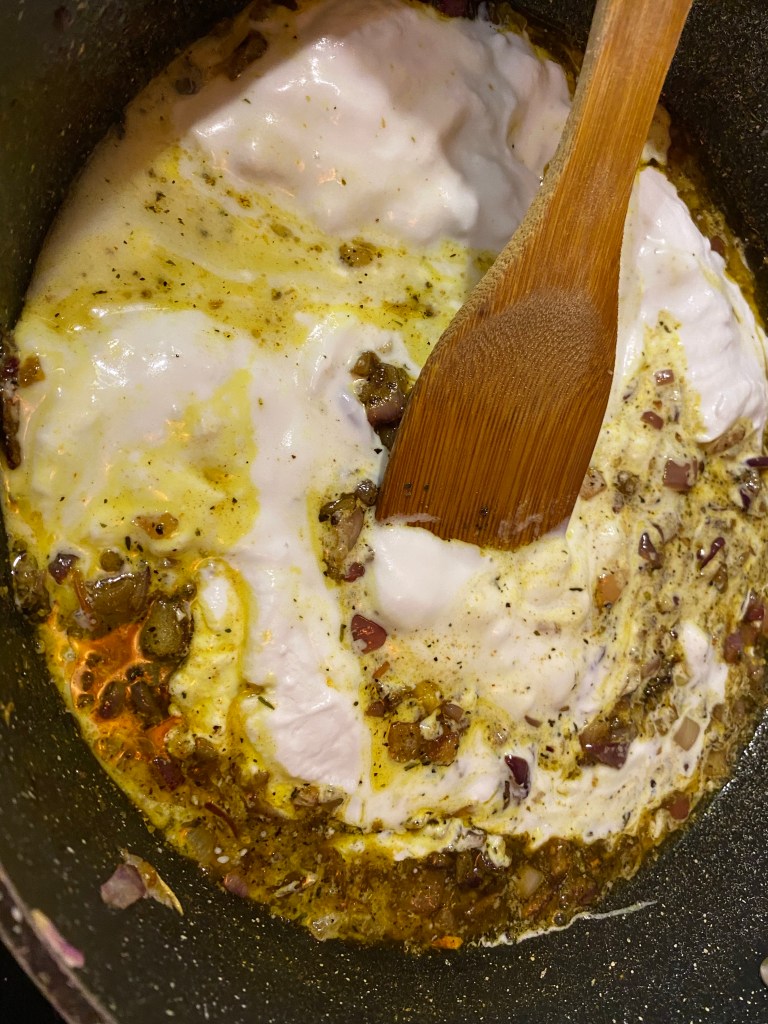
4. Add the coconut milk and stir in, followed by the beef stock. Cook for 5 minutes and stir well.
5. Add the remaining ingredients (sweet potatoes, chickpeas, mushrooms, bay leaves, and any other vegetables you would like to add!).
6. Continue cooking and stirring occasionally for another 15-20 minutes, until curry thickens and vegetables are tender.
7. Serve over rice and garnish with fresh basil or parsley.
Additional Note: This recipe is lovely with some fresh Naan bread for dipping. I am developing a recipe to share on here soon!
Other Soups and Entrees to Check Out:
Hi, I’m Jessie!
I’m a Wife and Homeschooling Mom living in a remote town in Northern Ontario, Canada.I love making wholesome meals for my family from scratch, homeschooling our girls and learning more about natural living.
Subscribe to Northbird’s email list to get weekly posts on: tasty recipes, activity ideas for kids, natural living tips, and some genuine mom thoughts and encouragement!
This post contains affiliate links. As an Amazon associate, I earn from qualifying purchases. This means that I make a small commission at no extra cost to you. You can read my full disclosure HERE.
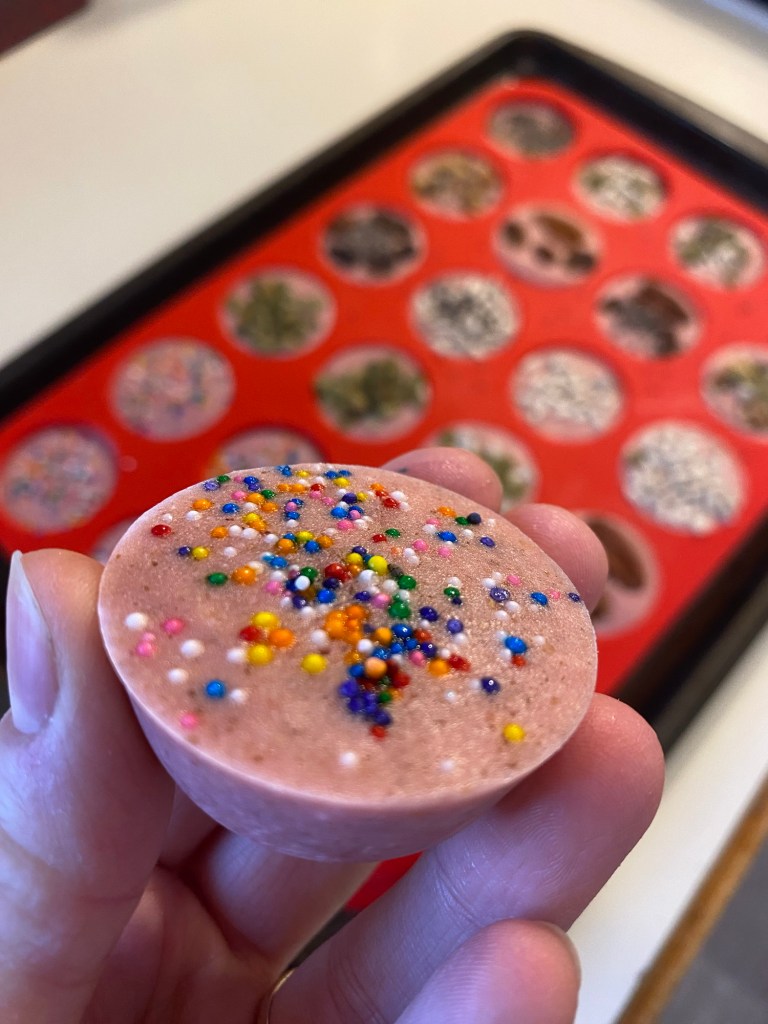
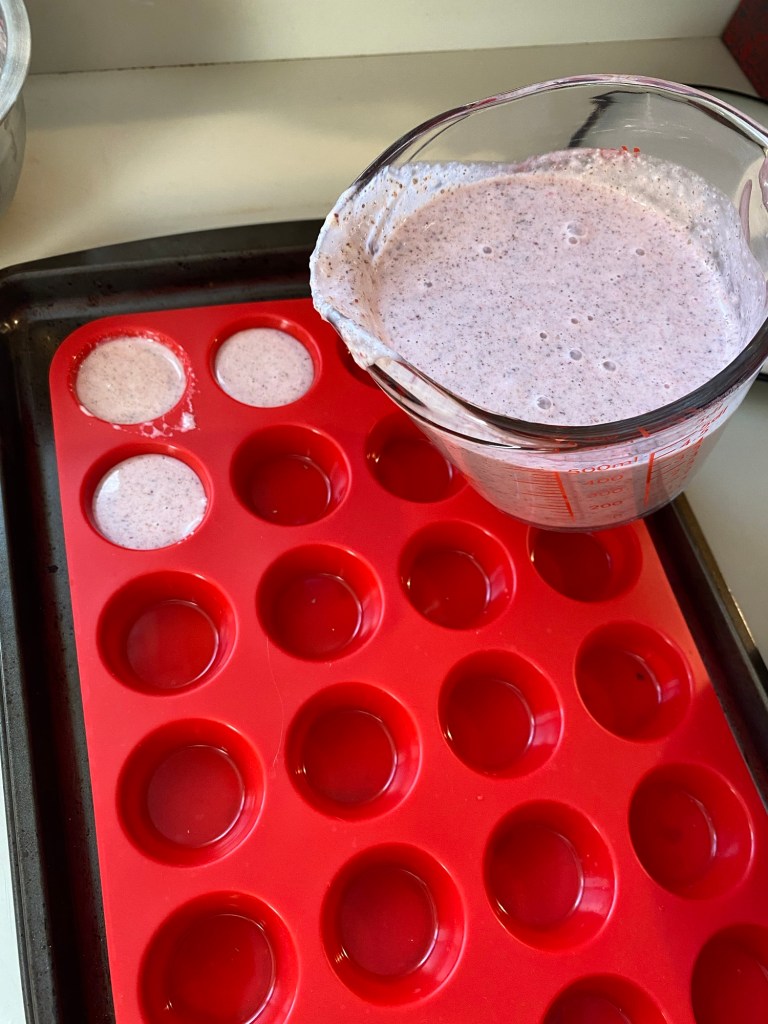
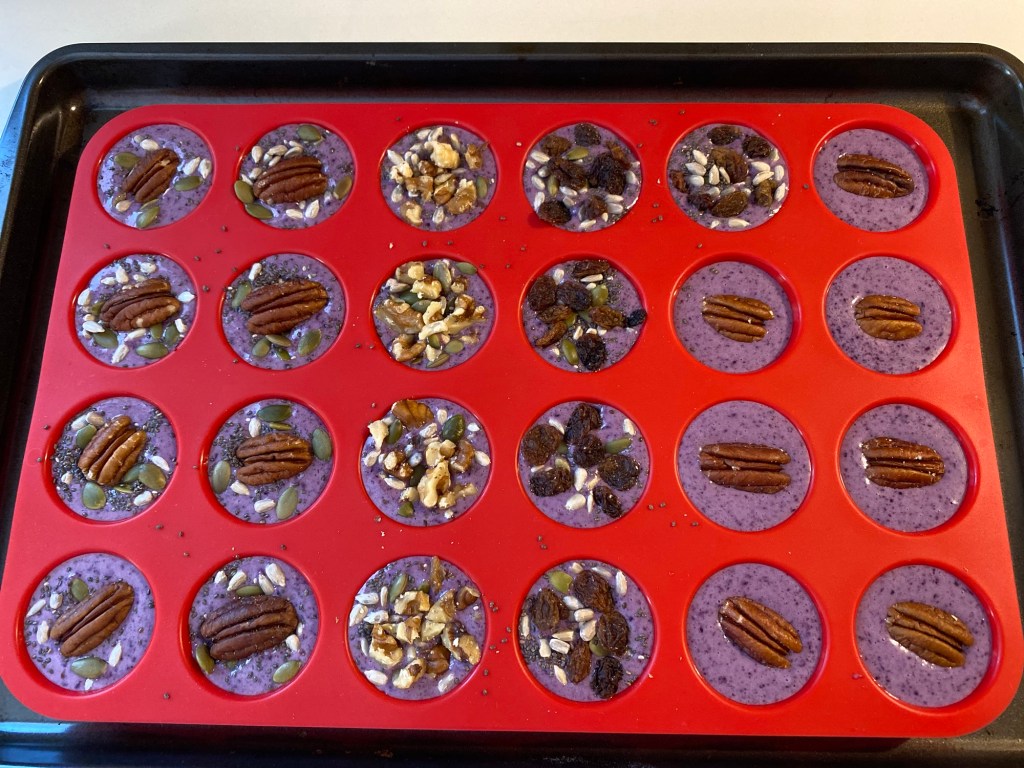
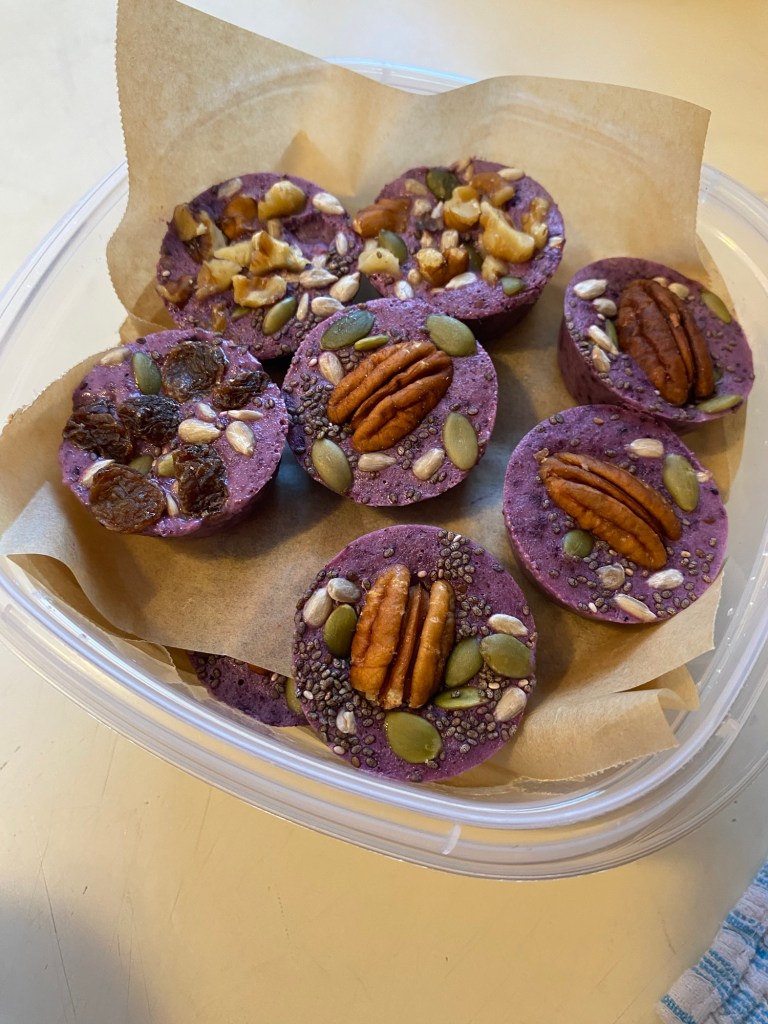
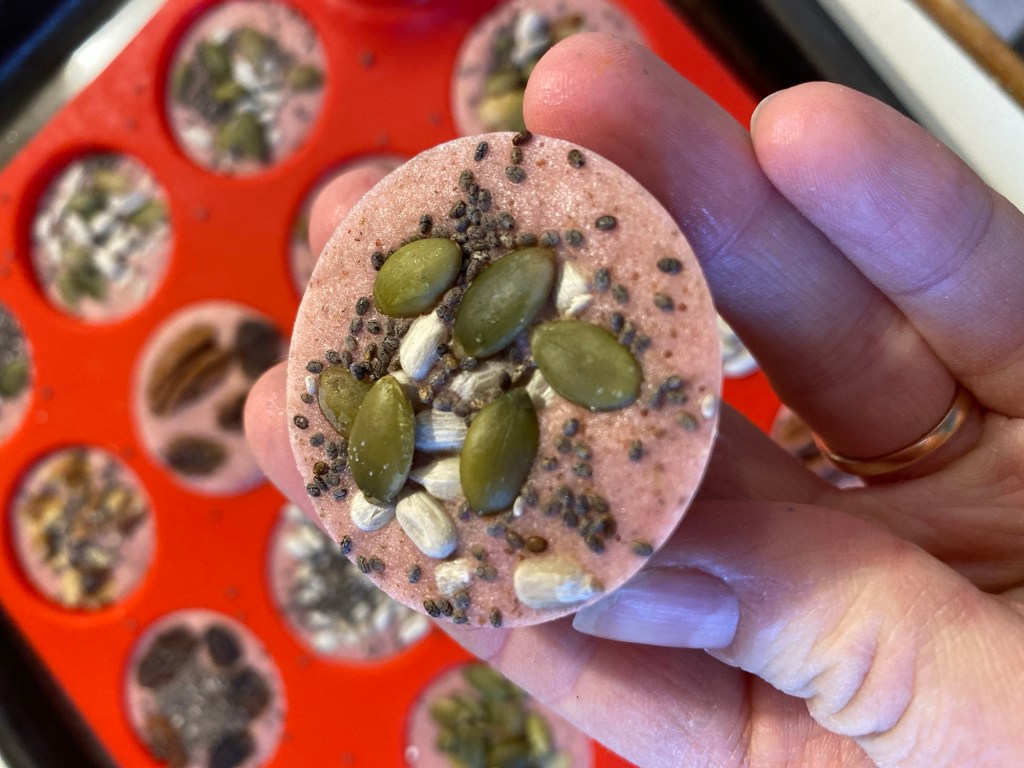
We made a big batch of homemade yogurt the other day, and after setting aside what we needed for the week, we realized that there was still quite a bit left over. So we thought this would be a fun time to experiment with our taste buds! The girls and I had a lot of fun creating this healthy and oh so delicious treat.
My oldest has enjoyed having these cold homemade yogurt treats as little rewards for completing her schoolwork, chores, and as a healthy desert option over the past week. Being a very high-energy child, she tends to overheat and loves having something cold to help her “cool down” from all her activity. (And this is normal even with eliminating sugar!) Her little sister (not yet 2) is not as excited to eat “cold” sweets and instead prefers to watch the yogurt bombs melt in her hands and then play with the gooeyness…!
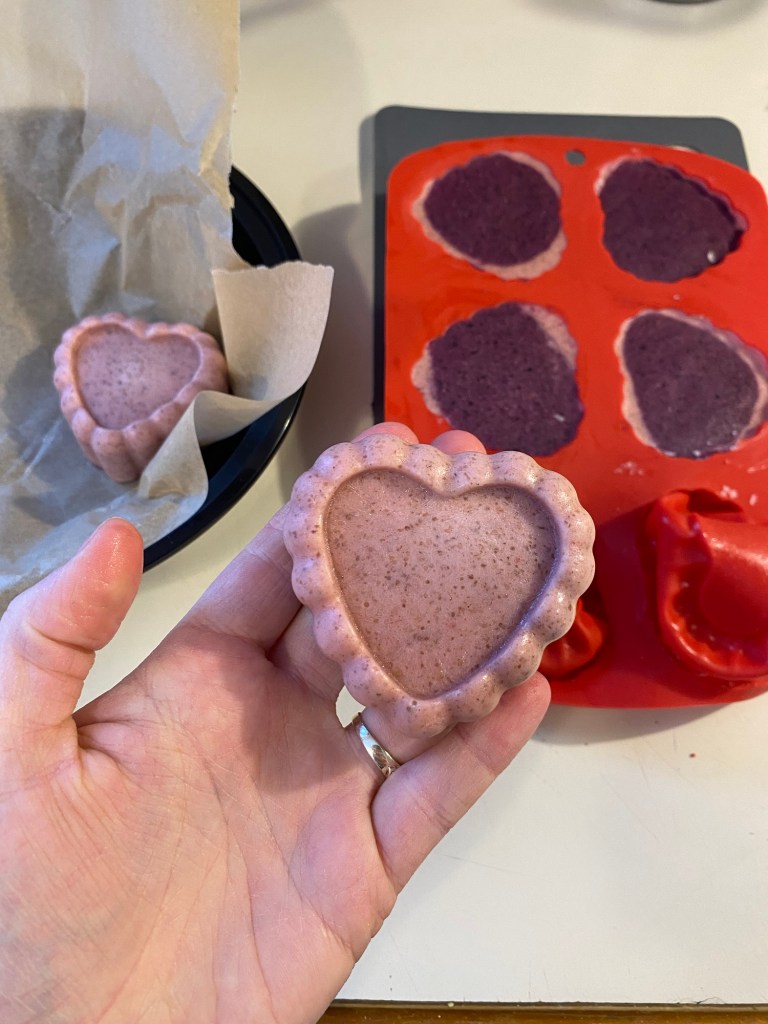
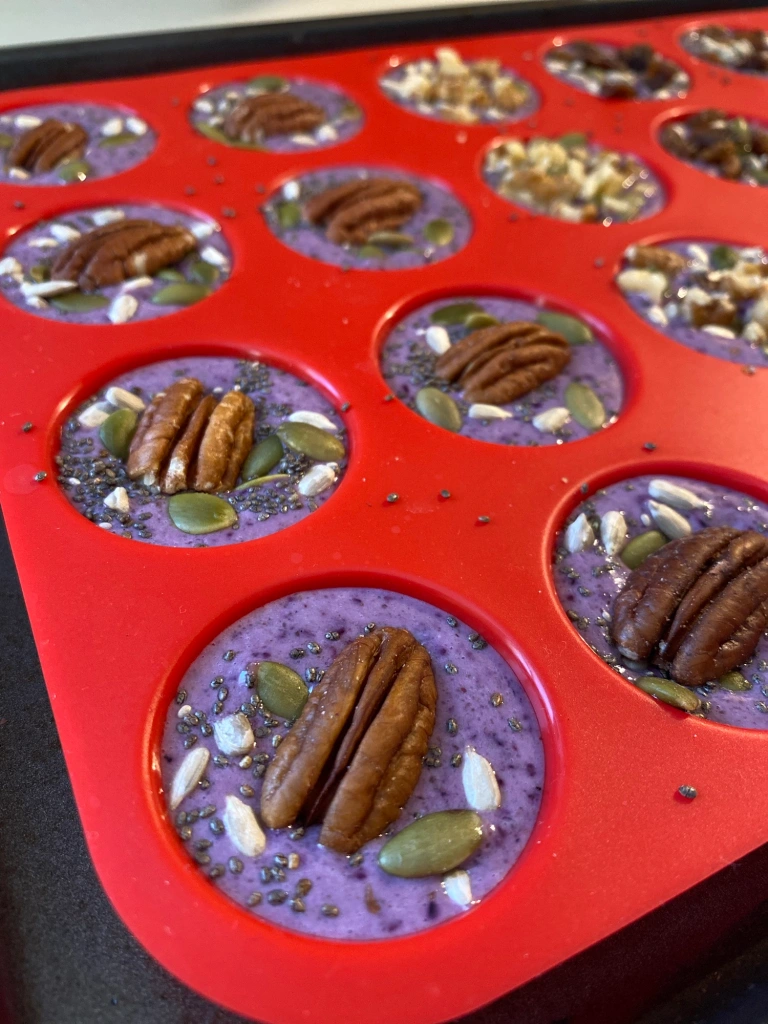
We doubled this recipe and did one batch using frozen strawberries to make the bombs pink, and the other batch using frozen blueberries to make those bombs purple. Perfect colours for these girls! Another time we will experiment with using different frozen fruit, for example: peaches, pineapple and kiwi. (I’m curious to find out if we will get orange, yellow and green!)
I will update this post with my findings when that happens. (Or you can and let me know how it turns out!)
We enjoyed the creativity and hands-on part of this kitchen activity. Once I poured the prepared yogurt/berries/seeds/maple syrup into the silicone molds, it was easy for my daughter to decorate the tops and have fun with it! I also had some heart-shaped silicone molds which were perfect for Valentines Day coming up.
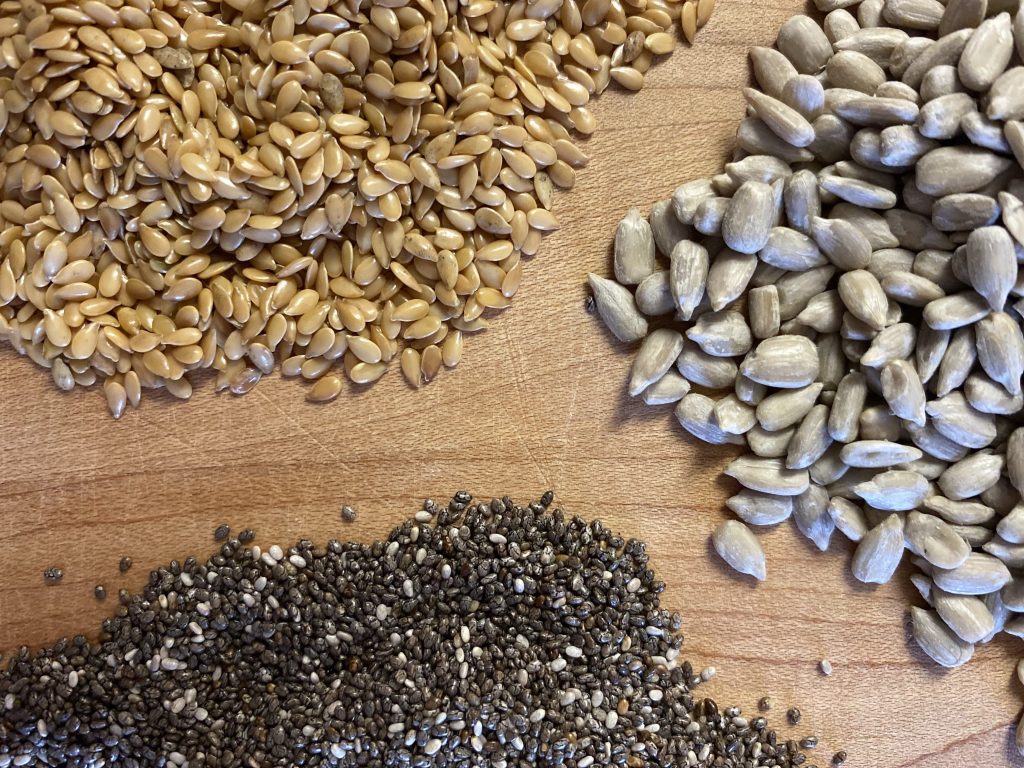
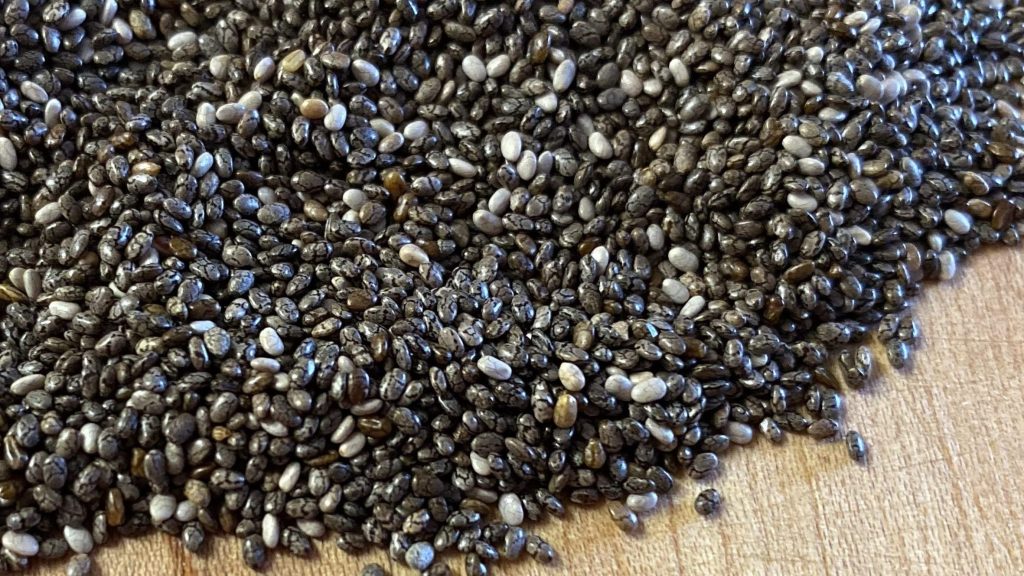
What is our 3 Seed Blend?
My second post ever I did on here featured the 3 Seed Blend Mix that we use quite often in breakfast bowls and other dishes. It is made up of equal parts of blended Flaxseed, Sunflower Seed and Chia Seeds.
When blended up finely, it is easy for your body to digest and absorb all the goodness! It also acts as a natural thickener, and works very well adding it to this frozen yogurt treat without taking over the flavours of the yogurt and berries.
A little more about the Seeds…
Organic Golden Flaxseed:
These are high in fibre and omega-3 fatty acids! They have also been shown to help lower blood pressure and blood sugar, contain protein, improve digestion (hence the fibre) and reduces bloating. Some doctors also claim it to help with weight loss.
Important to note: Nutrition experts recommend the importance of grinding up flaxseed instead of eating it whole. Ground flaxseed is easier to digest and for your body to absorb the nutrients. Avoid buying it pre-ground, as it is best ground fresh and stored in the fridge. At room temperature it will lose some of its nutritional properties, which is why our Naturopath discouraged us from buying the pre ground sold at bulk barn!
We buy organic flax seeds in bulk from a health food store in the south and then put in freezer bags and freeze until we need them. Big $ saver this way and ensures we always have some on hand for various recipes.
Raw, Hulled Organic Sunflower Seeds:
These are notably high in vitamin E and selenium, which act as a powerful antioxidant and supports your immune system and thyroid function. They also contain protein, magnesium, and linoleic fatty acids.
We have also been able to buy these in bulk, and store them the same way as the flaxseeds. It is important to buy them raw and unsalted!
Organic Chia Seeds:
Chia seeds have had their waves of popularity over the past few years, but the science and nutritional values still speak for themselves. Chia seeds are amazing for lowering blood pressure, blood sugar and cholesterol, and improving overall heart health. They are high in fibre, which aids in digestion and reduces bloating.
It is important to soak whole chia seeds for at least twenty minutes before eating them so that they become more digestible. This is true of most edible seeds! If we are eating them whole, we like to soak them in almond milk (see our recipe for homemade almond milk), but some people soak them in water as well.
When they are soaked, the hard seed shell releases a gelatinous-like film around the seed, making it look like frog eggs!
How to Make the 3 Seed Blend:
Click HERE to get specific directions to make your own 3 Seed Blend.
Here’s a short video of how we made these easy Yogurt Berry Bombs!
Mix yogurt, berries, 3 seed blend and maple syrup in a small bowl with an immersion blender (regular blender works great too).
2. Pour into silicone molds or muffin baking sheets (**with paper muffin liners).
3. Top with your choice of sprinkled goodies. Get creative!
4. Place in freezer for a minimum of 2 hours until berry bombs have finished setting.
5. Transfer to parchment lined food storage containers and return to freezer until ready to eat.
6. Best to use within 3 months.
More Desert & Snack Recipes:
Hi, I’m Jessie!
I’m a Wife and Homeschooling Mom living in a remote town in Northern Ontario, Canada.I love making wholesome meals for my family from scratch, homeschooling our girls and learning more about natural living.
Subscribe to Northbird’s email list to get weekly posts on: tasty recipes, activity ideas for kids, natural living tips, and some genuine mom thoughts and encouragement!
This post contains affiliate links. As an Amazon associate, I earn from qualifying purchases. This means that I make a small commission at no extra cost to you. You can read my full disclosure HERE.
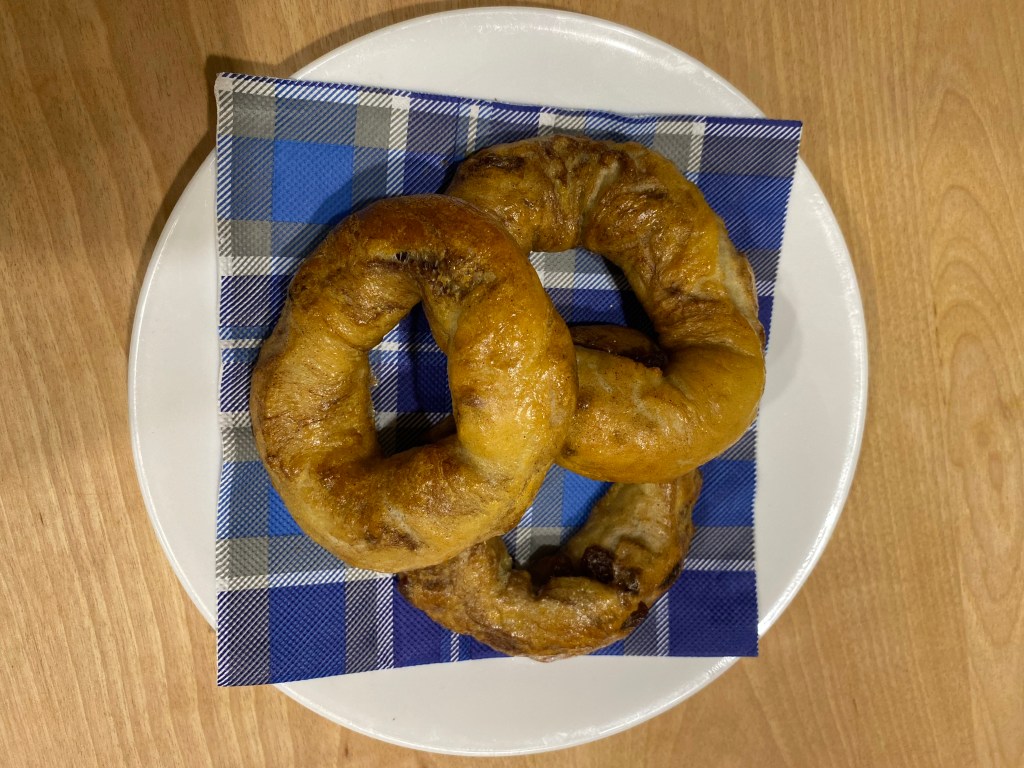
The common bagel is thought to have originated in Poland and other Eastern European countries around the 1600s. Later in the mid 1800s, Jewish immigrants brought the “bagel” with them to the United States and Canada. After this, the classic bagel became increasingly popular and a part of our western cuisine. The varying types of bagels we see today originate from the different communities that the Jewish and European immigrants came from.
The root dough recipe is very similar to that of soft pretzels, and you can easily mix one batch of dough to produce both bagels and soft pretzels. I have done this a few times, since each family member has their particular favourites!
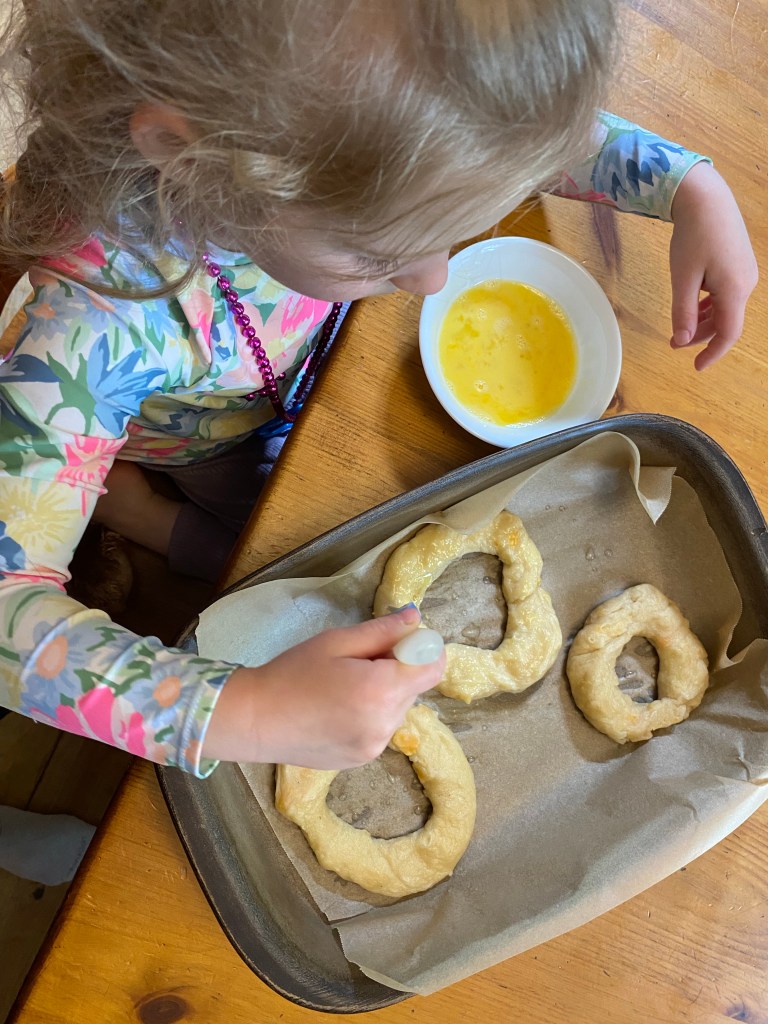
My daughter L had a lot of fun making these bagels with her two cousins A & M. It was a great homeschooling activity and they loved shaping the bagels and picking what flavours they wanted to make (and eat later!)
We will continue to share recipes for the other types of bagels that the girls and I have come up with since that fun day, using the same easy dough recipe!
What is Sourdough?
Sourdough is made using a fermented mixture of flour and water, called the “starter”, and mixed with more water, flour, and usually salt. The dough naturally rises as it ferments during resting stages. There is a lower amount of gluten in sourdough baking, which is why the dough needs to be “stretched” multiple times to help it expand and become fluffy.
Are you new to Sourdough? Click HERE for a little more “starter” information found on my post “How to Make Sourdough Bread”.
Is Sourdough Good For You?
Sourdough is easier to digest than other traditional yeasted baking. The fermenting that takes place while making sourdough baked products produces amino acids, which in turn produces enzymes that help to break down proteins and lower the overall gluten levels in the sourdough products (making it easier to digest).
Whole grain sourdough products have a lower glycemic index than other types of bread, (specifically white flour baking) that have been processed and are packed full of preservatives. This means that sourdough baking has less of a glycemic spike, and more of a gradual release on the glycemic scale, making it a healthier option for those struggling with balancing blood sugar levels.
Sourdough breads and baked goods contain higher levels of protein, fibre and nutrientsthan most traditional yeasted baking.
Sourdough baking still contains many of the natural nutrients that are processed out of the majority of other kinds of breads and baked goods.
Sourdough contains lower levels of phytate, which helps your body to absorb the nutrients easier than other breads.
Whole grain sourdough is considered a high-fiber food, which feeds the good bacteria in your gut and digestive system.
Common vitamins and minerals found in sourdough baking: Calcium, Iron, Manganese, B1-B6, B12, Potassium, Magnesium, Folate, Niacin, Zinc, Thiamin, Riboflavin, Selenium, Phosphorus, and Vitamin E.
Other Sourdough Bagel Recipe Variations:
Use this one recipe to make many more kinds of bagels! Just add the extra ingredients right before the dough is ready to be shaped into bagels. I’ll post more bagel recipes when I can, but until then have fun experimenting and trying some of these out!
1. Mix your active sourdough starter with the water and honey. Mix the sea salt and flour together and add to the wet mixture. Mix all together well.
2. Cover with a beeswax food cover, plastic wrap or a tea towel and let rest overnight or for 8-10 hours to bulk ferment. Dough will be moist and spongy and will have doubled in size.
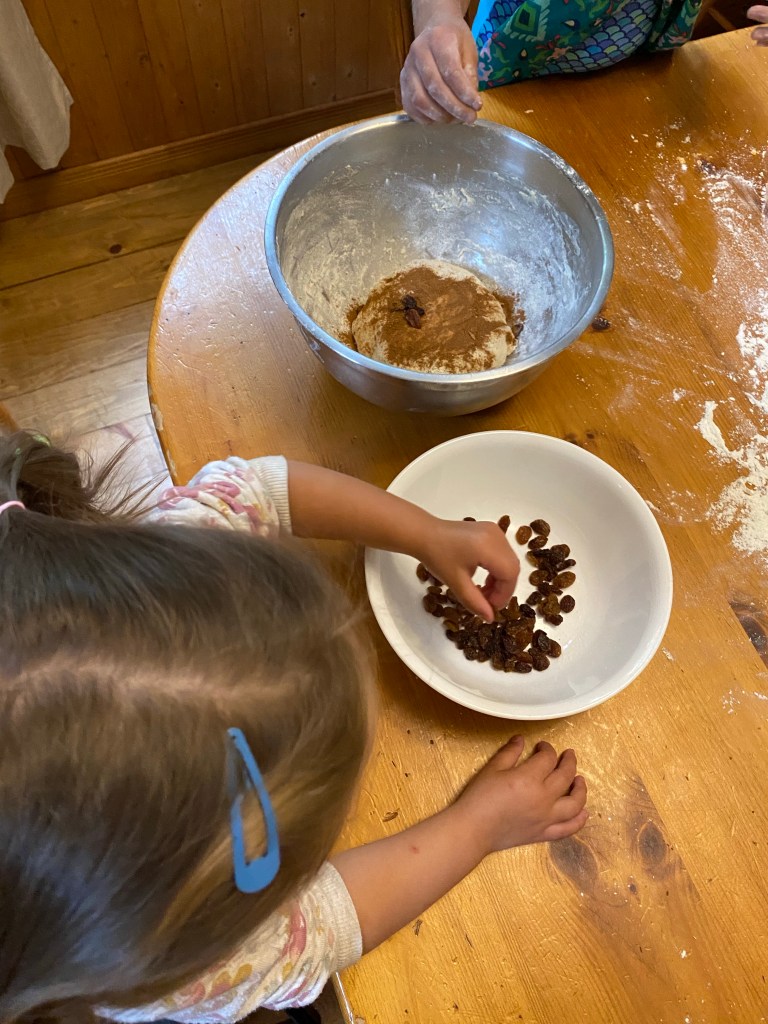
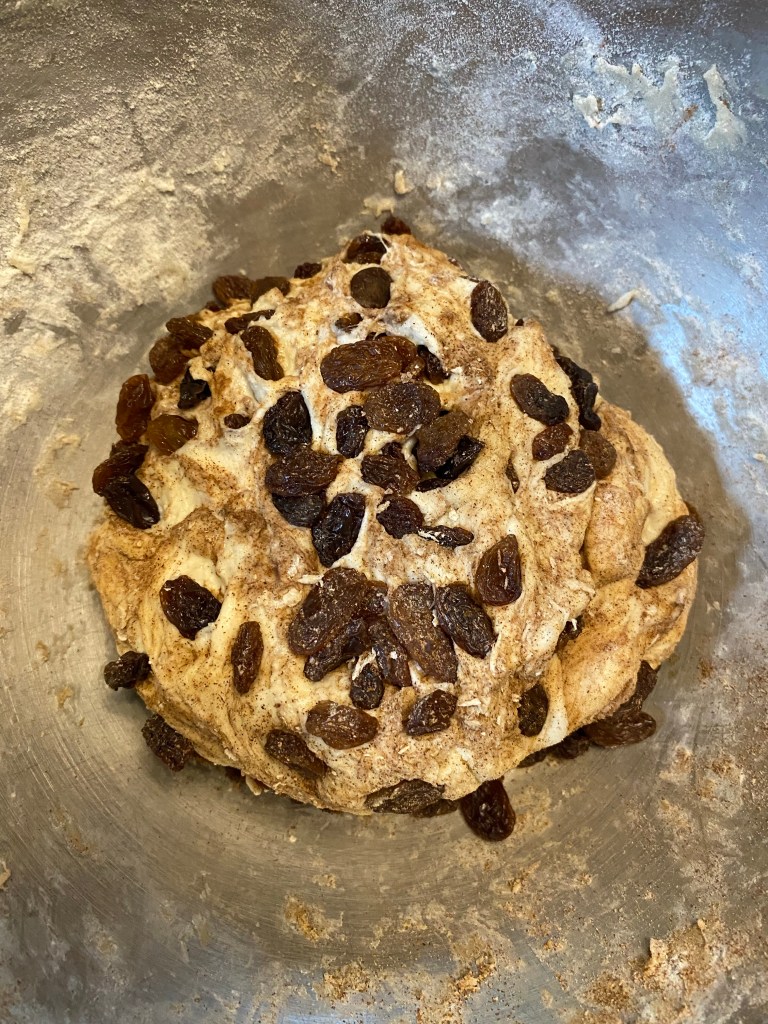
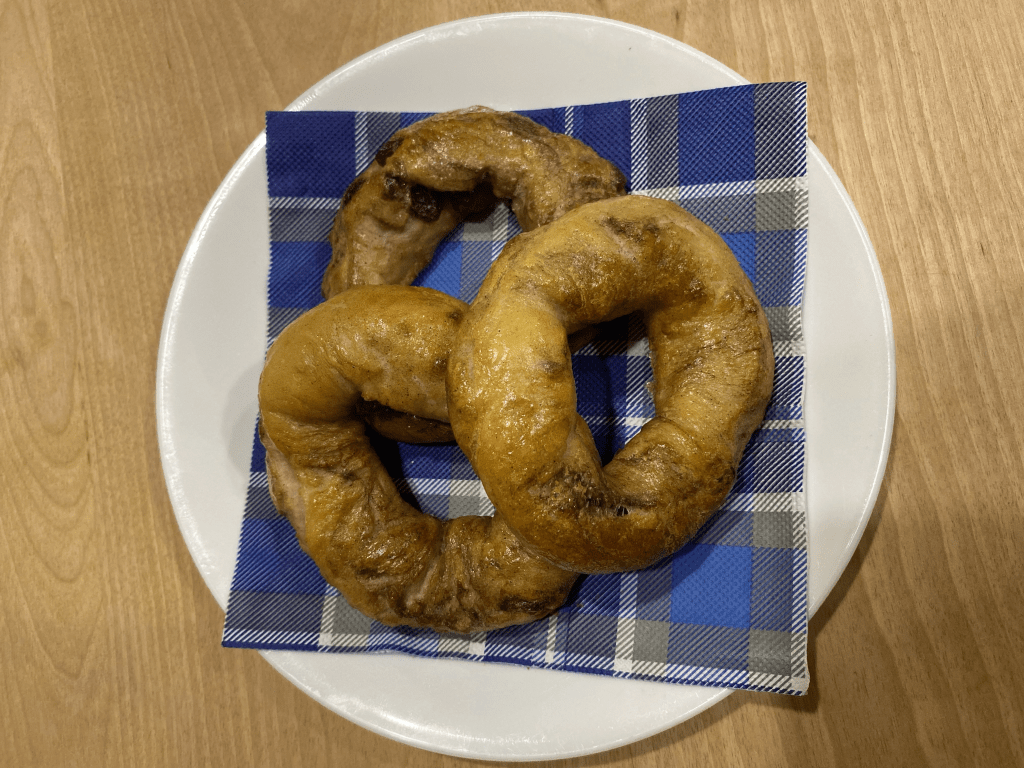
3. Add 1 cup of raisins and 1 tablespoon of ground cinnamon to the bowl and work it into the dough. Knead dough on floured surface for 2 minutes until it is a soft dough ball. Divide into 12 equal pieces.
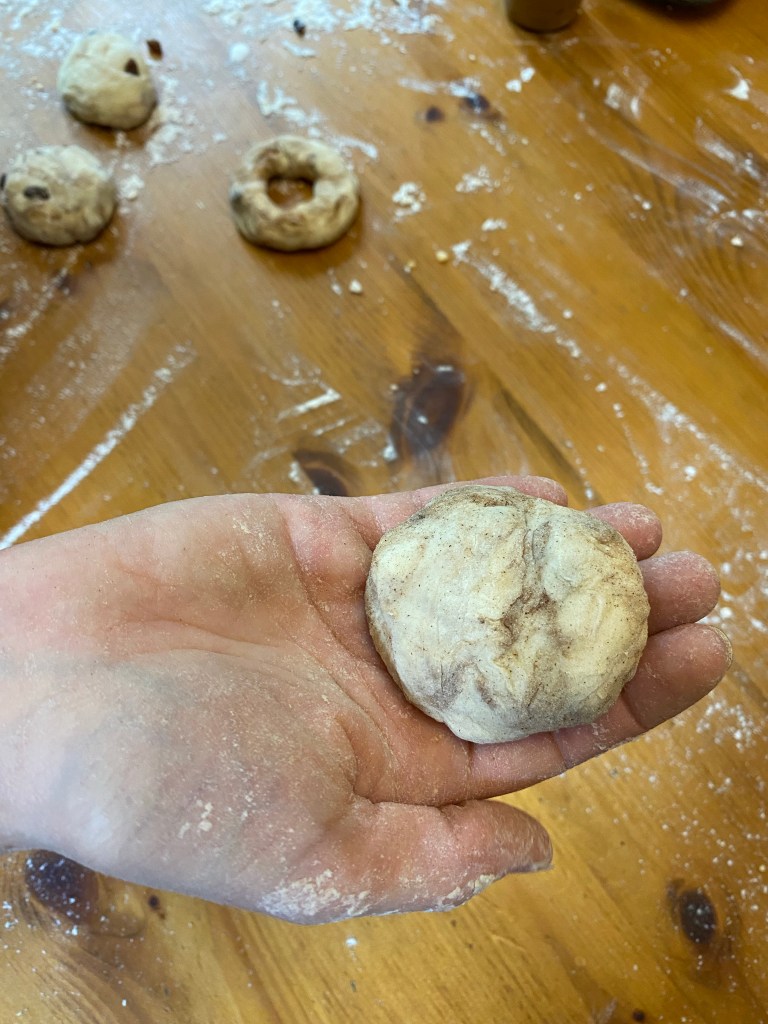
4. Form each piece into a flattened “ball” then poke fingers through the middle to create a hole.
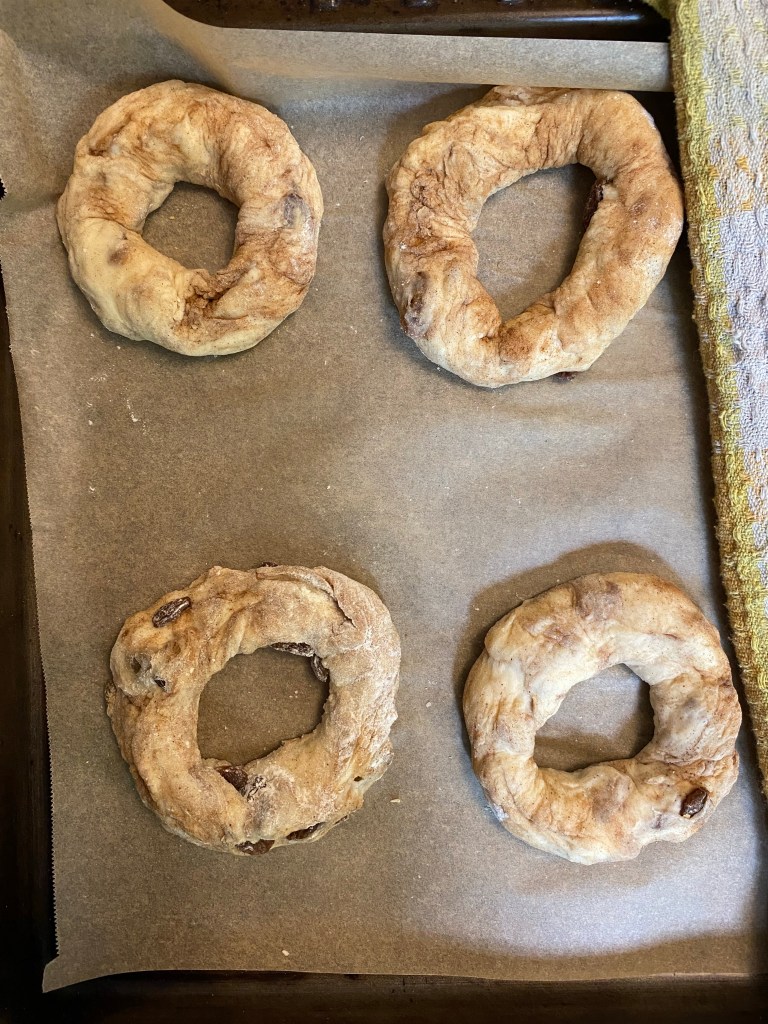
5. Place on parchment-covered baking sheet and cover with a tea towel. Let rest for 1 hour. (Note that at this stage the bagels will expand and puff up, so thinner is good prior to resting. You can always gently stretch them again before putting in the water bath too.)
6. Preheat oven to 425 degrees Fahrenheit.
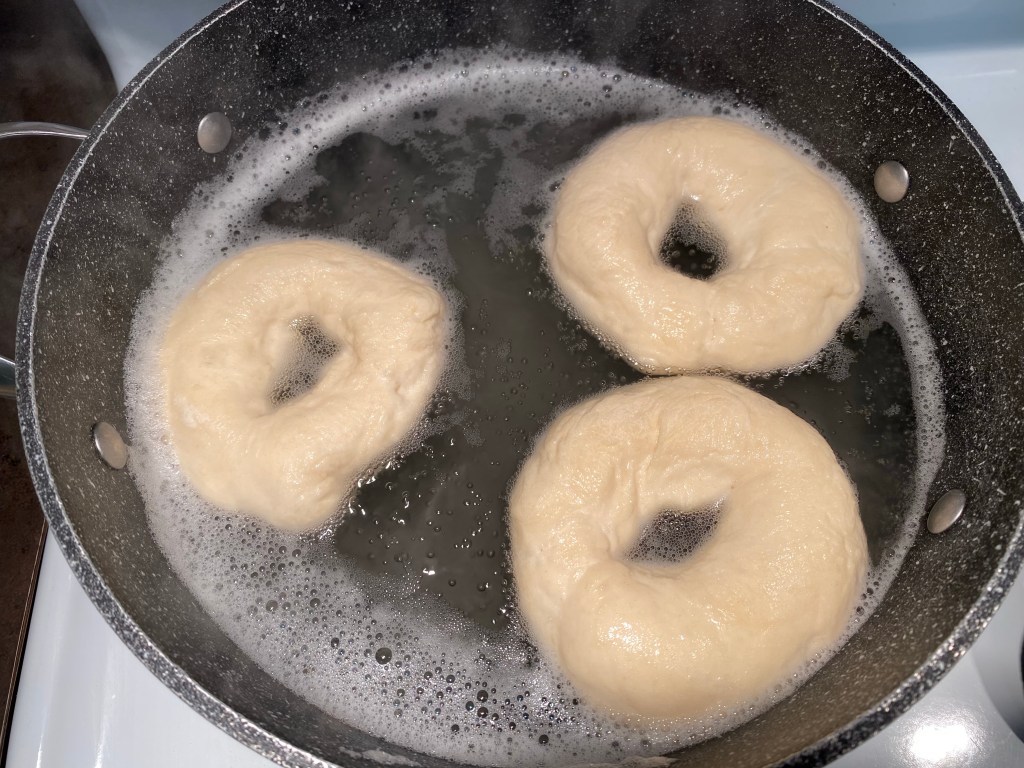
7. Boil 6 cups of water in a large pot and add baking soda and sugar. When it is a rolling boil, add 3-4 bagels gently with a large slotted spoon.
8. Set the timer for 30 seconds, then turn them over for another 30 seconds on the other side. Transfer them back to the baking sheet.
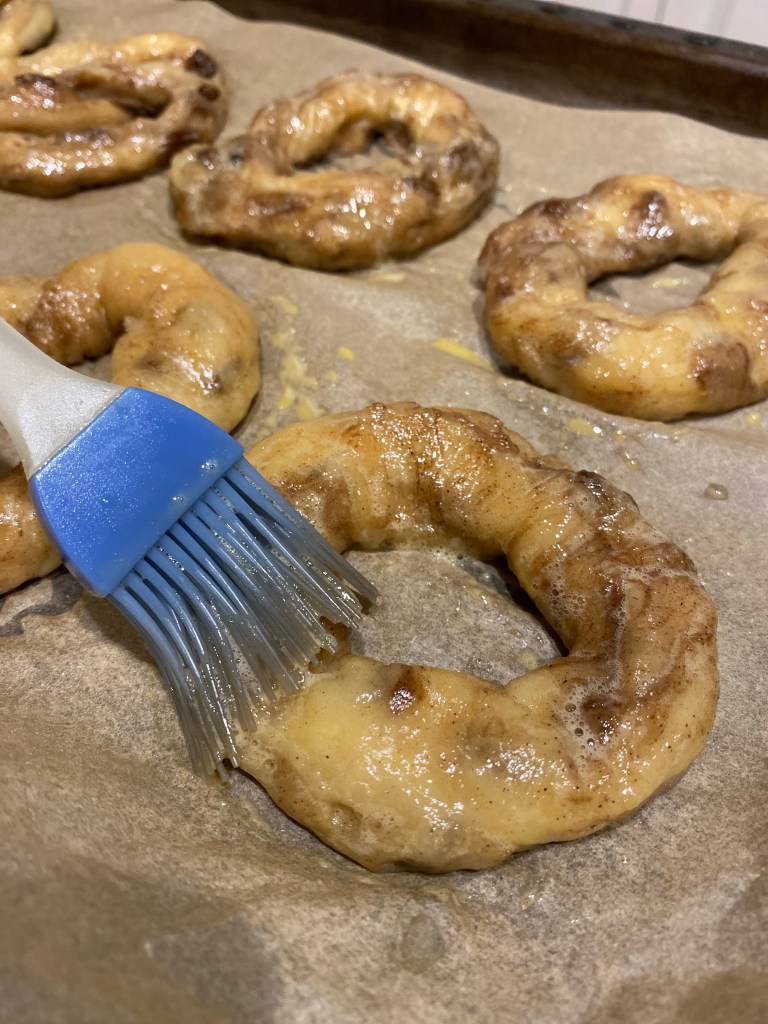
9. When all the bagels are back on the baking sheets, whisk up an egg in a small bowl and paint the bagels with a cooking brush. (This will give them that lovely golden colour on the crust after being baked!)
10. Bake the bagels on the middle rack in oven for 14-16 minutes or until golden brown on top and bottom and cheese starts to bubble. Let cool on baking sheets or rest at least 10 minutes before biting into. Enjoy!
Additional Notes: Store at room temperature for 5 days in an airtight container, or freeze for up to three months in a freezer bag. Thaw in fridge then warm in the oven or microwave to freshen them up!
Enjoyed this recipe?
You can turn this Cinnamon Raisin Sourdough Bagel Recipe into a Sourdough Soft Pretzel Recipe! Click HERE to learn how to shape the pretzels and how to add additional ingredients to make many more types of delicious pretzels!
Other Tasty Sourdough Recipes to Check Out!
Hi, I’m Jessie!
I’m a Wife and Homeschooling Mom living in a remote town in Northern Ontario, Canada.I love making wholesome meals for my family from scratch, homeschooling our girls and learning more about natural living.
Subscribe to Northbird’s email list to get weekly posts on: tasty recipes, activity ideas for kids, natural living tips, and some genuine mom thoughts and encouragement!
Mix your active sourdough starter with the water and honey. Mix the sea salt and flour together and add to the wet mixture. Mix all together well.
Cover with a beeswax food cover, plastic wrap or a tea towel and let rest overnight or for 8-10 hours to bulk ferment. Dough will be moist and spongy and will have doubled in size.
Add 1 cup of raisins and 1 tablespoon of ground cinnamon to the bowl and work it into the dough. Knead dough on floured surface for 2 minutes until it is a soft ball. Divide it into 12 equal pieces.
Form each piece into a flattened “ball” then poke fingers through the middle to create a hole.
Place on parchment-covered baking sheet and cover with a tea towel. Let rest for 1 hour. (Note that at this stage the bagels will expand and puff up, so thinner is good prior to resting. You can always gently stretch them before putting in the water bath too.)
Preheat oven to 425 degrees fahrenheit.
Boil 6 cups of water in a large pot and add baking soda and sugar. When it is a rolling boil, add 3-4 bagels gently with a large slotted spoon.
Set the timer for 30 seconds, then turn them over for another 30 seconds on the other side. Transfer them back to the baking sheet.
When all the bagels are back on the baking sheets, whisk up an egg and paint the bagels with a cooking brush. (This will give them that lovely golden colour on the crust after being baked!)
Bake the bagels on middle rack in oven for 14-16 minutes or until golden brown on top and bottom and cheese has started to bubble. Let cool on baking sheets or rest at least 10 minutes before biting into!
Store at room temperature for 5 days in an airtight container, or freeze for up to three months in a freezer bag. Thaw in fridge then warm in the oven to freshen them up.
Nutrition
Per 1 Cinnamon Raisin Bagel: 274 calories; 5.8 g fat; 47.6 g carbohydrates;
8.7 g protein.