Fun Salt Water Painting Activity for Kids

Find Northbird on social media:

This post contains affiliate links. As an Amazon associate, I earn from qualifying purchases. This means that I make a small commission at no extra cost to you. You can read my full disclosure HERE.

Return to “Homeschooling Activities & Resources”

Return to “Ocean Life”

Jump to Printable Activity Card

Investigating Salt Water in Homeschooling:

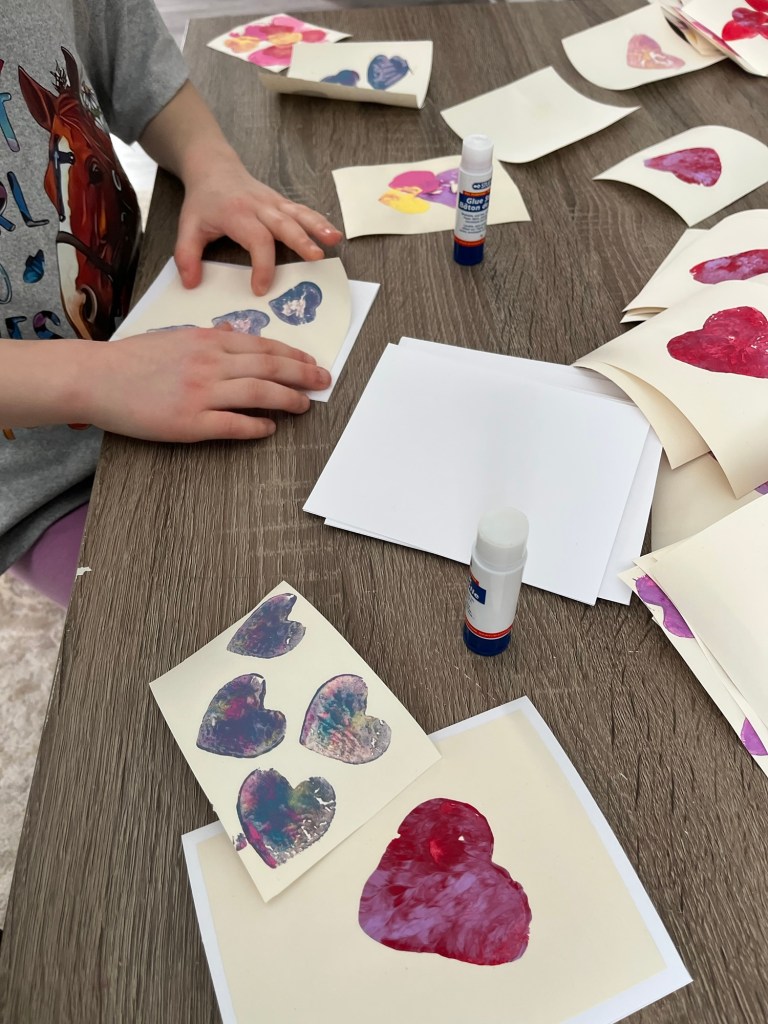
This is a simple and fun painting craft using salt and watercolours!

We did this easy activity as part of our inquiry into Ocean Life last year, learning about the difference between salt and fresh large bodies of water.

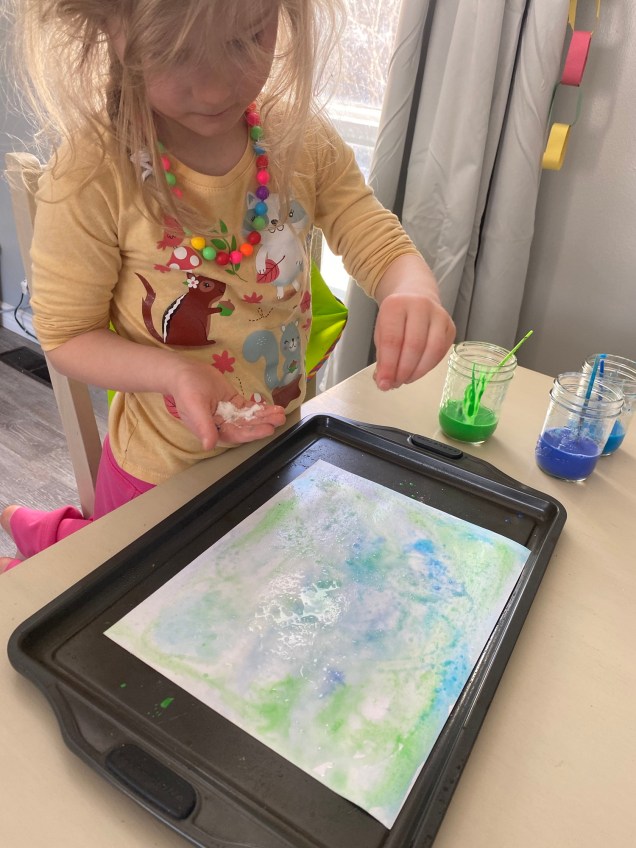
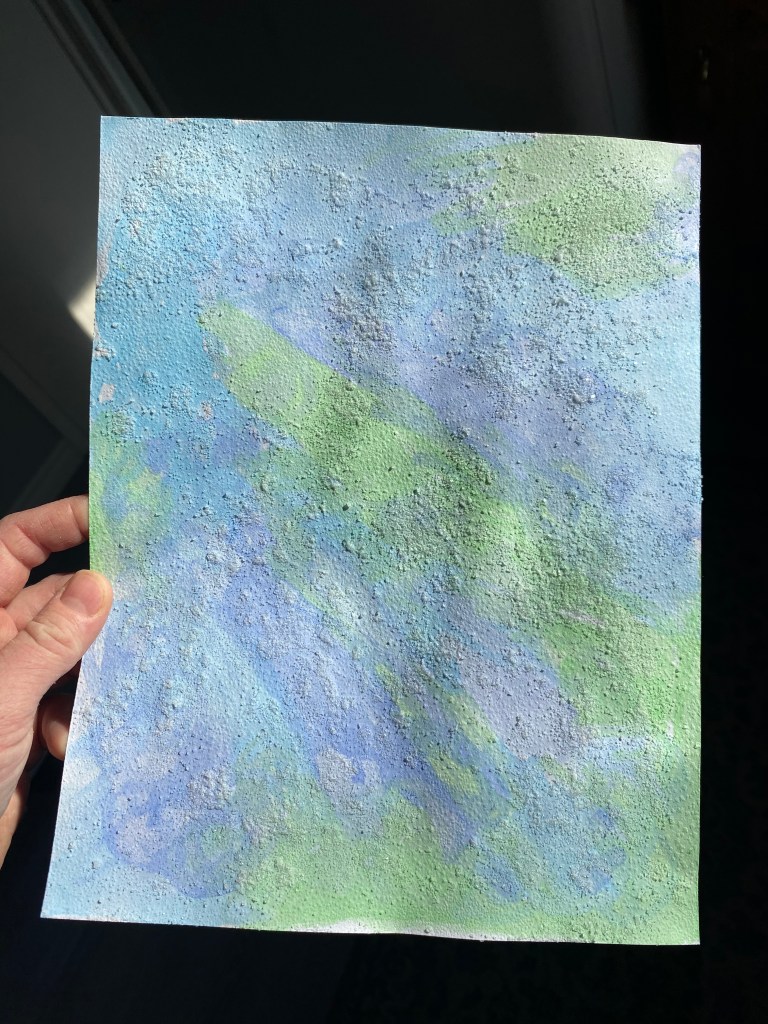
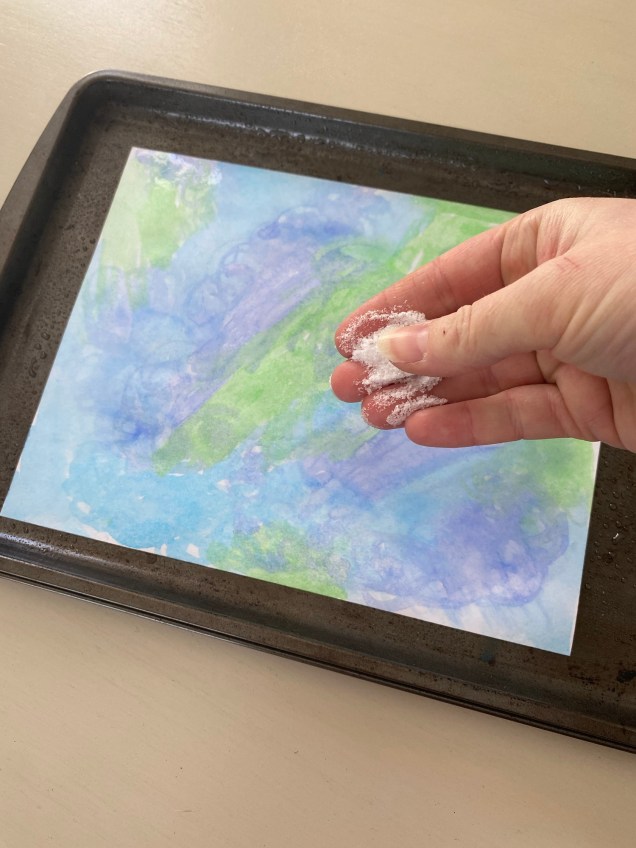
My kids loved doing this freestyle watery painting and then getting to sprinkle it with table salt. It left a textured feel to the painting, as well as altering the colours while the salt dried on the wet paper.

As a side note, we live near James Bay, Northern Ontario, and the river not far from our house is mostly fresh water. However, because it flows into James Bay (which is connected to the Arctic Ocean) and has some tidal changes, it carries back some salinity to our community area.

If you read a previous post on “Exploring Salt Water Density: Homeschooling Egg Experiment”, you might already see or understand a little of the relationship between salt and water. This egg experiment was to test the different levels of density in each of these water glasses, and compare it to the egg’s own density.

(Spoiler alert, the kids made an egg float in salted water!)

Educational Videos: A little more about Salt and Saltwater!

Where Does Salt Come From?

Why The Ocean Needs Salt:

How to Make a Salt Water Painting:

Supplies Needed:

Directions:

1. Put white card stock paper on tray.

2. Paint picture as desired with ocean colours (or more!)

3. Sprinkle table salt over the painting.

4. Spray paper with water to help the salt dissolve a little and alter the colours.

5. Let painting completely dry, then gently brush off the extra salt and enjoy the results!

Made this Activity?

I’d LOVE to see your results!! Feel free to post to your social media account and tag Northbird using one of the links below or post in the comments!

Hi, I’m Jessie!

I’m a Wife and Homeschooling Mom living in a remote town in Northern Ontario, Canada. I love making wholesome meals for my family from scratch, homeschooling our girls and learning more about natural living.

Read more about my story HERE.

Subscribe to Northbird’s email list to get weekly posts on: tasty recipes, activity ideas for kids, natural living tips, and some genuine mom thoughts and encouragement!

Salt Water Painting Activity

This is a fun way to paint using salt and watered down paints! Our kids loved the texture the salt left on the paper, as well as the way the salt affected the way their pictures turned out!


Jessica Burman, 2025 © The Northbird Blog. https://www.thenorthbirdblog.com

Ingredients

  • Watercolours Paints (you can also use food colouring and water, or watered down other paints)
  • Paintbrushes
  • Tray
  • White Cardstock Paper
  • Table Salt
  • Spray Bottle with water
  • Flat surface to let pictures dry

  • Directions

    1. Put white card stock paper on tray.
    2. Paint picture as desired with ocean colours (or more!)
    3. Sprinkle table salt over the painting.
    4. Spray paper with water to help the salt dissolve a little and alter the colours.
    5. Let painting completely dry, then gently brush off the extra salt and enjoy the results!

    Return to Top

    Creative Potato Stamping Art for Kids

    Find Northbird on social media:

    This post contains affiliate links. As an Amazon associate, I earn from qualifying purchases. This means that I make a small commission at no extra cost to you. You can read my full disclosure HERE.

    Jump to Printable Activity Card

    Return to “Homeschooling Activities and Resources”

    Valentine Season is Just Around the Corner

    This thought went through my mind a few weeks ago in January, as I was thinking ahead and planing out what blog post topics to write about next. And then on January 31, my dear husband (being the planner and organizer that he is) said:

    “Honey, aren’t you doing a homeschooling valentine exchange again this year? You should probably start sending them out next week.”

    I turned a little defensive in my response, saying that there was plenty of time until the 14th –but then I realized that he was right.

    Things ALWAYS take longer than we anticipate, especially when kids are involved in the production, inscription, and assembly of cards to mail out…and then there’s our slightly sluggish postal system.

    Living in a remote part of Canada is absolutely beautiful and I am so so thankful to live here in Moosonee. But in regards to sending and receiving mail –You get the point!

    So yes. The hubby wins brownie points for helping me keep track of the date and keeping my commitment to mailing valentine cards across Canada.

    The Solution?

    We rummaged around in the potato bin and found some thick russet potatoes that would work to try some potato stamping art, and found the heart-shaped cookie cutters that had been hiding since last year. A little cutting of potato, applying of paint and voila! Some original artwork that the kids were very proud of!

    How to Make Potato Stamp Art & Valentine Cards:

    Supplies Needed:

    Directions:

    1. Wash potatoes and lightly dry the outside. Cut in half at thickest point. Pat dry the inside.
    2. Press cookie cutter into the white flesh, then cut down the sides of the cookie cutter (see picture). Remove the cookie cutter once shape is achieved.
    3. Squirt paint onto paper plate. Dab the potato in the paint and begin stamping!

    Homemade Cards:

    1. We did the potato stamping first on cream-coloured paper, then let it dry for 30 minutes.

    2. I then cut 1 page of card stock paper in half for making 2 cards (8.5″x11″ paper size), and folded those in half.

    3. We then cut and trimmed the potato stamped art, and glued it to a red-coloured paper background.

    4. Lastly we glued the red paper to the front of the prepared white cardstock cards. We kept it simple due to time and somewhat limited focus for the kiddos, but at this point you can decorate and inscribe as desired!

    6. Enclose with one of these simple white envelopes that fit perfectly!

    Made this Craft?

    I’d LOVE to see your results!! Feel free to post to your social media account and tag Northbird using one of the links below or post in the comments!

    Hi, I’m Jessie!

    I’m a Wife and Homeschooling Mom living in a remote town in Northern Ontario, Canada. I love making wholesome meals for my family from scratch, homeschooling our girls and learning more about natural living.

    Read more about my story HERE.

    Subscribe to Northbird’s email list to get weekly posts on: tasty recipes, activity ideas for kids, natural living tips, and some genuine mom thoughts and encouragement!

    Creative Potato Stamping Art for Kids

    • Difficulty: Easy
    • Print


    By Jessica Burman © 2025 The Northbird Blog http://www.thenorthbirdblog.com

    Supplies Needed:

  • Potatoes (large enough to cut in half and fit a cookie cutter into it)
  • Cookie cutters (For Valentine Cards we used heart shaped ones)
  • Paring Knife
  • Paint (for smaller kids I would use non-toxic paint, but acrylic paint works better in my opinion)
  • Paper Plate or other disposable etc for putting paint on
  • Glue sticks
  • Scissors
  • Cardstock paper
  • Coloured Paper
  • Envelopes

  • Directions:

    1. Wash potatoes and lightly dry the outside. Cut in half at thickest point. Pat dry the inside.
    2. Press cookie cutter into the white flesh, then cut down the sides of the cookie cutter (see picture). Remove the cookie cutter once shape is achieved.
    3. Squirt paint onto paper plate. Dab the potato in the paint and begin stamping!

    Homemade Cards:

    1. We did the potato stamping first on cream-coloured paper, then let it dry for 30 minutes.

    2. I then cut 1 page of card stock paper in half for making 2 cards (8.5″x11″ paper size), and folded those in half.

    3. We then cut and trimmed the potato stamped art, and glued it to a red-coloured paper background.

    4. Lastly we glued the red paper to the front of the prepared white cardstock cards. We kept it simple due to time and somewhat limited focus for the kiddos, but at this point you can decorate and inscribe as desired!

    6. Enclose with one of these simple white envelopes that fit perfectly!

    Return to Top

    Birdwatching Binocular Craft with Bird Survey Printables

    Find Northbird on social media:

    This post contains affiliate links. As an Amazon associate, I earn from qualifying purchases. This means that I make a small commission at no extra cost to you. You can read my full disclosure HERE.

    Jump to Binocular Activity Card

    Return to “Homeschooling Activities & Resources”

    Return to “Discovering Birds”

    Birds: A Natural Homeschooling Inquiry…

    Learning about birds in our homeschool studies is one of the easiest topics to investigate in my opinion, simply because it is on-going, and the kid’s curiosity is spring boarded from seeing “who” comes to our bird feeders!

    This is such a natural discovery process that leaps into questions of:

    “Where do the birds go when it is raining or snowing?”

    “What do birds eat when we forget to fill up the bird feeder?”

    “Why are the birds chasing each other in the sky?”

    Even though questions from these little treasures may be nearly constant some days, I am learning to pray for patience and view them as a golden opportunity for the kids to learn.

    A “Whisky Jack”/”Canada Jay”,
    Moose River area, Northern Ontario

    Honestly, there are so many days that we have dropped the math or language arts lessons to simply go stare out the window for several minutes to watch the various feathered creatures fly around, eat at our feeders, scratch for worms and bugs, or pick up grass for their nests.

    There is always something to learn from watching birds, even if it is to realize our need to sit still, and step away from whatever business is in our lives while we quietly observe these beautiful creatures. Birdwatching is so calming, both for myself and also my very busy children!

    I love how one can almost hear a pin drop if they are watching the birds from our window. They have learned to be as quiet as they can and not move so the birds don’t get spooked!

    A downy woodpecker hanging on to have a snack.

    One of our favourite types of bird feeders is the clear plastic one above  ↑ (The Window Cafe, similar to THIS ONE available on Amazon) that suctions right onto the window glass!

    A “Whisky Jack” eating from one of our homemade bird feeders.

    You can check out THIS POST if you are interested in seeing how we made these easy & seedy paper roll bird feeders.

    About this Craft:

    This bird-based inquiry craft is an easy set up, inexpensive, and can be completed as simple or fancy as you like!

    I must give credit to my sister-in-law “L” for first having the idea several years ago and making two quick sets for our toddlers to decorate with stickers when they were having trouble getting along with each other!

    I hope you and your students have fun making this simple fun birding craft!

    Watch and Record!

    Don’t forget to watch and record what types of birds your kids can find using their new birdwatching binoculars!

    You can download this Free Birdwatching Survey Sheet PDF HERE.

    Have a student that loves to record and draw?

    My daughter loves drawing! I created this bird survey tool as a way for her to record and draw the different birds that she finds around our home in Northern Ontario. It will be a great keepsake in years to come.

    This birdy resource will encourage students to get outside into nature and watch and listen for the many amazing different bird species out there! It is non-specific to any geographical area, and is to be used as an interactive survey tool.

    On each page students can record:

    • The name of the BIRD sighted
    • Date/Time
    • Location of the BIRD
    • Colour and any notable markings of the BIRD
    • Behavior of the BIRD (what was the bird doing?)

    At the bottom of each page there is a framed box where students can DRAW their impression of what the bird looked like, or what it was doing (flying, perching, nesting, etc)

    This PDF file has been designed to be easily printed, folded and stapled together, making it an easy handout to either print and make ahead of time for younger students, or have the older students assemble it themselves!

    This Bird Watching Printable Journal is available to purchase and download from my store on Teachers Pay Teachers HERE.

    How to Make Paper Binoculars

    Supplies Needed:

    Decorating suggestions:

    Directions:

    1. If you are using paper towel rolls, first cut them in half. If using toilet paper rolls, make sure they are completely bare!

    2. Cut coloured paper into strips for a background, then wrap around and tape in place.

    3. Cut a different colour of paper into thinner strips and also wrap and tape into place. (*Note: it helps to have all the tape along one side, so that when you staple it together, the tape can be hidden)

    4. Staple together the two rolls where they touch when held together, (tape side in), stapling twice both at the top and bottom.

    5. Use a single hold punch, make a small hole about 1/2 inch below the eye hole top, opposite from the staples (see picture).

    6. Insert string into hole and tie a large knot at the end of the string to hold it in place.

    7. It’s time to begin using the binoculars!

    Made this Craft?

    I’d LOVE to see your results!! Feel free to post to your social media account and tag Northbird using one of the links below or post in the comments!

    Hi, I’m Jessie!

    I’m a Wife and Homeschooling Mom living in a remote town in Northern Ontario, Canada. I love making wholesome meals for my family from scratch, homeschooling our girls and learning more about natural living.

    Read more about my story HERE.

    Subscribe to Northbird’s email list to get weekly posts on: tasty recipes, activity ideas for kids, natural living tips, and some genuine mom thoughts and encouragement!

    Birdwatching Binocular Craft

    This is a fun bird inquiry craft to make at home: Kids can make their own binoculars and decorate them as simple or as decorative as they like!


    By Jessica Burman © 2025 The Northbird Blog http://www.thenorthbirdblog.com

    Supplies Needed:

  • String or Twine
  • Scissors
  • Stapler
  • Tape
  • Single Hole Punch
  • Coloured Paper
  • Inside cardboard roll from toilet paper or paper towel rolls

  • Decorating Ideas:

  • Paint
  • Markers
  • Stickers (These watercolour bird stickers are gorgeous!)
  • Coloured Ribbons
  • Washi Tape
  • Directions:

    1. If you are using paper towel rolls, first cut them in half. If using toilet paper rolls, make sure they are completely bare!
    2. Cut coloured paper into strips for a background, then wrap around and tape in place.
    3. Cut a different colour of paper into thinner strips and also wrap and tape into place. (*Note: it helps to have all the tape along one side, so that when you staple it together, the tape can be hidden)
    4. Staple together the two rolls where they touch when held together, (tape side in), stapling twice both at the top and bottom.
    5. Use a single hold punch, make a small hole about 1/2 inch below the eye hole top, opposite from the staples (see picture).
    6. Insert string into hole and tie a large knot at the end of the string to hold it in place.
    7. It’s time to begin using the binoculars!

    Return to Top

    Homemade Valentine Balloon Cards: Creative Homeschooling Activity for Kids

    Find Northbird on social media:

    This post contains affiliate links. As an Amazon associate, I earn from qualifying purchases. This means that I make a small commission at no extra cost to you. You can read my full disclosure HERE.

    Jump to Printable Activity Card

    Return to “Homeschooling Activities and Resources”

    I love celebrating Valentines Day, and using this opportunity to speak words of encouragement and love into my little girls and husband.

    I recently started reading “The Five Love Languages of Children” by Gary Chapman & Ross Campbell, M.D., and it is just as good as the Love Languages book that was written for adults.

    Every child needs to know that they are loved and valued, and this book focuses on learning how to express that love in a way that your child can understand it in their own unique way. I highly recommend this book as a parenting resource to check out!

    To summarize the Five Love Languages, these are the common ways that each person receives and gives love:

    • Quality Time
    • Words of Affirmation
    • Gifts
    • Acts of Service
    • Physical Touch

    “We believe a child’s need for love is basic to all other needs. Receiving love and learning to give love is the soil out of which all positive human endeavors grow.” -Gary Chapman & Ross Campbell

    Other Love Language books that I love from Gary Chapman:

    Applying this to our Home:

    Since my oldest was about 18 months, I have kept up this tradition for her and my husband as a way of speaking and affirming words of encouragement for them:

    Every day, for the 14 days leading up to Valentines day, I put a heart on their doors with a word that I feel describes part of who they are. I always end on the 14th day with a red heart saying: “You Are Loved”.

    This particular year, we joined an online Homeschooling Valentine exchange group on facebook to make and sends cards to other homeschooling students all over Canada. The idea was to incorporate a little geography learning of our country for my 5-year-old, and also understanding more about the postal system.

    The result: my particular online group had 30+ students that we needed to make cards for! (Honestly, a little mind boggling in addition to the other valentine cards for family and friends that we were ALREADY going to make!)

    So the girls and I decided to create something that would be relatively simple, yet creative, customizable, and could easily be in a flat envelope (not a bulky card, and less expensive to post).

    I also wanted to make something that my youngest (not yet 2) could participate in (and for it to look somewhat still pleasing to the eye!).

    I have included here the free template that the girls and I used to paint and cut out for the cards, as you’ll see more in the directions below on how to use this template.

    I hope your kids have fun with this creative activity as much as mine did!

    How to Make Valentine Balloon Cards:

    Supplies Needed:

    Directions:

    1. Print and paint on heart template.

    2. When paint has dried, cut out painted hearts.

    3. Cut 1 page of card stock paper in half for two cards, and pre-cut string for balloon hearts and bow.

    4. Tie string at one end with ends amounting to number of “balloons” you wish to use on the front of card. Glue all and write on front of card if desired.

    5. Glue remaining hearts on the inside of card and write/decorate as desired.

    6. Enclose with one of these simple white envelopes that fit perfectly!

    Additional Notes: This activity could be easily done with inserting coloured paper into your printer and then print the template form to eliminate the painting step.

    Here are other homemade Valentine Cards we have done in the past:

    Hi, I’m Jessie!

    I’m a Wife and Homeschooling Mom living in a remote town in Northern Ontario, Canada. I love making wholesome meals for my family from scratch, homeschooling our girls and learning more about natural living.

    Read more about my story HERE.

    Subscribe to Northbird’s email list to get weekly posts on: tasty recipes, activity ideas for kids, natural living tips, and some genuine mom thoughts and encouragement!

    Homemade Valentine Balloon Cards

    • Difficulty: Easy
    • Print

    A sweet little homemade valentine card that the girls and I designed. Directions and a free template included!


    This activity could be easily done with inserting coloured paper into your printer and then print the template form to eliminate the painting step.


    Directions:

    1. Print and paint on heart template.
    2. When paint has dried, cut out painted hearts.
    3. Cut 1 page of card stock paper in half for two cards, and pre-cut string for balloon hearts and bow.
    4. Tie string at one end with ends amounting to number of “balloons” you wish to use on the front of card. Glue all and write on front of card if desired.
    5. Glue remaining hearts on the inside of card and write/decorate as desired.

    Return to Top