Ocean Pelagic Zone Booklet: A Fun Learning Resource for Students

Find Northbird on social media:

Return to “Homeschooling Activities & Resources”

Return to “Ocean Life”

Designing This Mini Pelagic Zone Booklet:

This project was fun to create! I wanted to make a little flip-book that showed the depth of the ocean layers through shades of colours. This simple book illustrates how the deeper the layers go in distance from the sun, the darker it gets from increasing lack of sunlight.

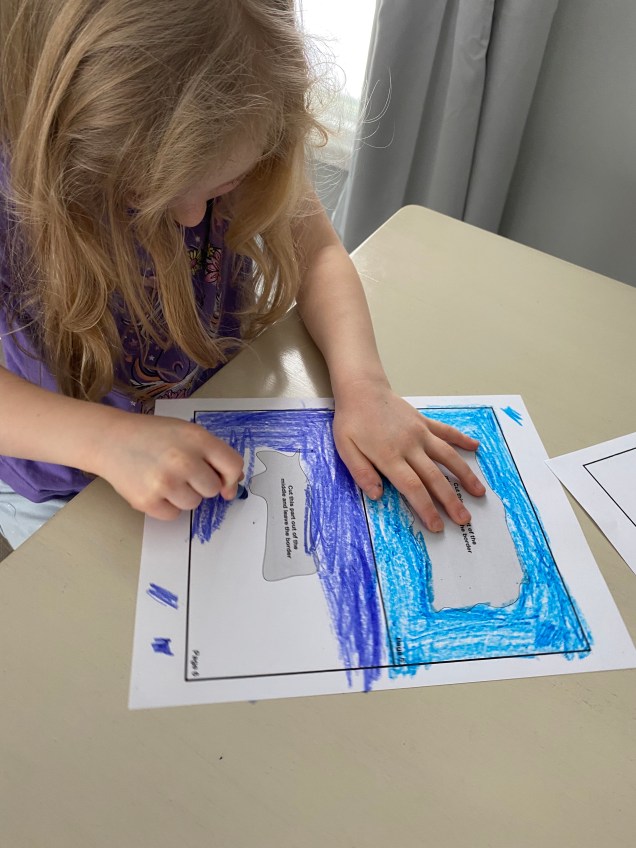
My daughter enjoyed this activity as she got to go through our crayon box and pull out every possible shade of blue, purple, grey and lastly black. She then lined them up and selected 6 shades to use in her little flip book.

After some technical educating on my part for how to develop this resource, I discovered how much I enjoy creating digital educational files and have since then updated and redesigned this product to be able to offer it as a digital purchase.

What Is This Resource Used For?

This is a fun, hands-on resource for kids to learn about the amazing layers of the ocean, also known as the “Pelagic Zones”! Great to use alongside any ocean studies!

What are the “Pelagic Zones?”

The pelagic zones, or layers of the oceans are split up into 6 areas, ranging from the most shallow intertidal zone near the sunny surface, to the deepest and darkest depths of the hadalpelagic trenches.

  • Intertidal Zone
  • Epipelagic Zone (Sunlight Zone)
  • Mesopelagic Zone (Twilight Zone)
  • Bathypelagic Zone (Midnight Zone)
  • Abyssopelagic Zone (The Abyss)
  • Hadalpelagic Zone (The Trench)

Showing (1) completed booklet, with 5 pages of B&W booklet template, and the B&W Info cards.

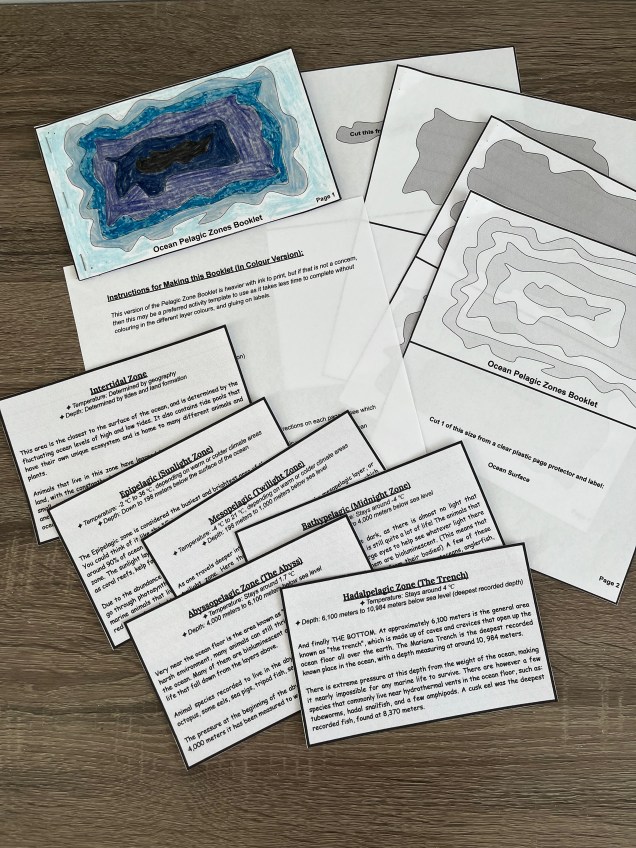
What is Included in this Digital Package? (Total 17 Pages)

  • Ocean Pelagic Zones Booklet (Colour Version) & Instructions
  • Ocean Pelagic Zones Booklet (Black and White Version) & Instructions
  • Pelagic Zone Info Cards (Colour Version)
  • Pelagic Zone Info Cards (Black and White Version)
  • Terms of Use

**Please Note that this is a DIGITAL FILE. There is no physical product from this purchase. After purchasing, there is a link that is automatically sent to your email where you can access your new file.

The Pelagic Zone Booklet:

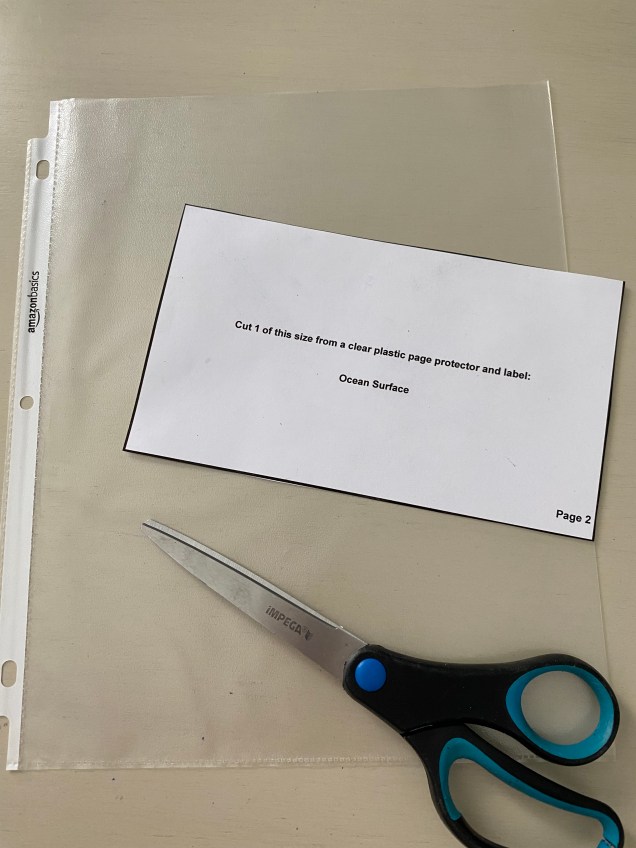
Kids can use either one of the booklet template versions to cut and staple together their own mini pelagic zone books. Both the B&W and the Colour version were designed to insert a transparent page protector cut to represent the ocean’s surface. (This is of course optional, but my daughter and I thought it was a cool part of the activity!)

Showing my daughter’s completed booklet cover with the B&W booklet template

The black and white version has the extra steps of colouring or painting the different layers and then gluing on the different layer’s labels. This version is printer-friendly, and has detailed instructions on how to complete the booklet.

The In-colour version booklet template

The in-colour version may be heavier on ink usage, but the added step of colouring or painting the layers is already done, and the labels are already included, which enables this project to be completed in less time. The pelagic layer colours also coordinate with the coloured version of the pelagic zone info cards.

The finished product size is approximately 7.5″ x 4.5″.

Supplies Needed for this Activity:

  • Scissors
  • Gluestick (**not required for the in-colour version)
  • PDF template printed (pages 1-4, instructions are page 5) **I recommend printing on white cardstock if you are painting in the coloured layers)
  • Plastic page protector (cut in half if size is 8.5″x11″, use template for sizing)
  • 6 Different Crayon or Marker shades of blue, navy blue, purple and black. (You could also paint if you prefer!) (** Not required for the in-colour version)


Pelagic Zone Info Cards:

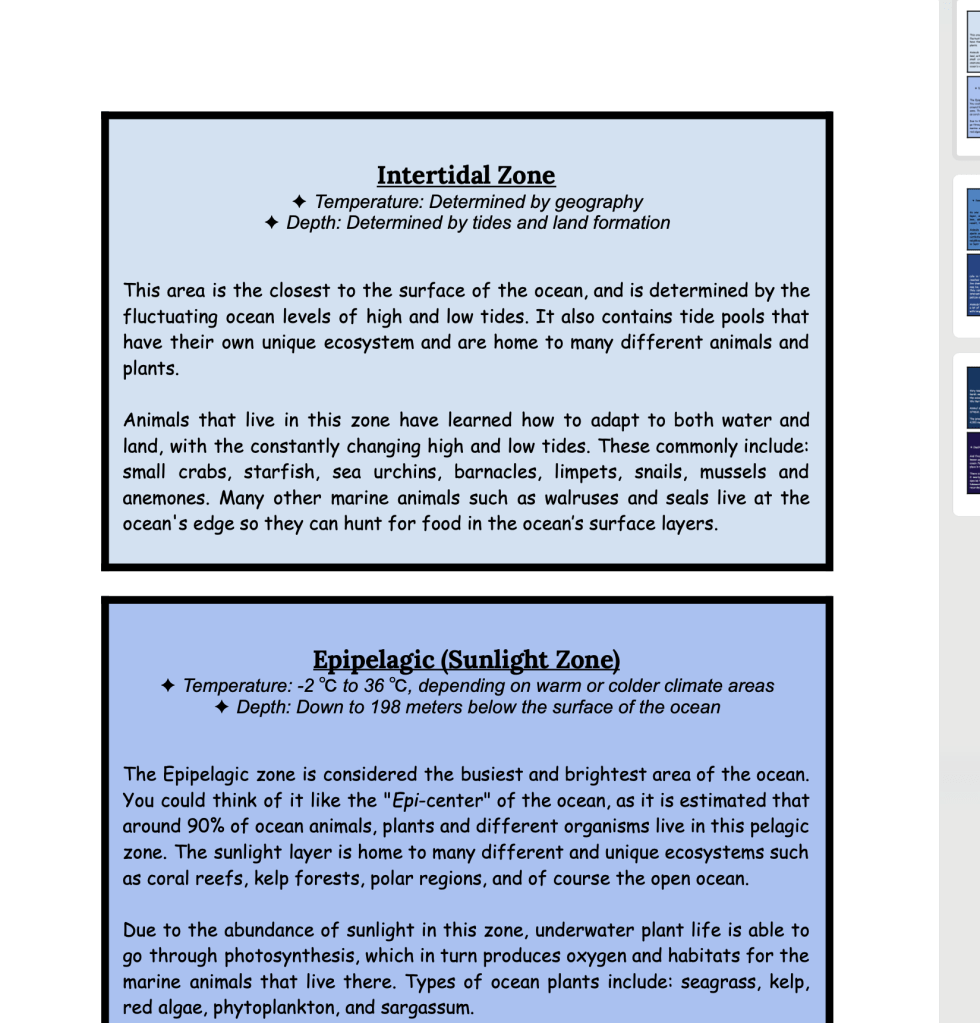
Each of the Pelagic Zone Info Cards relates to a layer of the ocean and has details included of the following:

  • Approximate recorded depth
  • Average recorded temperature for that zone
  • Plant life or unique habitats to that zone
  • Marine animals
  • Other known facts related to that zone

The black and white version is of course printer friendly, and the in-colour version uses the same ocean layer colours as the coloured pelagic booklet template! So if using lots of coloured ink is not an issue then this is a great option!

Thank you for your interest in this product!

** This is a DIGITAL FILE. There is no physical product from this purchase. After purchasing, there is a link that is automatically sent to your email where you can access your new file.

Hi, I’m Jessie!

I’m a Wife and Homeschooling Mom living in a remote town in Northern Ontario, Canada. I love making wholesome meals for my family from scratch, homeschooling our girls and learning more about natural living.

Read more about my story HERE.

Subscribe to Northbird’s email list to get weekly posts on: tasty recipes, activity ideas for kids, natural living tips, and some genuine mom thoughts and encouragement!

Return to Top

This post may contain affiliate links. As an Amazon associate, I earn from qualifying purchases. This means that I make a small commission at no extra cost to you. You can read my full disclosure HERE.

Exploring Salt Water Density: Homeschooling Egg Experiment

Find Northbird on social media:

This post contains affiliate links. As an Amazon associate, I earn from qualifying purchases. This means that I make a small commission at no extra cost to you. You can read my full disclosure HERE.

Jump to Printable Activity Card

Jump to Video

Return to “Homeschooling Activities & Resources”

Return to “Ocean Life”

What is density?

Why do some things float in water and others sink? It all comes down to density.

Density is the measurement of how compact an item is. If an item generally feels heavy, then it has high density, and if an item feels light then it has low density.

For example, a rock has high density and will sink when you throw it in the water. But if you throw a dry stick in the water, it will float because the particles that make it up are more spread apart, and it is less dense than the water.

We did a little experiment at home to test the buoyancy of an egg when first submerged in water, then sugar water, then lastly in salted water. This was to test the different levels of density in each of these water glasses, and compare it to the egg’s own density.

This was my oldest’s first time learning about density and salinity. She was quite baffled that we were actually able to make the egg float!

(My toddler’s favourite part was watching the glasses be stirred and the sugar and salt getting dissolved!)

Check out the directions below to do this yourself at home!

Here’s a short video of the process and the kid’s delight in seeing the egg bobbing in the glass!

Egg Density Experiment:

Supplies Needed:

Directions:

  1. Fill the 3 glasses with equal amounts of cold water.
  2. Label each glass: 1-Control, 2-Salt, 3-Sugar.

3. Put 8 Tablespoons of table salt in the “Salt” glass and stir well until dissolved.

4. Put 8 Tablespoons of granulated sugar in the “Sugar” glass and stir well until dissolved.

5. Ask the kids what they think will happen. They can write their “hypothesis” in the attached PDF printable at this point.

6. Place egg carefully in the “Control” glass (you might want to use the spoon to lower it in…!)

7. Then put egg in the “Sugar” glass, followed by the “Salt” glass, and see the results! If easier, use two eggs for these glasses to compare the egg’s buoyancy.

8. Document your findings and compare your results to the hypothesis made earlier. See if you guessed right or were surprised!

Our Findings:

We discovered that in the “Control” glass of water, the egg was more dense than the water, so it sank.

The “Sugar” glass of water was more dense than the “Control” water, but not more dense than the egg, so the egg lifted a bit in the water but didn’t float on the surface.

The “Salt” glass of water had the highest density. We discovered that when the egg was put in it, it floated on the water’s surface. This showed that the egg had a lower density than the salted water.

Educational Videos

“Why is it called “Dead Sea”? Why does everyone float in this sea?” by Science ABC

This is a very detailed thorough video about the density of salt in the Dead Sea (Israel). They discuss why people can effortlessly float in it, and how there is such a high amount of salt in that particular body of water. This video is definitely geared toward older kids (my 6 year old’s eyes sort of “glazed over” after a few minutes in!)

“Why is the Ocean Salty?” by Mystery Science

This video is well done and designed to engage younger grades. It is full of questions that younger kids ask (at least ones that my oldest has asked me and I had no idea the answer to!).

I love how there is also a part where they recommend pausing the video to discuss with the kids “Why do you think the ocean is salty but lakes and rivers aren’t?”

Sink or Float?” by SciShow Kids

This cute video discusses the topic of density and how the density of different items compare with the density of water. There is a simple experiment that you can do at home alongside the video so that younger kids can test this concept out for themselves. The conclusion of the study is communicated clearly, making it easy for younger kids to understand the concept of density.

Other posts on Ocean Life:

Hi, I’m Jessie!

I’m a Wife and Homeschooling Mom living in a remote town in Northern Ontario, Canada. I love making wholesome meals for my family from scratch, homeschooling our girls and learning more about natural living.

Read more about my story HERE.

Subscribe to Northbird’s email list to get weekly posts on: tasty recipes, activity ideas for kids, natural living tips, and some genuine mom thoughts and encouragement!

Exploring Salt Water Density: Homeschooling Egg Experiment


Supplies Needed

  • 3 tall glasses
  • 6 Tablespoons of table salt
  • 6 Tablespoons of granulated sugar
  • An egg
  • A spoon
  • Label & marker
  • PDF printed experiment page

  • Directions

    1. Fill the 3 glasses with equal amounts of cold water.
    2. Label each glass: 1-Control, 2-Salt, 3-Sugar.
    3. Put 8 Tablespoons of table salt in the “Salt” glass and stir well until dissolved.
    4. Put 8 Tablespoons of granulated sugar in the “Sugar” glass and stir well until dissolved.
    5. Ask the kids what they think will happen. They can write their “hypothesis” in the attached PDF printable at this point.
    6. Place egg carefully in the “Control” glass (you might want to use the spoon to lower it in…!)
    7. Then put egg in the “Sugar” glass, followed by the “Salt” glass, and see the results! If easier, use two eggs for these glasses to compare the egg’s buoyancy.
    8. Document your findings and compare your results to the hypothesis made earlier. See if you guessed right or were surprised!

    Return to Top