This post contains affiliate links. As an Amazon associate, I earn from qualifying purchases. This means that I make a small commission at no extra cost to you. You can read my full disclosureHERE.
We love this time of year! Lots of beautiful fall colours, it’s sweater weather, and it’s time to harvest what is left in the garden.
(Now, this year is a bit of an exception as there wasn’t much of a garden to speak about!) But other years at my parent’s house there has been much fun in discovering all the pumpkins and squash that have been hiding all summer, and bringing them inside to store for the next several months.
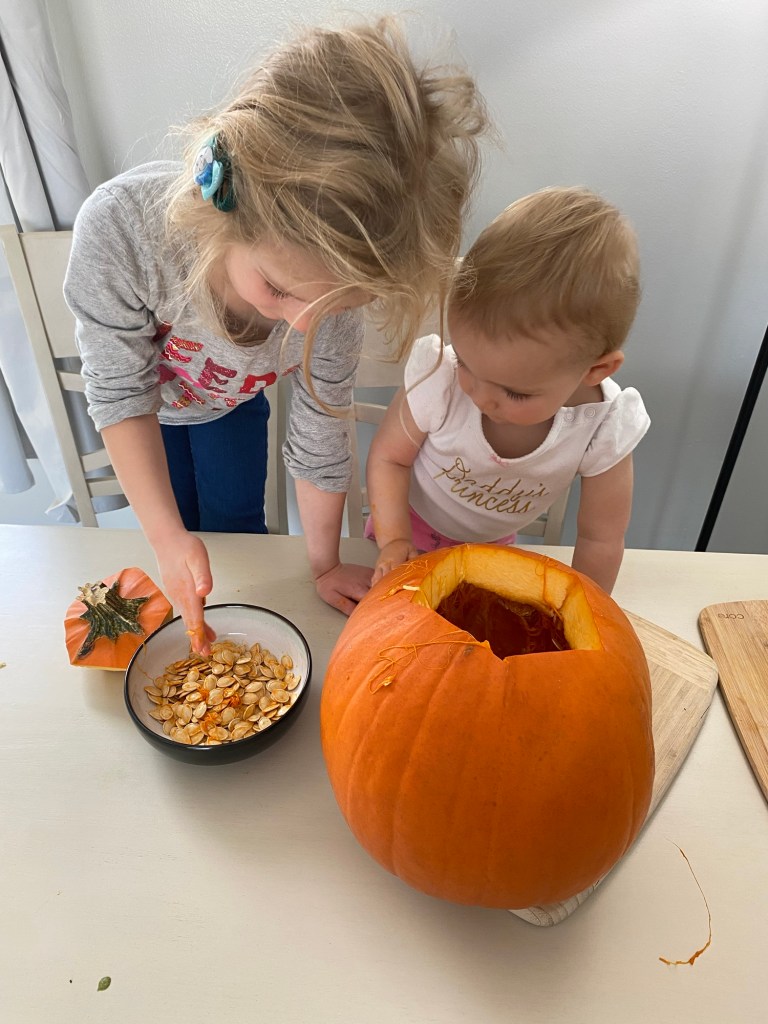
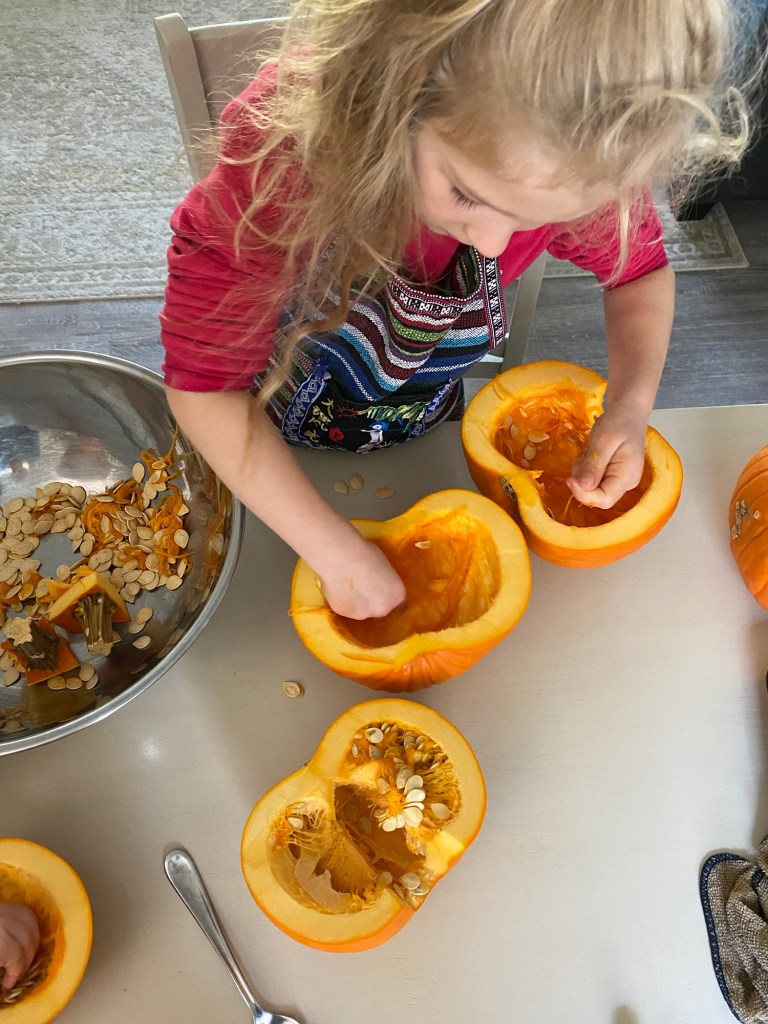
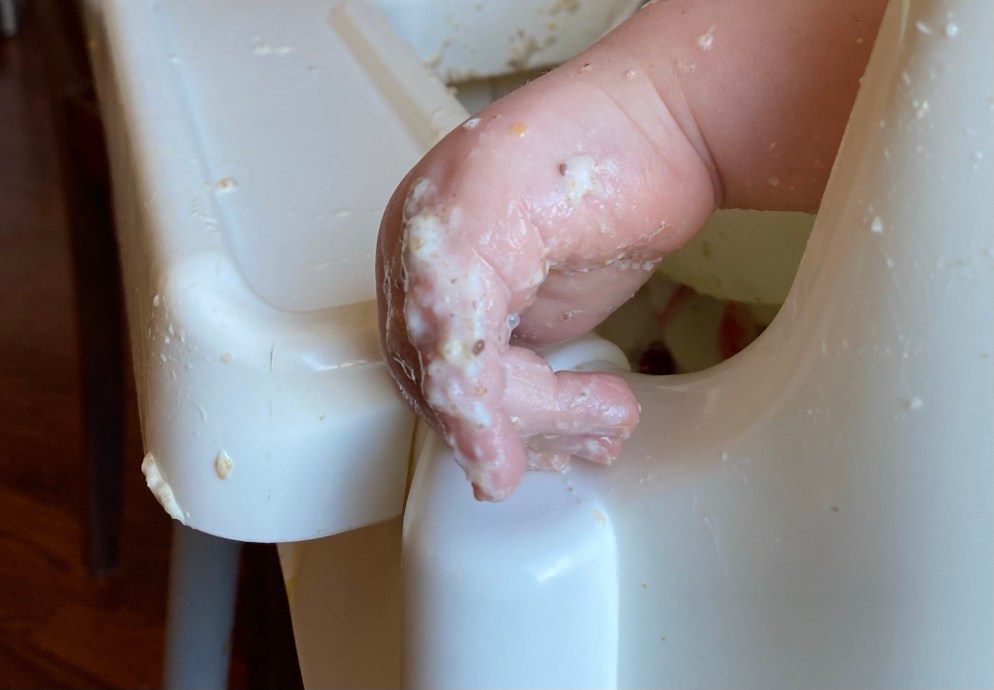
We particularly love cutting up and cooking pumpkins to turn into homemade pumpkin puree. It’s a great activity for the kids to help with, working on their fine motor skills and scooping out all the gooey seeds!
Ways to use Pumpkins and Pumpkin Puree:
There are so SO many ways of using this tasty fall vegetable besides carving it up and putting it on your doorstep for decoration!
Here are a few of my favourites plus a few more fun ideas:
Sweet
Savoury
Pumpkin Pie
Pumpkin Seed Wheat Bread
Pumpkin Muffins
Pumpkin Crackers
Pumpkin Energy Balls
Pumpkin Egg Noodles & Other Pastas
Pumpkin Chocolate Squares
Pumpkin Hummus & Veggie Dips
Pumpkin Sweet Bread
Pumpkin Soup Variations
Pumpkin Cookies
Pumpkin Casserole
Pumpkin Spiced Latte & Other drinks
Stuffed Pumpkin Dishes
Pumpkin Pancakes & Waffles
Fried Pumpkin Fritters
Does the Size of Pumpkin Matter?
Honestly, the size only matters for what you plan on using the puree for. The smaller pumpkins will typically be sweeter, and the larger ones will just be a bit more watery.
Smaller pumpkins, such as “pie pumpkins” are usually used for (obviously!) pies! They are sweeter, and have a more distinct taste, making them ideal for baked goodies and treats.
The larger pumpkins are not usually used for pies and baking due to their slightly more dulled taste because they have a higher water content. This of course doesn’t mean that they can’t be used in baking and cooking, it’s purely a matter of preference.
What can you do with the Pumpkin Seeds?
Here are 3 ways that we use leftover pumpkin seeds:
Seed Saving for planting the following year (s).
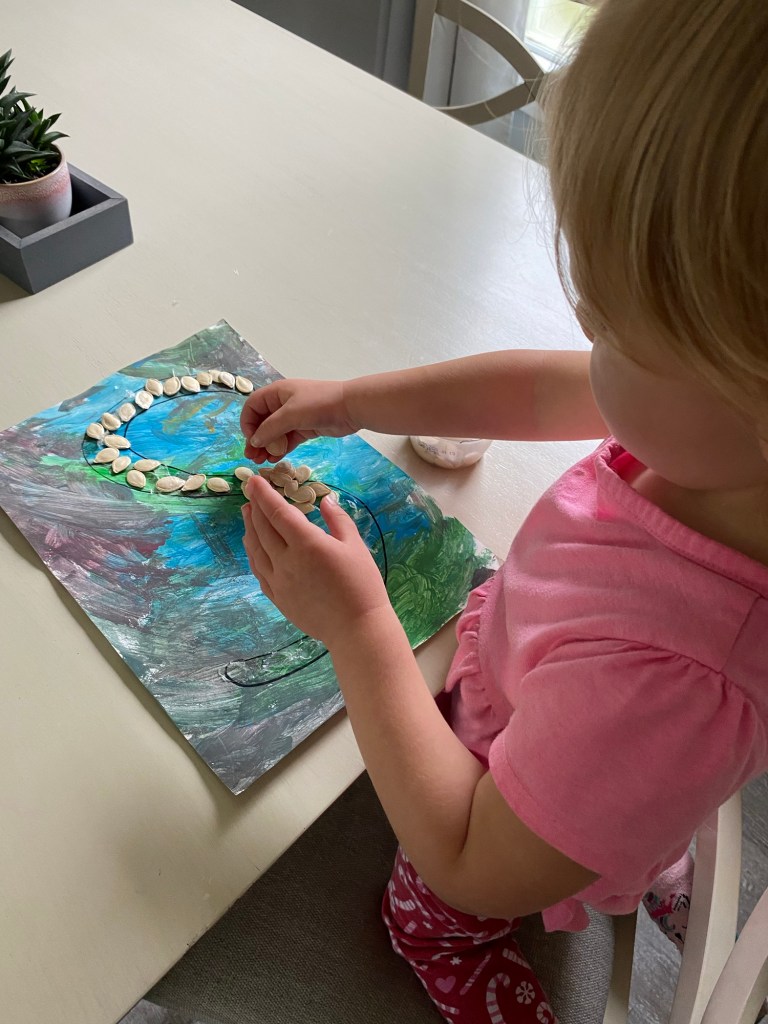
Dry the seeds to use in crafts or educational activities.
Roast and eat them in so many different ways!
Saving Pumpkin Seeds for Planting:
Clean seeds in a bowl of water and separate out any pulp or broken seeds. Select the biggest and best seeds to save.
Drain off as much water as possible and pat the seeds as fry as you can.
Put seeds on parchment paper to continue drying for several days.
Put in a paper envelope and label.
If you are using the seeds the following planting season, you can store it in a cool, dry pantry. If you want the germination of the seeds to last for many years, put in the freezer.
Note: If it’s an heirloom pumpkin then it is definitely nice to save some seeds for future planting. If it’s a hybrid-grown pumpkin then you may not get much produce from planting the seeds, and anything grown would likely be less hardy and more vulnerable to diseases.
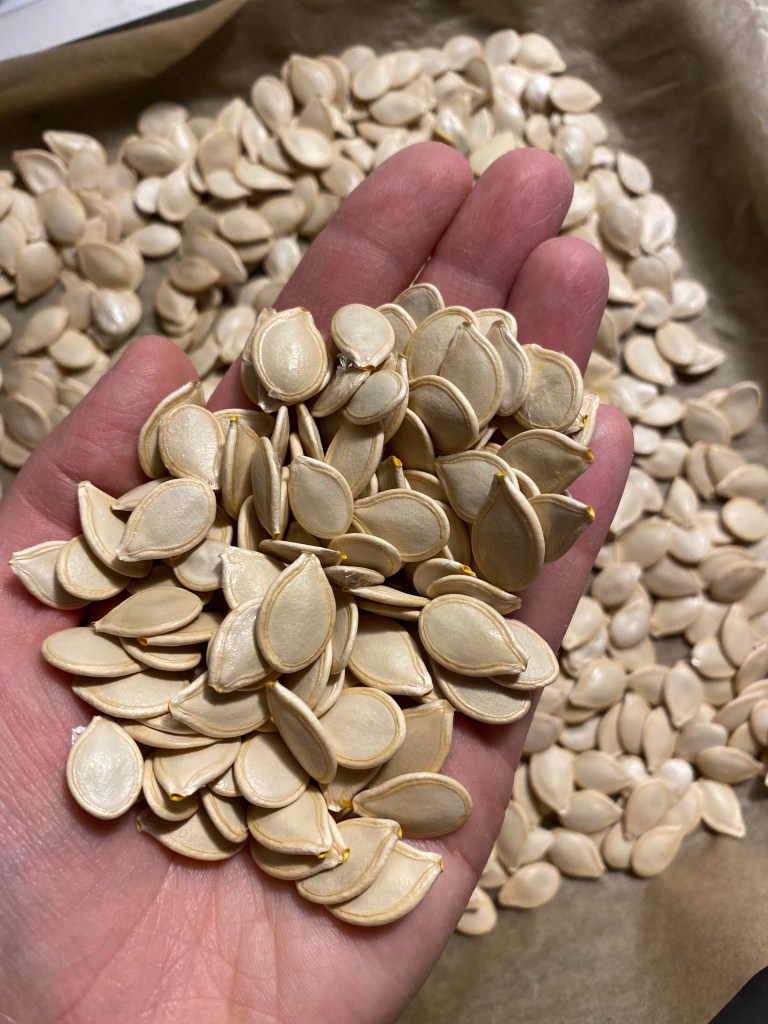
Dry the Seeds for Crafts & Activities:
1. Clean seeds in a bowl of water and separate out any pulp from them.
2. Drain off as much water as possible and pat the seeds as dry as you can.
3. Put seeds on parchment paper to continue drying for several days.
4. Store the seeds in a paper envelope.
Eating Pumpkin Seeds:
The seeds are delicious to use in so many ways!
Enjoy as a salty snack
Add to a trail mix with other seeds, nuts and dried fruits
As a salad topping
As a pumpkin or squash soup garnish
Make your own pumpkin seed crackers
Baked into bread
Put in a smoothie
Mix into a nutritious breakfast bowl
How to Roast Pumpkin Seeds:
1. Wash the seeds and separate from the pulp.
2. Mix in a small bowl with olive oil or (my favourite) Avocado oil. Add sprinklings of salt, pepper and also a dash of paprika.
3. Spread in single layer on parchment paper.
4. Broil on low for about 5 minutes, or until crispy (every oven is different!)
5. Store in an airtight container at room temperature for up to one week.
Here’s a simple video of one of the times we recently cut up some pie pumpkins.
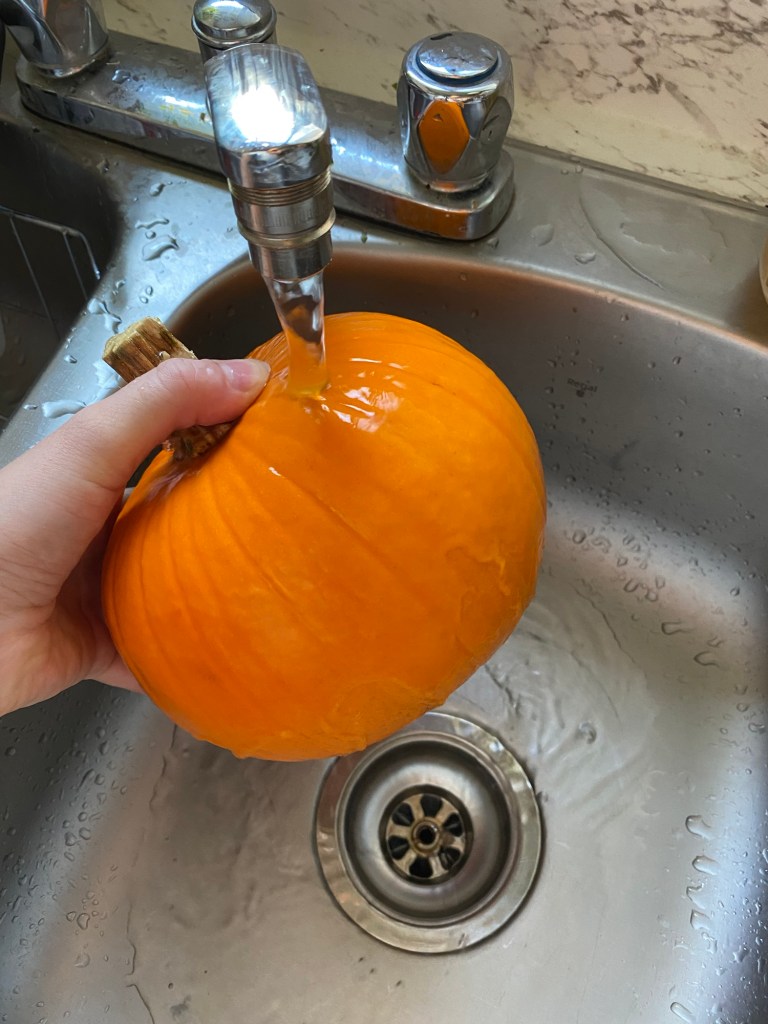
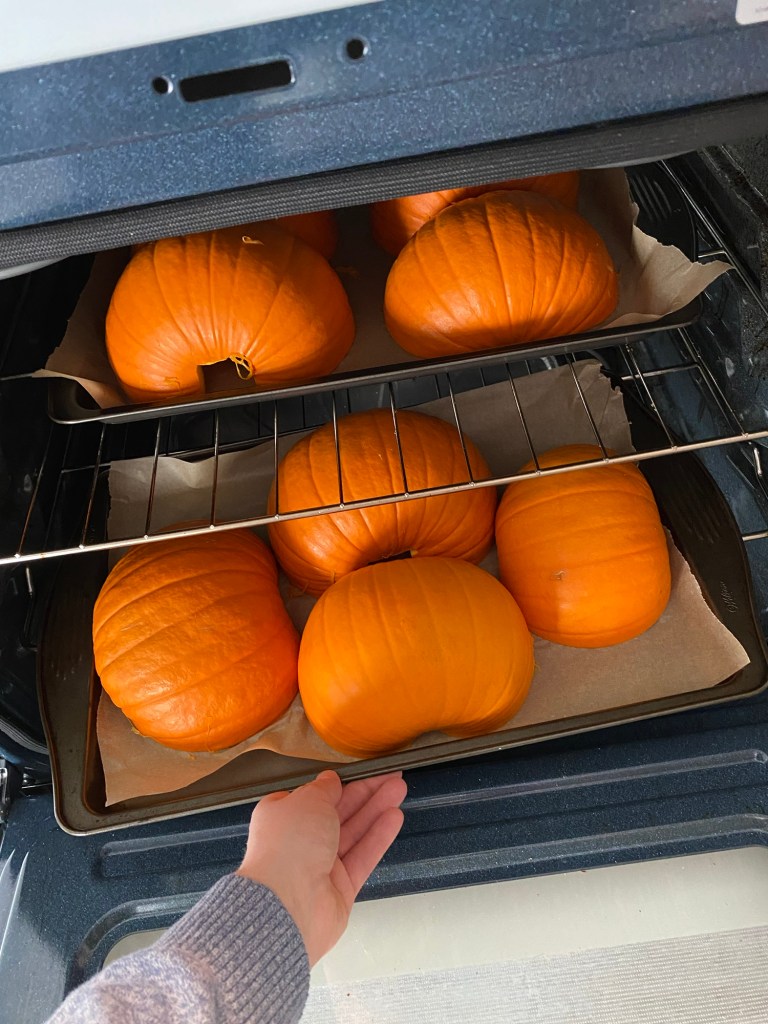
2. Wash the outside of the pumpkins to remove any dirt.
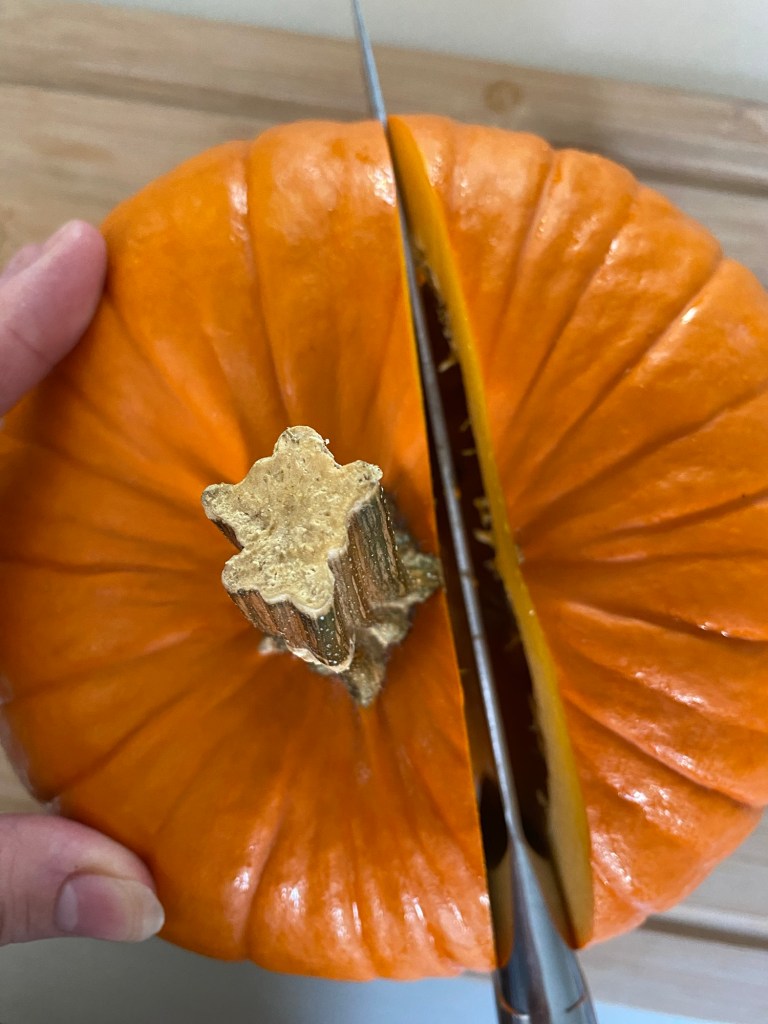
3. If it is a small pumpkin, simply cut in half next to the stem and cut through into two halves. Cut off the stem and blossom end. If it is a larger pumpkin, cut around the stem part of the pumpkin in a circle and lift it out. Cut off the blossom ends as well.
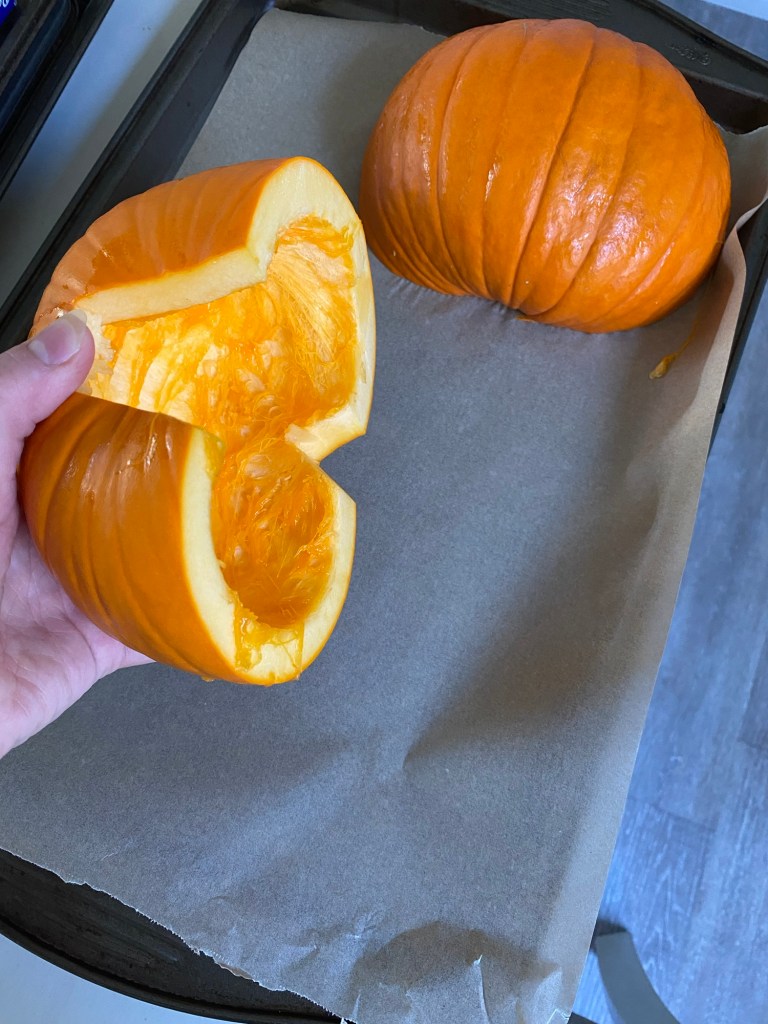
4. Scoop the seeds out into a bowl **Save these for a tasty snack later!
5. Place pumpkin halves upside down on parchment-lined baking sheets.
6. Bake fat 350 for 45-60 minutes until the pumpkin skin on the outside is soft, lightly browned, and can be easily pierced with a fork. (You will want it soft enough to easily scoop the pumpkin flesh)
7. Let cool completely, turning right side up to cool down faster.
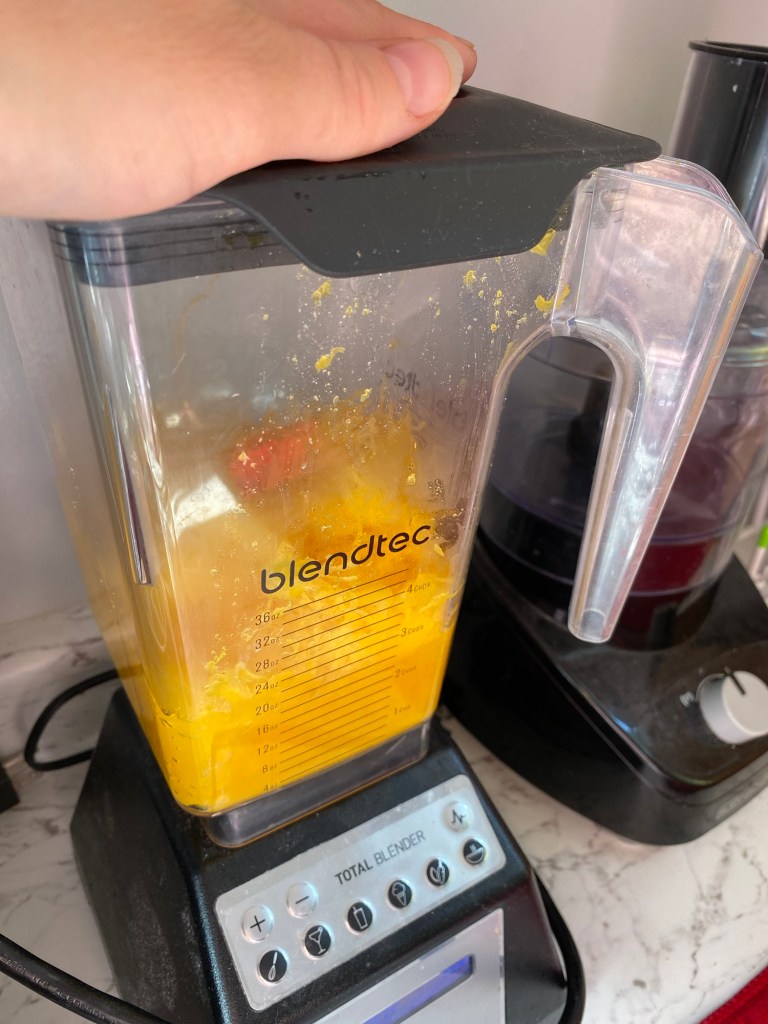
8. Scrape the insides out into a high powered blender and puree until smooth.
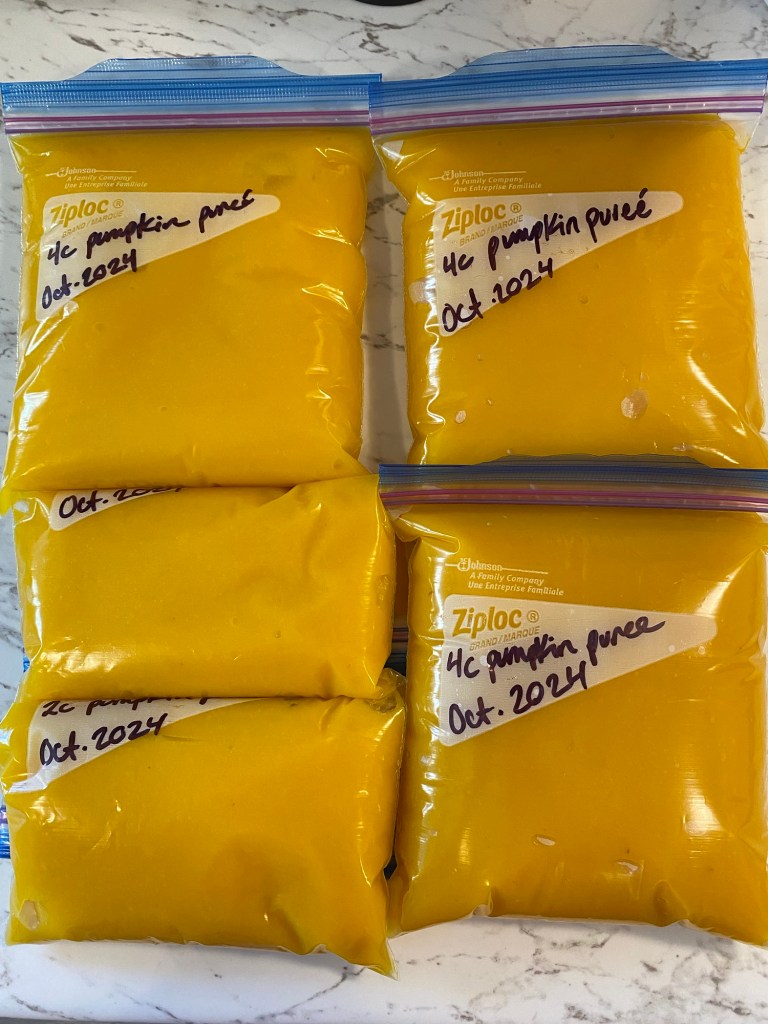
9. Use immediately in desired recipe, or put in a sealed container and store in the fridge for up to one week. You can also put the pumpkin puree in a ziplock bag in the freezer. Best to use within 6 months. (Although I have used some puree that was frozen for much longer than that and still thawed and tasted great!)
10. One small pie pumpkin makes approximately 4 cups of puree.
Hi, I’m Jessie!
I’m a Wife and Homeschooling Mom living in a remote town in Northern Ontario, Canada.I love making wholesome meals for my family from scratch, homeschooling our girls and learning more about natural living.
Subscribe to Northbird’s email list to get weekly posts on: tasty recipes, activity ideas for kids, natural living tips, and some genuine mom thoughts and encouragement!
Make your own pumpkin puree with this easy recipe and then freeze the puree to later make many sweet or savoury pumpkin recipes!
You can use either large or small pumpkins for this recipe. The smaller pumpkins will typically be sweeter, and the larger ones will just be more watery. See ideas above for how to use pumpkins best based on their size.
Wash the outside of the pumpkins to remove any dirt.
If it is a small pumpkin, simply cut in half next to the stem and cut through into two halves.
Scoop the seeds out into a bowl **Save these for a tasty snack later!
Place pumpkin halves upside down on parchment-lined baking sheets.
Bake fat 350 for 40-50 minutes until the pumpkin skin on the outside is soft, lightly browned, and can be easily pierced with a fork.
Let cool completely, turning right side up to cool down faster.
Scrape the insides out into a high powered blender and puree until smooth.
Use immediately in desired recipe, or put in a sealed container and store in the fridge for up to one week. You can also put the pumpkin puree in a ziplock bag in the freezer. Best to use within 6 months.
One small pie pumpkin makes approximately 3-4 cups of puree.
Nutrition
Per 1 cup serving: 34 calories; 0.3 g fat; 8.1 g carbohydrates;
1.1 g protein.
This post contains affiliate links. As an Amazon associate, I earn from qualifying purchases. This means that I make a small commission at no extra cost to you. You can read my full disclosure HERE.
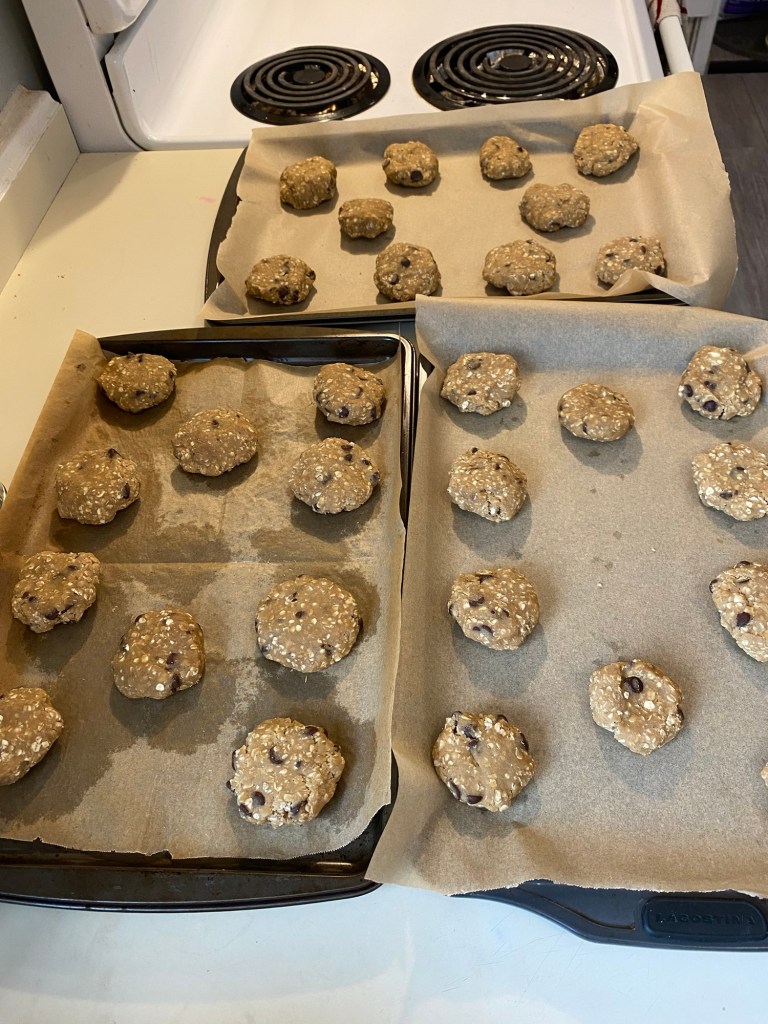
The first time I created this recipe, it sort of happened accidentally…! We were all craving my special Oatmeal Chocolate Chip Cookie recipe that I’ve made probably hundreds of times and altered over the years. But after softening the butter and starting to get ingredients ready, I realized we had NO EGGS!
The past weekend had been very full with baking lots with eggs, making frittata one night for dinner, a homemade egg noodle dish another night, and having eggs in our lunches a few times too! The final lonely egg in the fridge was used in a homeschool science experiment.
(Now, I’m not usually one to run out of ingredients: I LOVE planning and being prepared with meals, making snacks, etc, so this threw me off a little! But honestly, sometimes simply good stuff can happen from situations such as this!)
Soooo…after slightly panicking and wondering if I could turn the ingredients into something else, I remembered hearing at some point that one could use sourdough starter discard as an egg replacement.
PERFECT.
Here is the general equation that I found online and that several seasoned “sourdoughers” agree on:
3 Tablespoons of Sourdough Starter Discard = 1 egg
So if you are a fellow “Sourdough-er” and in an egg emergency like I was, I hope this comes in handy for you!
EDIT: Here is my youngest cookie helper, looking a little grumpy because Mommy had to set her down to finish off the cookies! (It was one of those days where Little Miss wanted to be held ALL DAY. )
Why Sourdough? Here’s a few facts you might not have heard of:
Improves digestion
Sourdough gluten is easier to digest
Lowers chronic disease risks
Promotes healthy aging
Assists in stabilizing blood sugar levels
Helps with weight loss
Lower glycemic index
Has natural preservatives
Contains high levels of protein, fibre and nutrients
Interested in more info about Sourdough Starter? Click HERE
A simple video of making these delicious sourdough cookies!
How to Make Sourdough Starter Oatmeal Chocolate Chip Cookies:
Cream together the softened butter and both sugars.
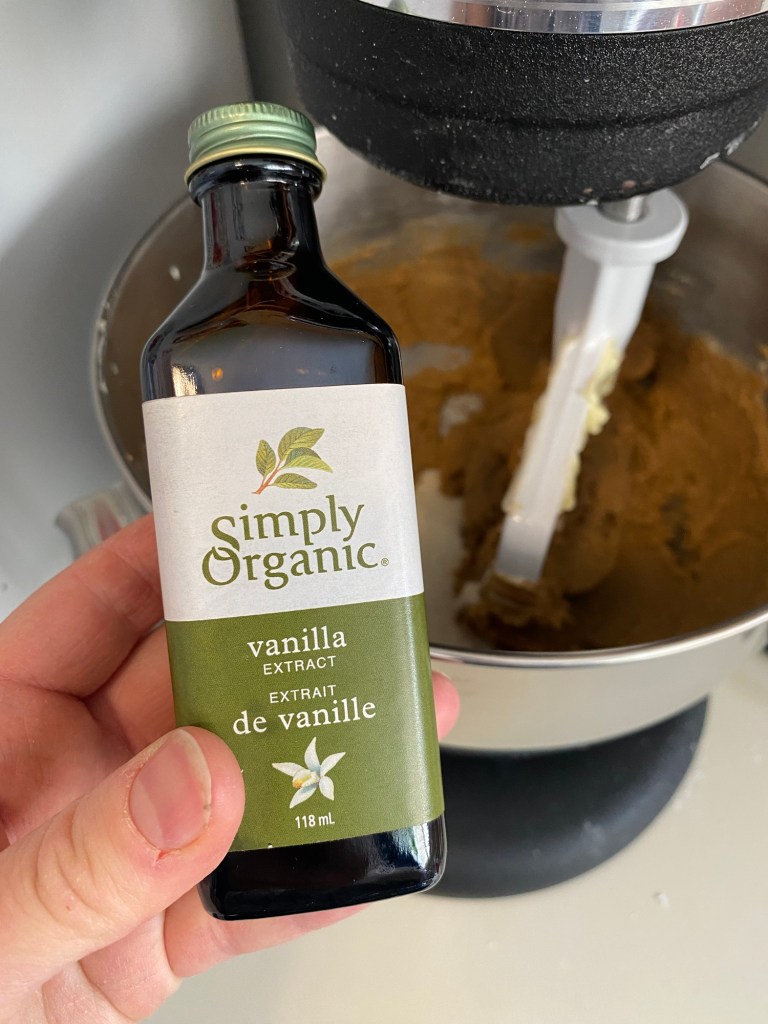
Add the sourdough starter and vanilla and mix until fully combined and smooth.
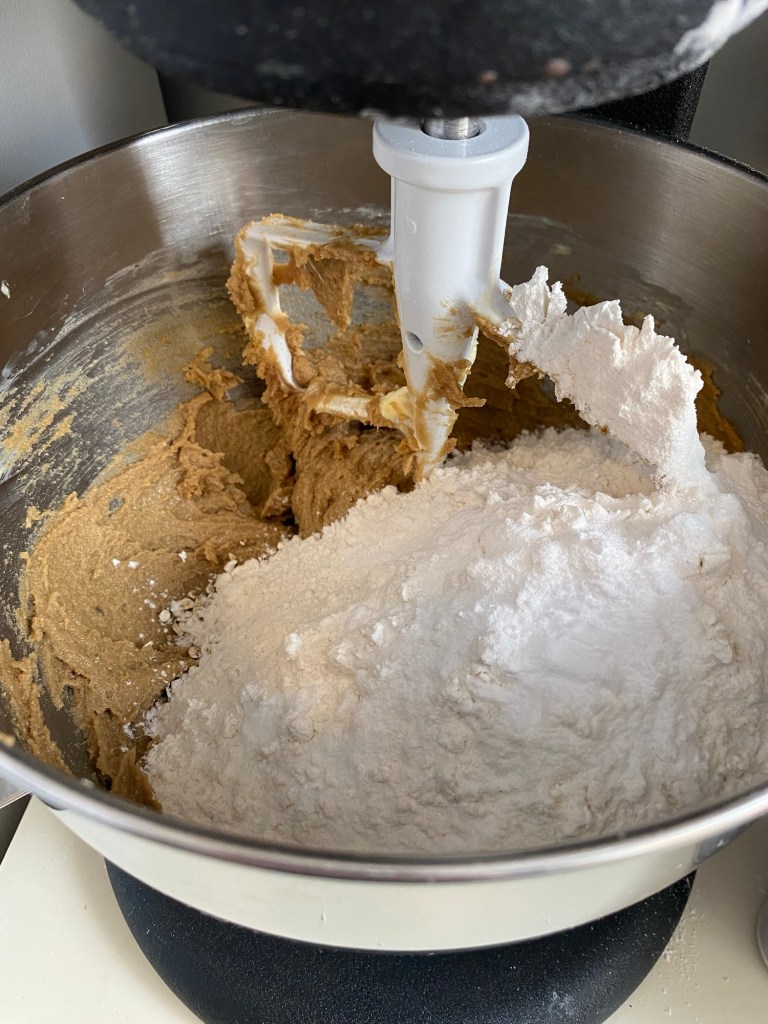
4. Add in the oats, flour, baking powder, baking soda and salt. Stir until all combined.
5. Add in desired amount of chocolate chips and stir until fully combined.
6. Drop by spoonfuls onto parchment lined cookie sheets, and slightly flatten the cookie dough.
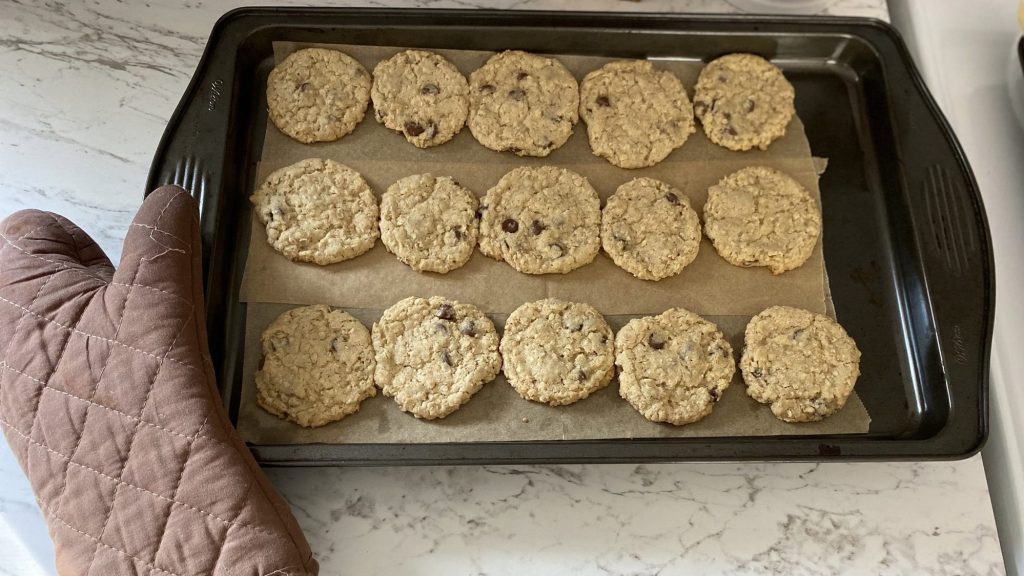
7. Bake 10-12 minutes on middle rack of oven.
8. Cool for 2 minutes on cookie sheets before transferring to a cooling rack.
9. Makes about 3 dozen medium sized cookies.
Note: This cookie dough freezes very well, so if 3 dozen is too much to enjoy all at once, you can simply put the extra dough amount in a sealed plastic container in the freezer until you are ready to bake it off. To thaw, simply put the whole container in a larger bowl of hot water until the dough becomes soft and palpable again.
I like to double this recipe, and then split up the dough into several leftover plastic yogurt containers and put them in the freezer. This makes it simple for baking off smaller batches of cookies without all the time it takes to mix it up!
I’m a Wife and Homeschooling Mom living in a remote town in Northern Ontario, Canada.I love making wholesome meals for my family from scratch, homeschooling our girls and learning more about natural living.
Subscribe to Northbird’s email list to get weekly posts on: tasty recipes, activity ideas for kids, natural living tips, and some genuine mom thoughts and encouragement!
A tasty spin on the classic oatmeal chocolate chip cookie, using sourdough starter discard as an egg replacement. Get your glass of milk ready!
This cookie dough freezes very well, so if 3 dozen is too much to enjoy all at once, you can simply put the extra dough amount in a sealed plastic container in the freezer until you are ready to bake it off. To thaw, simply put the whole container in a larger bowl of hot water until the dough becomes soft and palpable again.
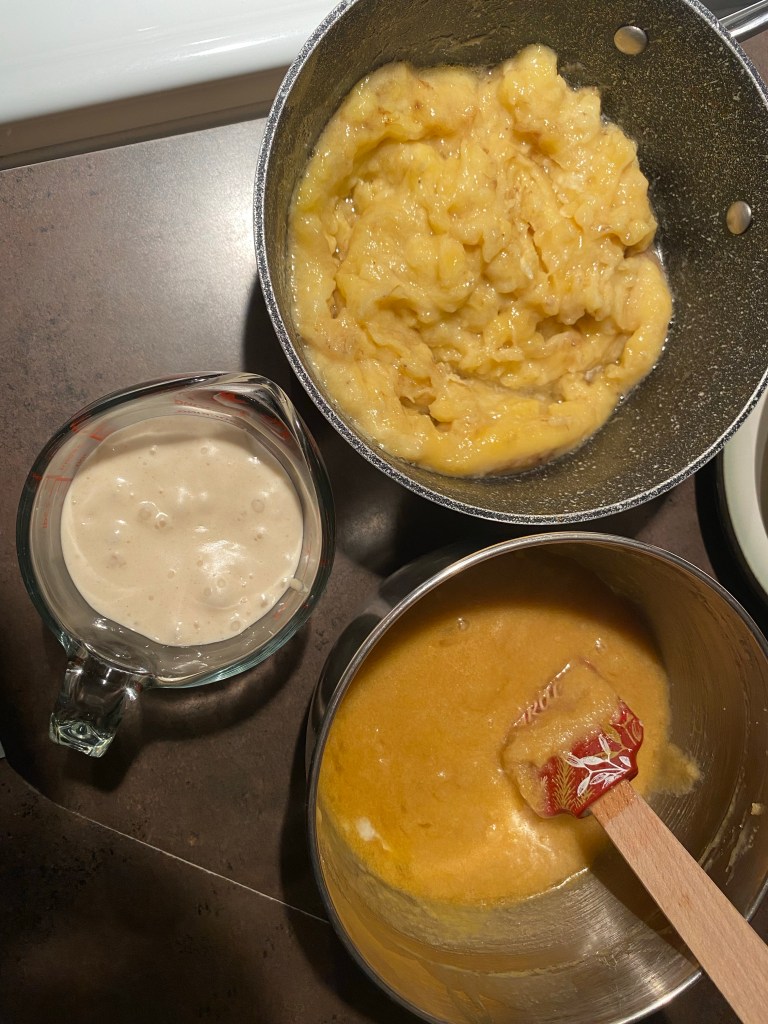
Every once in a while we do a purge and inventory of our freezers, and guess what we find?! Lots and lots of frozen bananas. Sometimes when our food order arrives off the train, the bananas look less than appealing. Especially if they’ve not been packaged properly (slightly squashed) or left in a cold area (slightly frozen). I really dislike wasting food, so as long as the bananas aren’t outright rotten, I’ll usually throw them into one of the freezers to be used later in baking.
This recipe was created from one such time, when we realized we were desperately running out of space in the fridge freezer, and also had an abundance of sourdough discard that I didn’t want to just toss out.
The amount of sourdough discard in this recipe is flexible, based on what you have available. That’s the beauty of muffin recipes: the batter consistency is usually not too different from a sourdough discard consistency, so anywhere up to 1 cup of sourdough discard would blend into this muffin batter quite well in my opinion. I have made it several times with varying amounts of discard and they all turn out great and tasty!
How to Make Banana Chocolate Chip Muffins (Sourdough Discard)
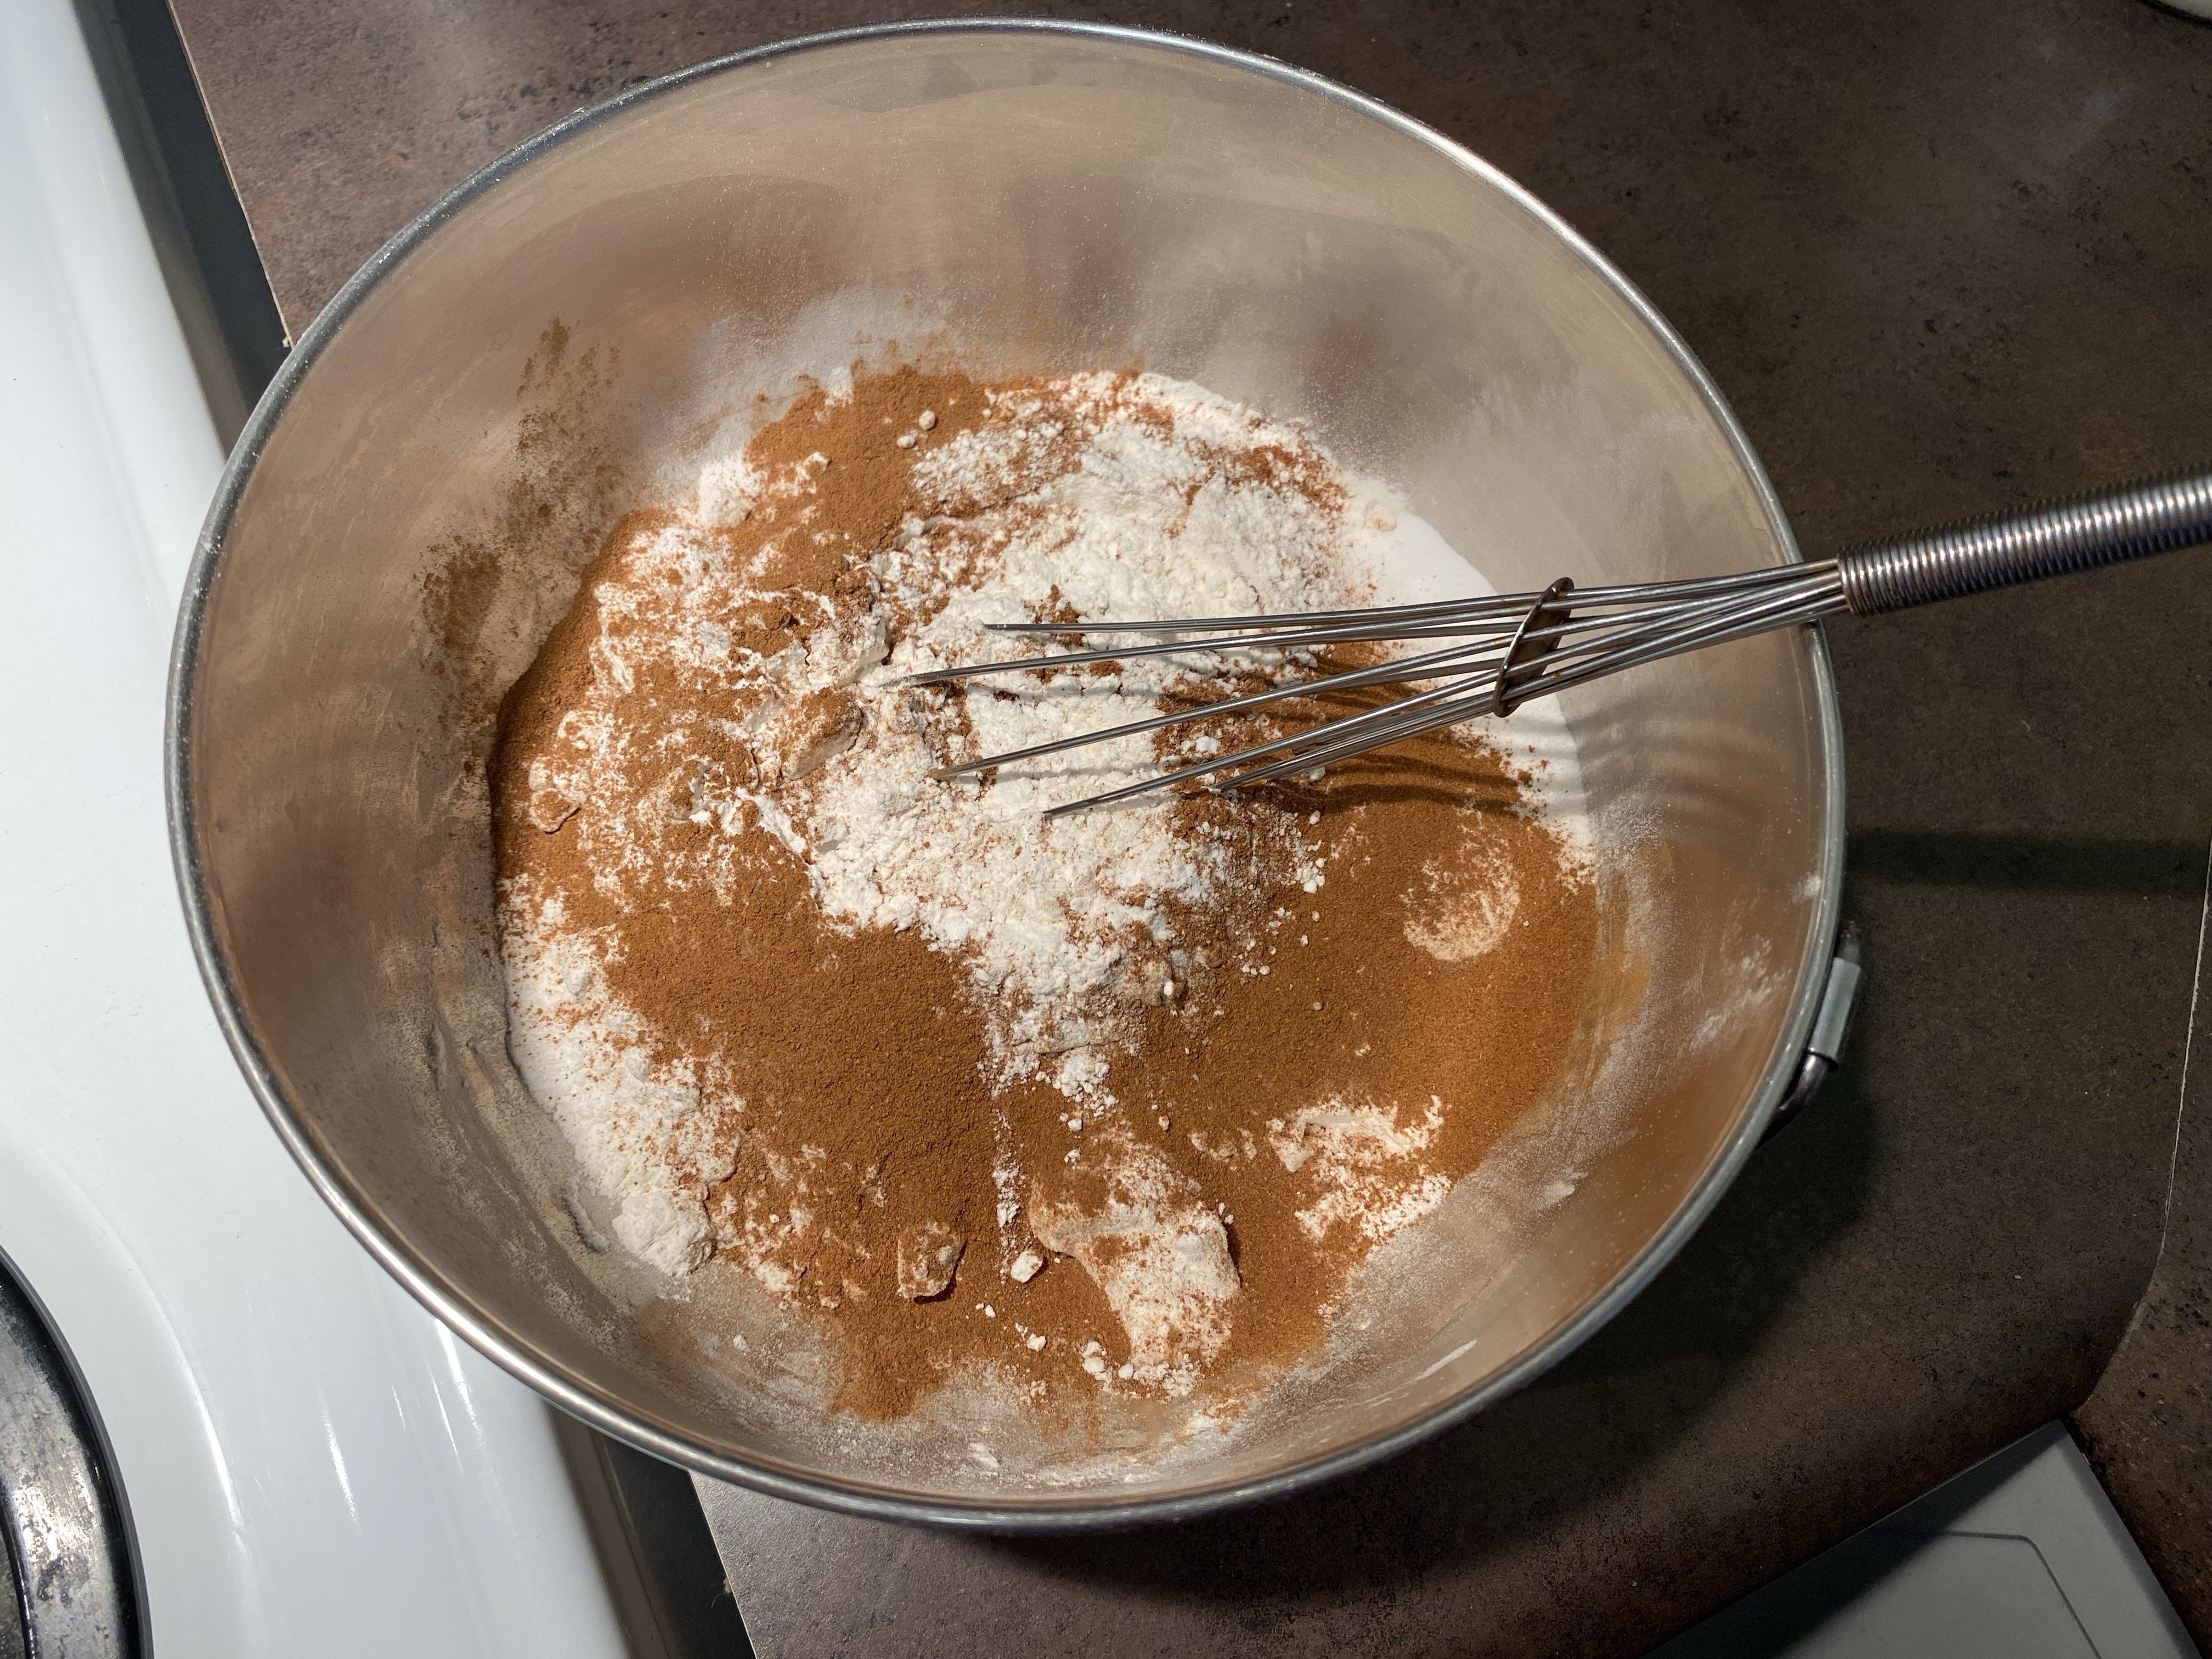
In a large bowl, mix the flour, baking soda, baking powder, salt, cinnamon, and nutmeg together
3. In another bowl, cream the butter and brown sugar together. Whisk in the eggs and add vanilla.
4. Add the mashed bananas, sourdough discard, and applesauce to the wet mixture and mix well together.
5. Make a “well” in the flour mix, and add the wet mixture to it. Mix until fully blended together, but do not “overmix” so that the muffins stay fluffy. Fold in the chocolate chips.
6. Grease muffin pans or use muffin cups. (I like greasing our muffin pans with coconut oil, works beautifully every time!)
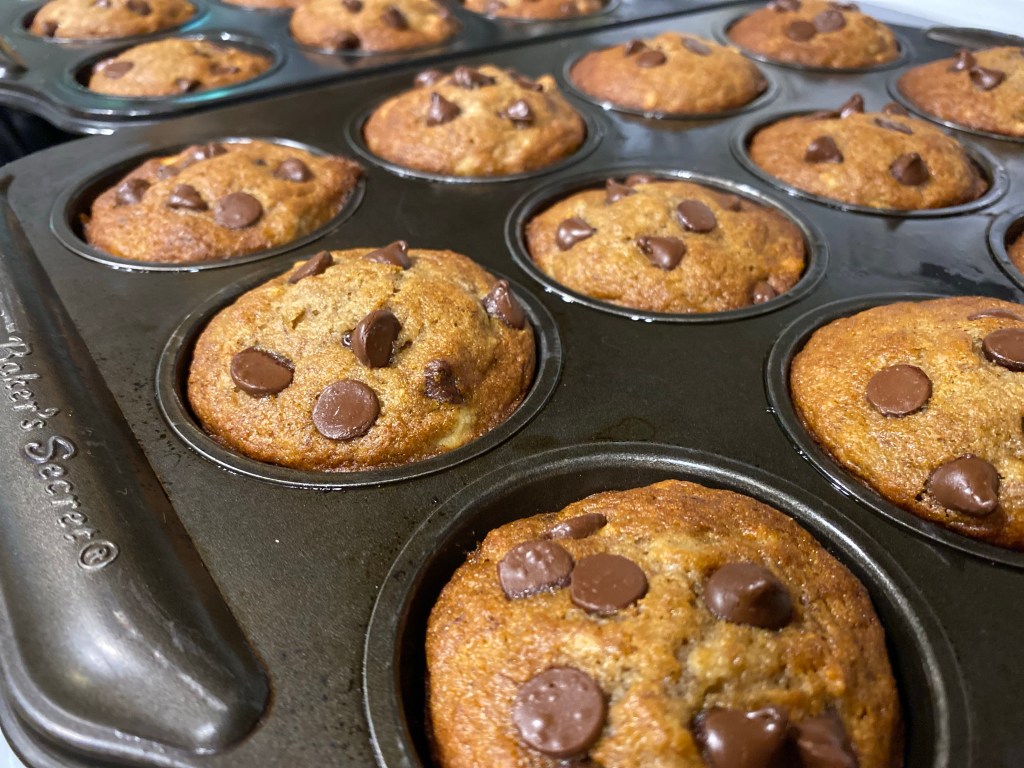
7. Fill muffin cups 3/4 full and sprinkle more chocolate chips on the tops.
8. Bake at 425 F for 5 minutes, then turn the oven down to 350 until muffins are golden on top and a toothpick comes out clean when inserted. For large muffins this takes me about 12-15 minutes.
9. Let muffins cool in the pan for 5 minutes before moving to a cooling rack or inverting in the pan.
10. Store in a sealed container at room temperature for up to 5 days, refrigerate for 1 week, or freeze in a sealed freezer bag for up to 6 months.
Additional note: This recipe usually makes about 30 muffins, half of which we like to freeze and use within a few months. Freeze in a freezer-ziploc bag, remove air. Thaw overnight and pop in the oven or microwave to freshen up!
More Desert & Snack Recipes:
Hi, I’m Jessie!
I’m a Wife and Homeschooling Mom living in a remote town in Northern Ontario, Canada.I love making wholesome meals for my family from scratch, homeschooling our girls and learning more about natural living.
Subscribe to Northbird’s email list to get weekly posts on: tasty recipes, activity ideas for kids, natural living tips, and some genuine mom thoughts and encouragement!
In a large bowl, mix the flour, baking soda, baking powder, salt, cinnamon, and nutmeg together.
In another bowl, cream the butter and brown sugar together. Whisk in the eggs and add vanilla.
Add the mashed bananas, sourdough discard, and applesauce to the wet mixture and mix well together.
Make a “well” in the flour mix, and add the wet mixture to it. Mix until fully blended together, but do not “overmix” so that the muffins stay fluffy. Fold in the chocolate chips.
Grease muffin pans or use muffin cups. (I like greasing our muffin pans with coconut oil, works beautifully every time!)
Fill muffin cups 3/4 full and sprinkle more chocolate chips on the tops.
Bake at 425 F for 5 minutes, then turn the oven down to 350 until muffins are golden on top and a toothpick comes out clean when inserted. For large muffins this takes me about 12-15 minutes.
Let muffins cool in the pan for 5 minutes before moving to a cooling rack or inverting in the pan.
Store in a sealed container at room temperature for up to 5 days, refrigerate for 1 week, or freeze in a sealed freezer bag for up to 6 months.
Additional Notes:
This recipe usually makes about 30 muffins, half of which we like to freeze and use within a few months. Freeze in a freezer-ziploc bag, remove air. Thaw overnight and pop in the oven or microwave to freshen up!
Nutrition
Per 1 muffin: 179 calories; 5.8 g fat; 31 g carbohydrates;
2.6 g protein.
This post contains affiliate links. As an Amazon associate, I earn from qualifying purchases. This means that I make a small commission at no extra cost to you. You can read my full disclosure HERE.
This post contains affiliate links. As an Amazon associate, I earn from qualifying purchases. This means that I make a small commission at no extra cost to you. You can read my full disclosure HERE.
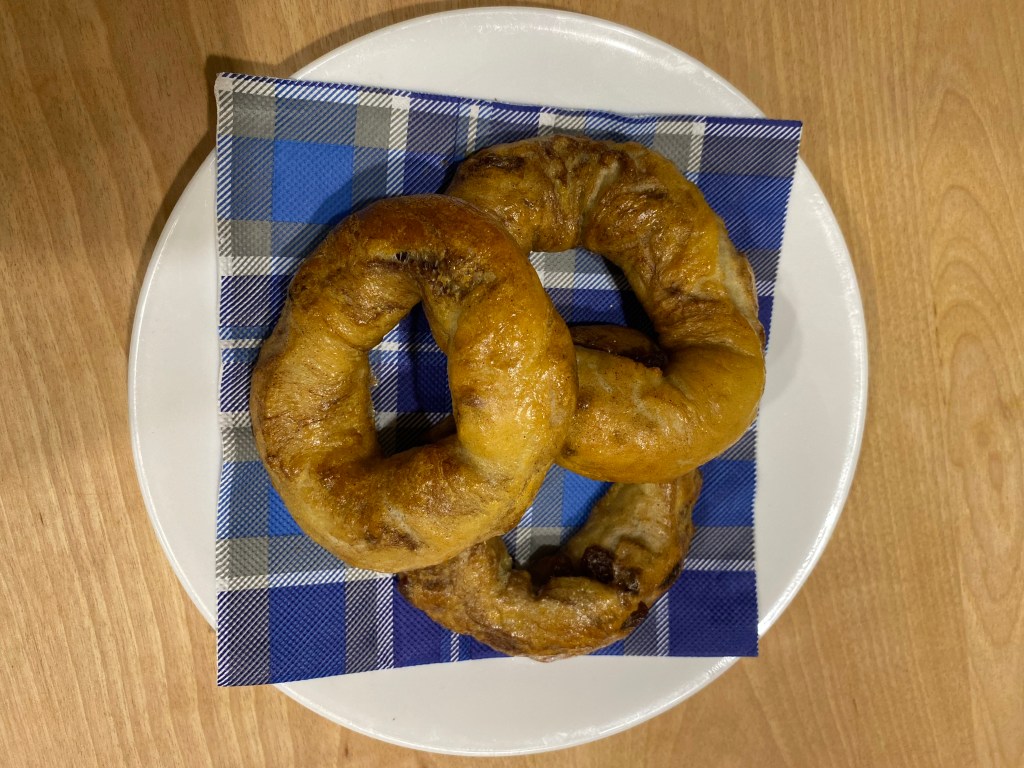
The common bagel is thought to have originated in Poland and other Eastern European countries around the 1600s. Later in the mid 1800s, Jewish immigrants brought the “bagel” with them to the United States and Canada. After this, the classic bagel became increasingly popular and a part of our western cuisine. The varying types of bagels we see today originate from the different communities that the Jewish and European immigrants came from.
The root dough recipe is very similar to that of soft pretzels, and you can easily mix one batch of dough to produce both bagels and soft pretzels. I have done this a few times, since each family member has their particular favourites!
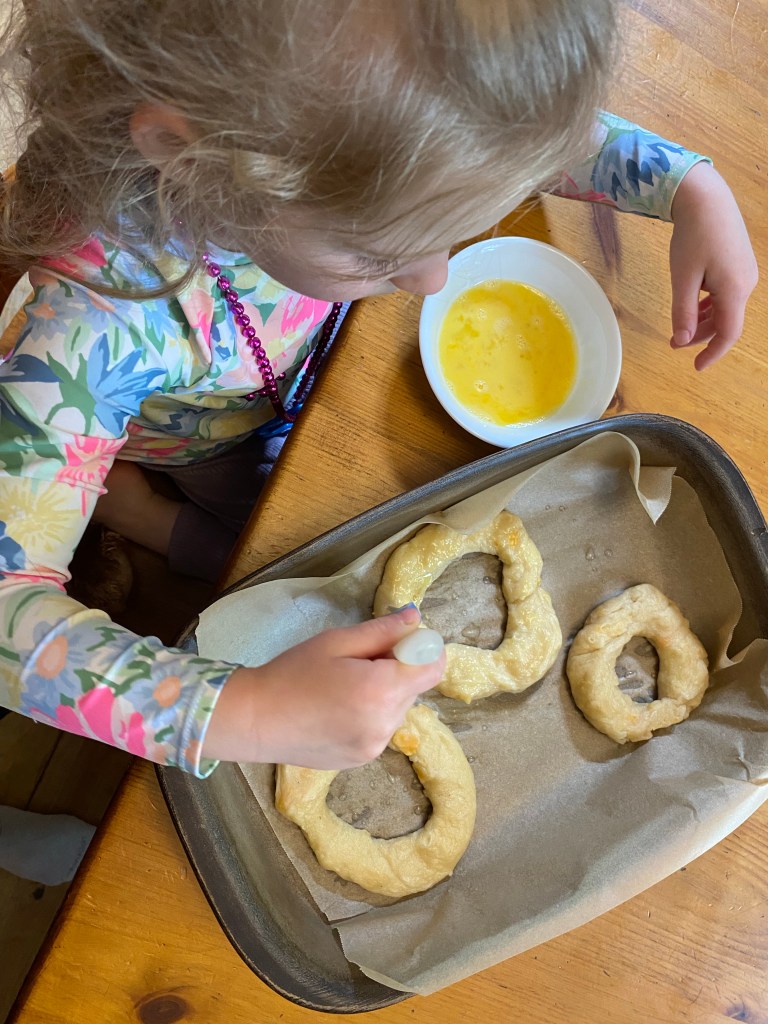
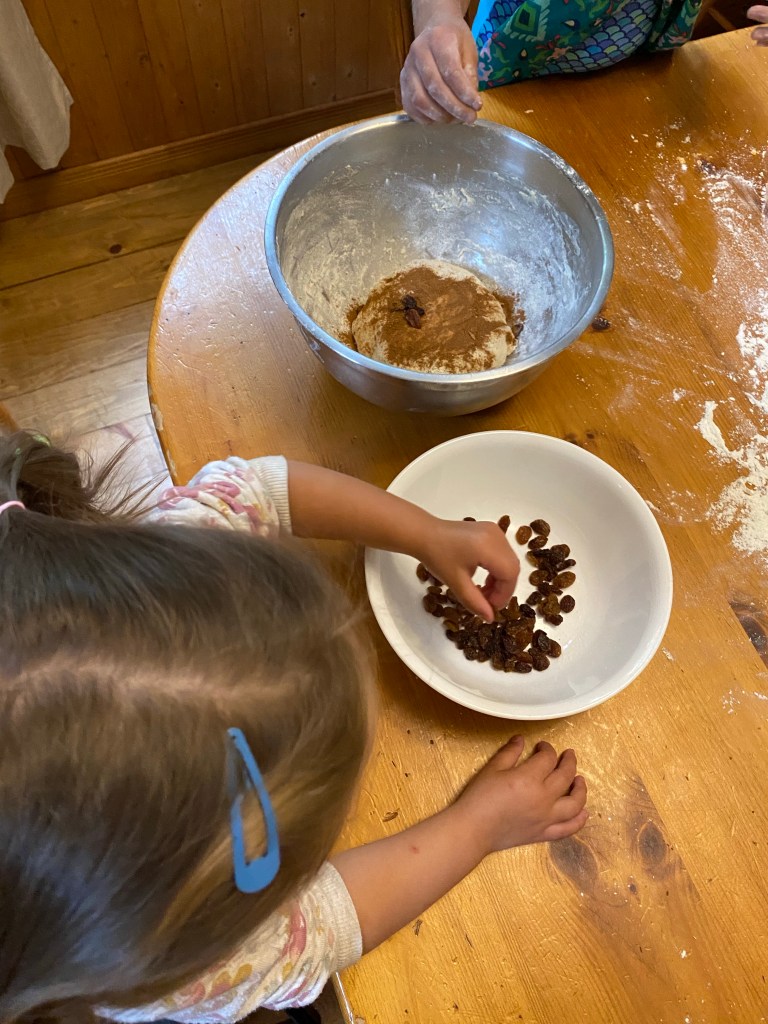
My daughter L had a lot of fun making these bagels with her two cousins A & M. It was a great homeschooling activity and they loved shaping the bagels and picking what flavours they wanted to make (and eat later!)
We will continue to share recipes for the other types of bagels that the girls and I have come up with since that fun day, using the same easy dough recipe!
What is Sourdough?
Sourdough is made using a fermented mixture of flour and water, called the “starter”, and mixed with more water, flour, and usually salt. The dough naturally rises as it ferments during resting stages. There is a lower amount of gluten in sourdough baking, which is why the dough needs to be “stretched” multiple times to help it expand and become fluffy.
Are you new to Sourdough? Click HERE for a little more “starter” information found on my post “How to Make Sourdough Bread”.
Is Sourdough Good For You?
Sourdough is easier to digest than other traditional yeasted baking. The fermenting that takes place while making sourdough baked products produces amino acids, which in turn produces enzymes that help to break down proteins and lower the overall gluten levels in the sourdough products (making it easier to digest).
Whole grain sourdough products have a lower glycemic index than other types of bread, (specifically white flour baking) that have been processed and are packed full of preservatives. This means that sourdough baking has less of a glycemic spike, and more of a gradual release on the glycemic scale, making it a healthier option for those struggling with balancing blood sugar levels.
Sourdough breads and baked goods contain higher levels of protein, fibre and nutrientsthan most traditional yeasted baking.
Sourdough baking still contains many of the natural nutrients that are processed out of the majority of other kinds of breads and baked goods.
Sourdough contains lower levels of phytate, which helps your body to absorb the nutrients easier than other breads.
Whole grain sourdough is considered a high-fiber food, which feeds the good bacteria in your gut and digestive system.
Common vitamins and minerals found in sourdough baking: Calcium, Iron, Manganese, B1-B6, B12, Potassium, Magnesium, Folate, Niacin, Zinc, Thiamin, Riboflavin, Selenium, Phosphorus, and Vitamin E.
Other Sourdough Bagel Recipe Variations:
Use this one recipe to make many more kinds of bagels! Just add the extra ingredients right before the dough is ready to be shaped into bagels. I’ll post more bagel recipes when I can, but until then have fun experimenting and trying some of these out!
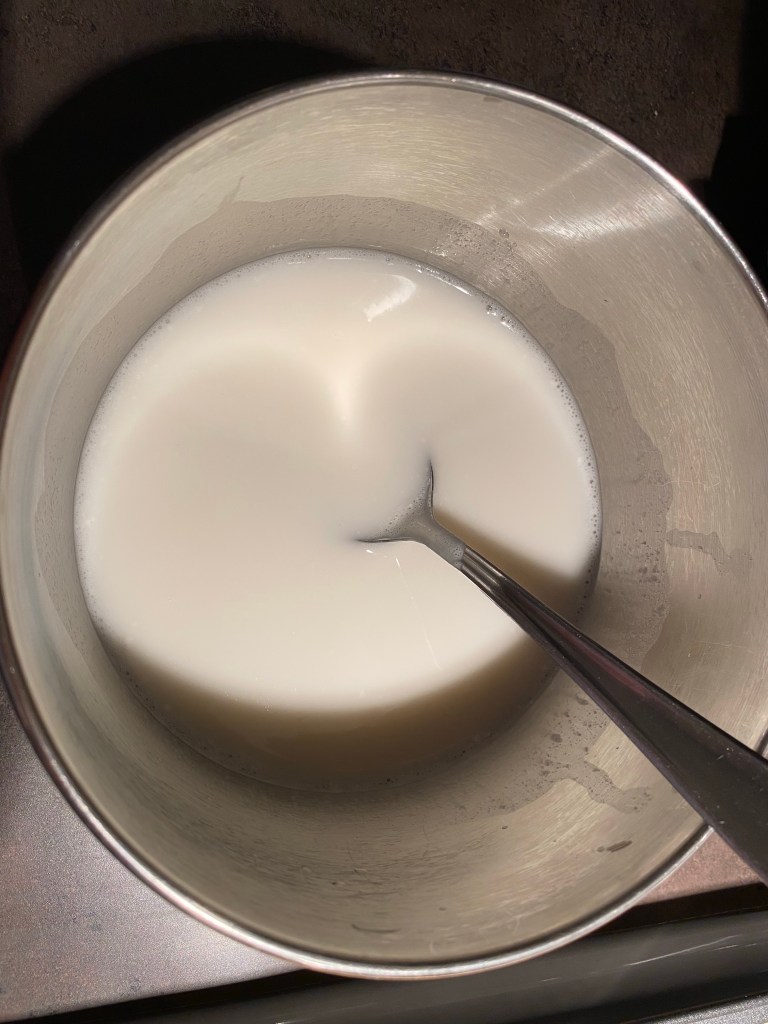
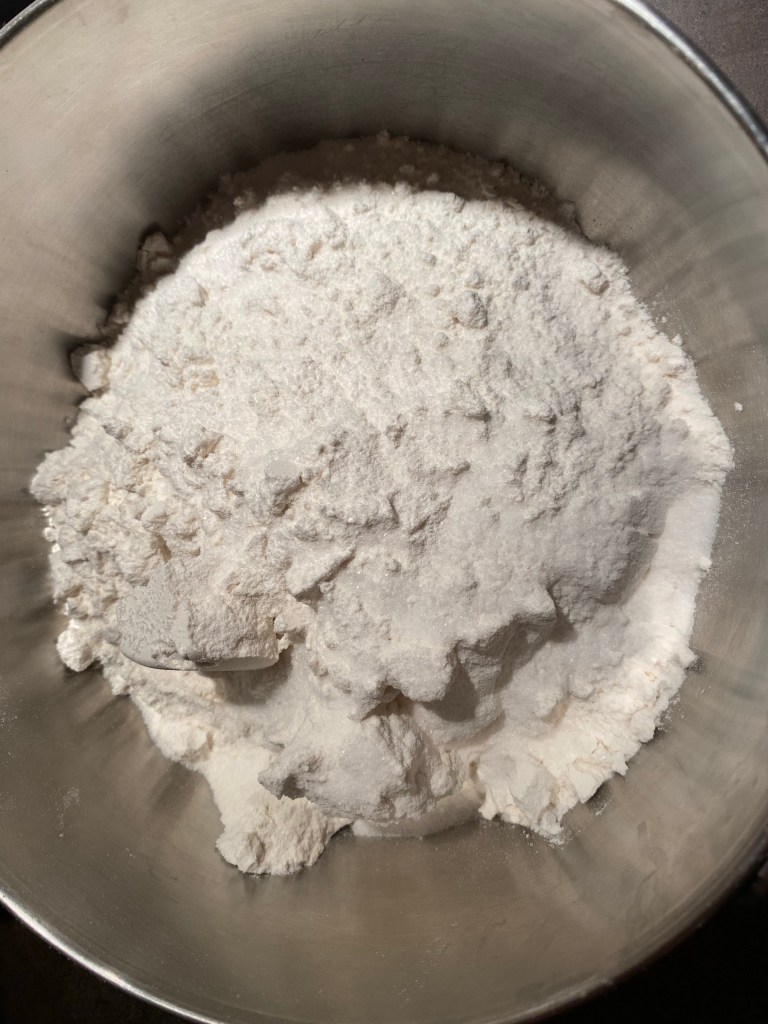
1. Mix your active sourdough starter with the water and honey. Mix the sea salt and flour together and add to the wet mixture. Mix all together well.
2. Cover with a beeswax food cover, plastic wrap or a tea towel and let rest overnight or for 8-10 hours to bulk ferment. Dough will be moist and spongy and will have doubled in size.
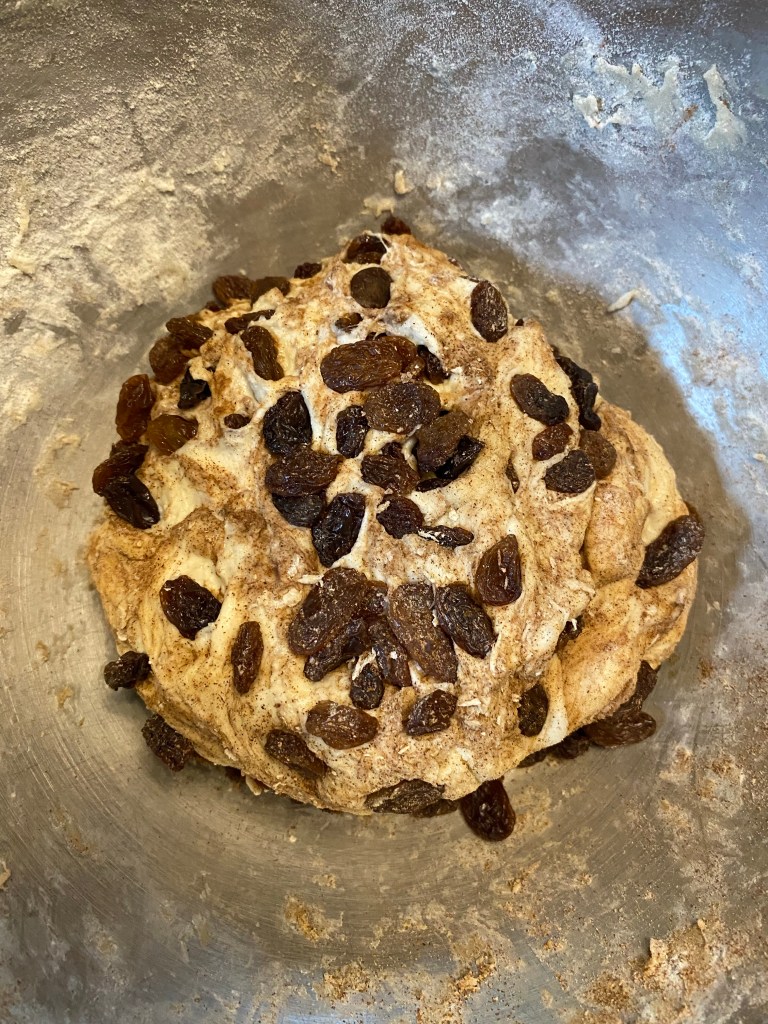
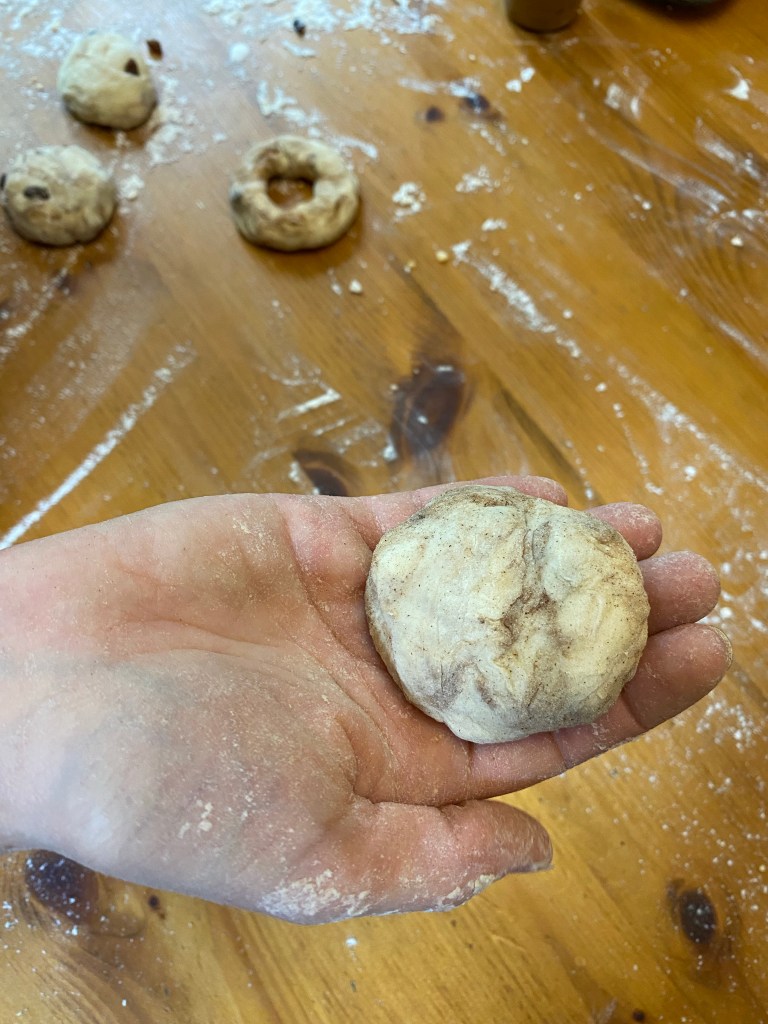
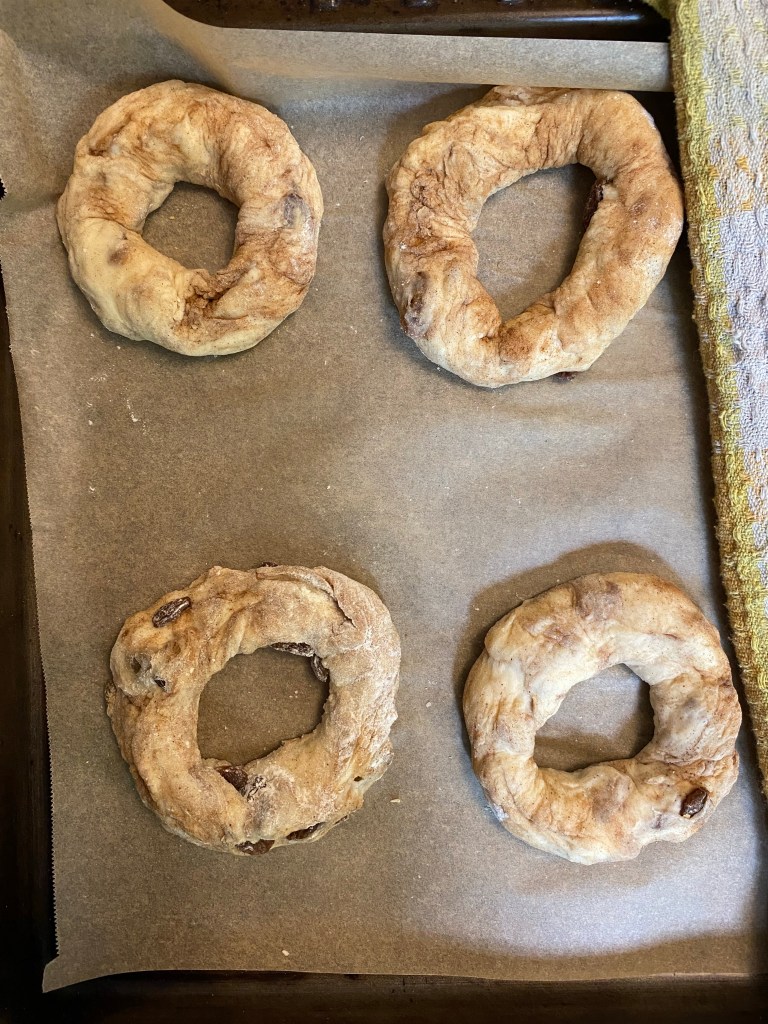
3. Add 1 cup of raisins and 1 tablespoon of ground cinnamon to the bowl and work it into the dough. Knead dough on floured surface for 2 minutes until it is a soft dough ball. Divide into 12 equal pieces.
4. Form each piece into a flattened “ball” then poke fingers through the middle to create a hole.
5. Place on parchment-covered baking sheet and cover with a tea towel. Let rest for 1 hour. (Note that at this stage the bagels will expand and puff up, so thinner is good prior to resting. You can always gently stretch them again before putting in the water bath too.)
6. Preheat oven to 425 degrees Fahrenheit.
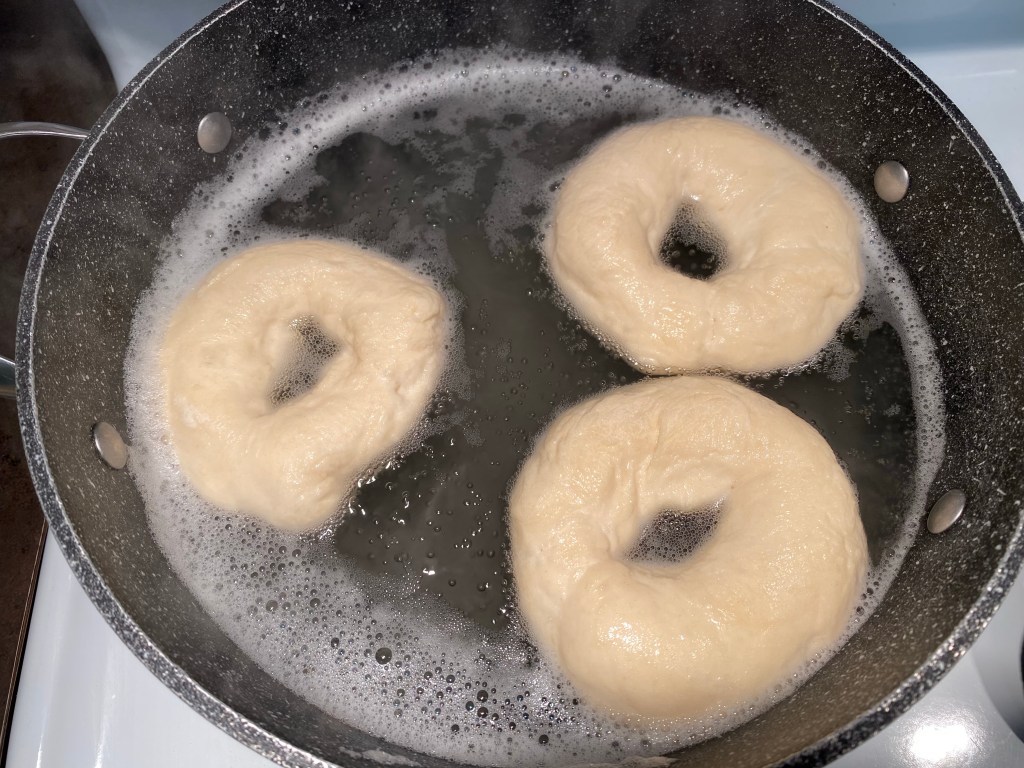
7. Boil 6 cups of water in a large pot and add baking soda and sugar. When it is a rolling boil, add 3-4 bagels gently with a large slotted spoon.
8. Set the timer for 30 seconds, then turn them over for another 30 seconds on the other side. Transfer them back to the baking sheet.
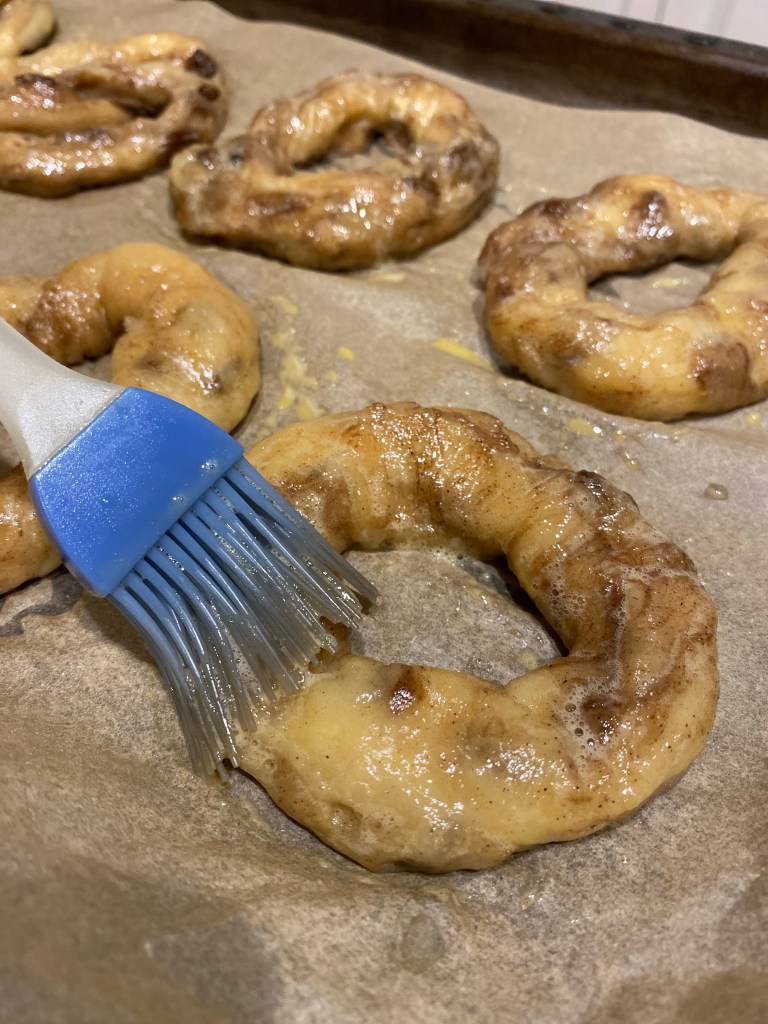
9. When all the bagels are back on the baking sheets, whisk up an egg in a small bowl and paint the bagels with a cooking brush. (This will give them that lovely golden colour on the crust after being baked!)
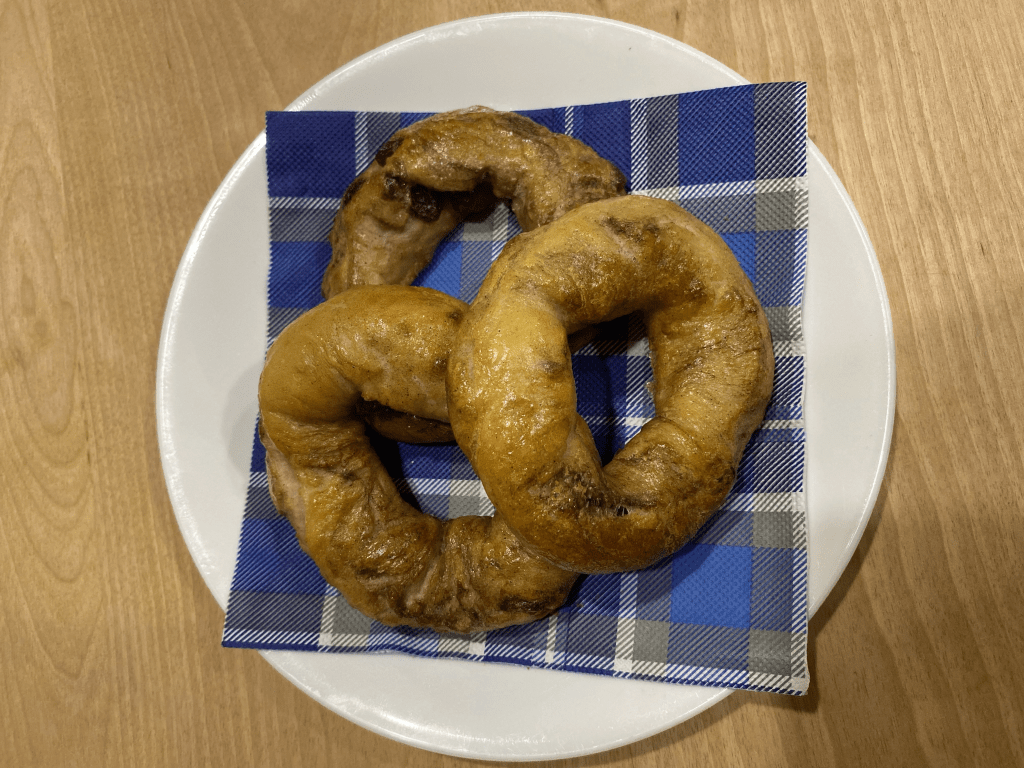
10. Bake the bagels on the middle rack in oven for 14-16 minutes or until golden brown on top and bottom and cheese starts to bubble. Let cool on baking sheets or rest at least 10 minutes before biting into. Enjoy!
Additional Notes: Store at room temperature for 5 days in an airtight container, or freeze for up to three months in a freezer bag. Thaw in fridge then warm in the oven or microwave to freshen them up!
Enjoyed this recipe?
You can turn this Cinnamon Raisin Sourdough Bagel Recipe into a Sourdough Soft Pretzel Recipe! Click HERE to learn how to shape the pretzels and how to add additional ingredients to make many more types of delicious pretzels!
Other Tasty Sourdough Recipes to Check Out!
Hi, I’m Jessie!
I’m a Wife and Homeschooling Mom living in a remote town in Northern Ontario, Canada.I love making wholesome meals for my family from scratch, homeschooling our girls and learning more about natural living.
Subscribe to Northbird’s email list to get weekly posts on: tasty recipes, activity ideas for kids, natural living tips, and some genuine mom thoughts and encouragement!
Mix your active sourdough starter with the water and honey. Mix the sea salt and flour together and add to the wet mixture. Mix all together well.
Cover with a beeswax food cover, plastic wrap or a tea towel and let rest overnight or for 8-10 hours to bulk ferment. Dough will be moist and spongy and will have doubled in size.
Add 1 cup of raisins and 1 tablespoon of ground cinnamon to the bowl and work it into the dough. Knead dough on floured surface for 2 minutes until it is a soft ball. Divide it into 12 equal pieces.
Form each piece into a flattened “ball” then poke fingers through the middle to create a hole.
Place on parchment-covered baking sheet and cover with a tea towel. Let rest for 1 hour. (Note that at this stage the bagels will expand and puff up, so thinner is good prior to resting. You can always gently stretch them before putting in the water bath too.)
Preheat oven to 425 degrees fahrenheit.
Boil 6 cups of water in a large pot and add baking soda and sugar. When it is a rolling boil, add 3-4 bagels gently with a large slotted spoon.
Set the timer for 30 seconds, then turn them over for another 30 seconds on the other side. Transfer them back to the baking sheet.
When all the bagels are back on the baking sheets, whisk up an egg and paint the bagels with a cooking brush. (This will give them that lovely golden colour on the crust after being baked!)
Bake the bagels on middle rack in oven for 14-16 minutes or until golden brown on top and bottom and cheese has started to bubble. Let cool on baking sheets or rest at least 10 minutes before biting into!
Store at room temperature for 5 days in an airtight container, or freeze for up to three months in a freezer bag. Thaw in fridge then warm in the oven to freshen them up.
Nutrition
Per 1 Cinnamon Raisin Bagel: 274 calories; 5.8 g fat; 47.6 g carbohydrates;
8.7 g protein.
This post contains affiliate links. As an Amazon associate, I earn from qualifying purchases. This means that I make a small commission at no extra cost to you. You can read my full disclosure HERE.
Every Friday night we have homemade sourdough pizza (unless we are not home or it is simply way to hot in the summer to use the oven!). We pair this with watching a family movie and setting up the screen projector to have a fun, relaxing family time while munching on delicious pizza.
I love the simplicity of this meal, and how easy it is to make and roll out the dough ahead of time, then decorate and bake off closer to when my husband is home from work and we get ready to start the movie.
We love pairing homemade pizza with fresh home-grown sprouts and an assortment of veggie sticks!
Prior to getting addicted to sourdough recipes, I would make variations with different flours using traditional yeast dough. I can honestly say that I prefer the sourdough process for making pizza dough, and because the dough ferments prior to being loaded and baked, my sensitive tummy appreciates it too.
New to Sourdough?
Sourdough is made using a fermented mixture of flour and water, called the “starter”, and mixed with more water, flour, and usually salt. The dough naturally rises as it ferments during resting stages. There is a lower amount of gluten in sourdough baking, which is why the dough needs to be “stretched” multiple times to help it expand and become fluffy.
You can read more in the Sourdough Bread Post HERE about sourdough tips, feeding the sourdough starter, and keeping it happy.
Pizza Topping Ideas: (what we use to cut down grocery costs)
Cheese: Mozzarella and white cheddar are my favourites to use on pizza, but they are undoubtedly the most expensive part of the pizza. Where we live in the north, one 400g block costs around $10! We buy several blocks at a time when we are in the south and they go on sale, and if the expiry date is close, then the cheese intended for pizza goes directly into the freezer. Frozen cheese can tend to crumble a little when thawed, but that works just fine for pizza, right?!
Pizza sauce: You can use regular canned pizza sauce or also pasta sauce, it just won’t be as thick. (In a later post I’ll share my mother’s Garlic Cream Sauce for pizza!)
Meat: If we have a ham, chicken, beef roast, etc then I’ll cut off small portions and put in freezer bags and label for pizza. I also use cooked bacon, kohlbassa and occasionally pepperoni and do the same thing.
Peppers: I love dehydrating peppers from the summer garden and using them year long on pizzas! They re-hydrate easily in a bowl of water for a few minutes prior to putting on the pizza.
Mushrooms: You can also dehydrate these, and rehydrate in water like the peppers. (it’s on my bucket list and I’ll share with you how it turns out!)
Olives: these are easy to buy canned and sliced.
Pineapple: We are one of those families that enjoys fruit on pizza! Easy to buy small cans of diced pineapple, or buy a whole one on sale, cut up and freeze in portioned baggies. Thaw prior to use.
Herbs: It’s always nice to sprinkle some herbs on top at the end. Fresh herbs in the summer, and dried herbs in the winter (unless we are organized to grow some windowsill herbs year long!) Oregano, thyme, chives and rosemary are delicious sprinkled on pizza.
Other veggies: We have also used zucchini, vidalia onion, red onion and arugula.
Directions: Day One
1. Feed your starterin the morning
If your starter takes less time to activate, then feed your starter in the early afternoon.
2. Mix your Dough in the Evening
Mix your active starter with the water and set aside. At this point if the measured starter floats on top of the measured water, you know it’s going to be a great rising pizza dough! Sometimes my timing has been a little off due to life getting crazy, and my starter doesn’t float (even though it looked bubbly and risen in the starter jar). If this happens to you, just add another 1-2 tablespoons of starter and it should still rise good.
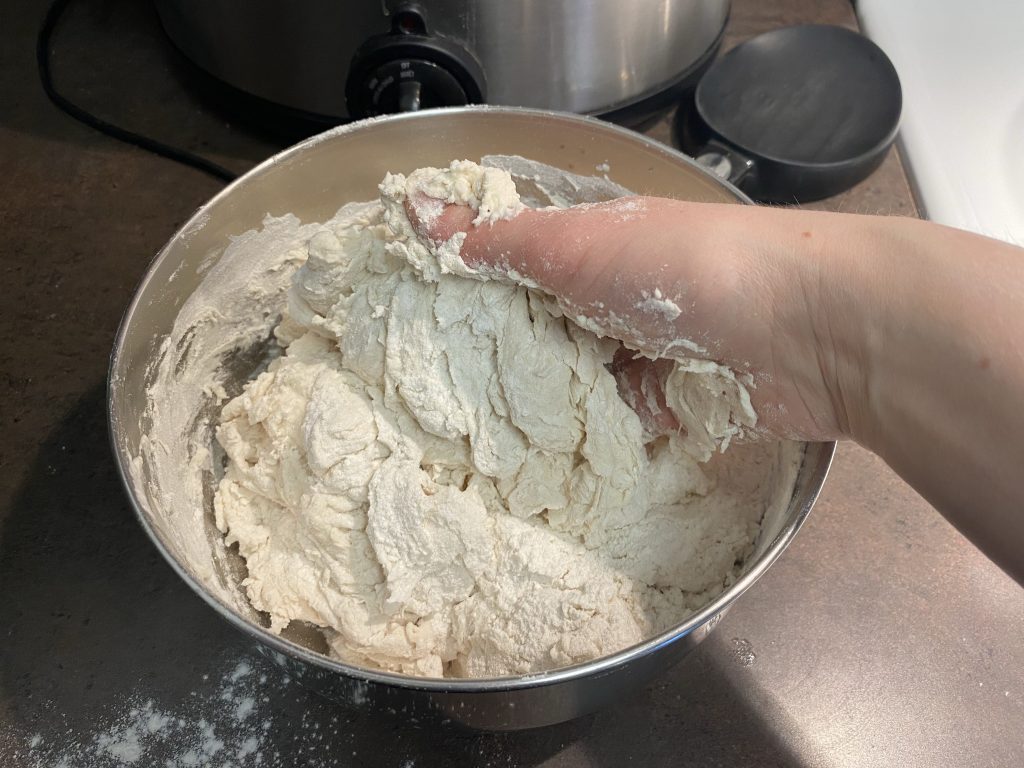
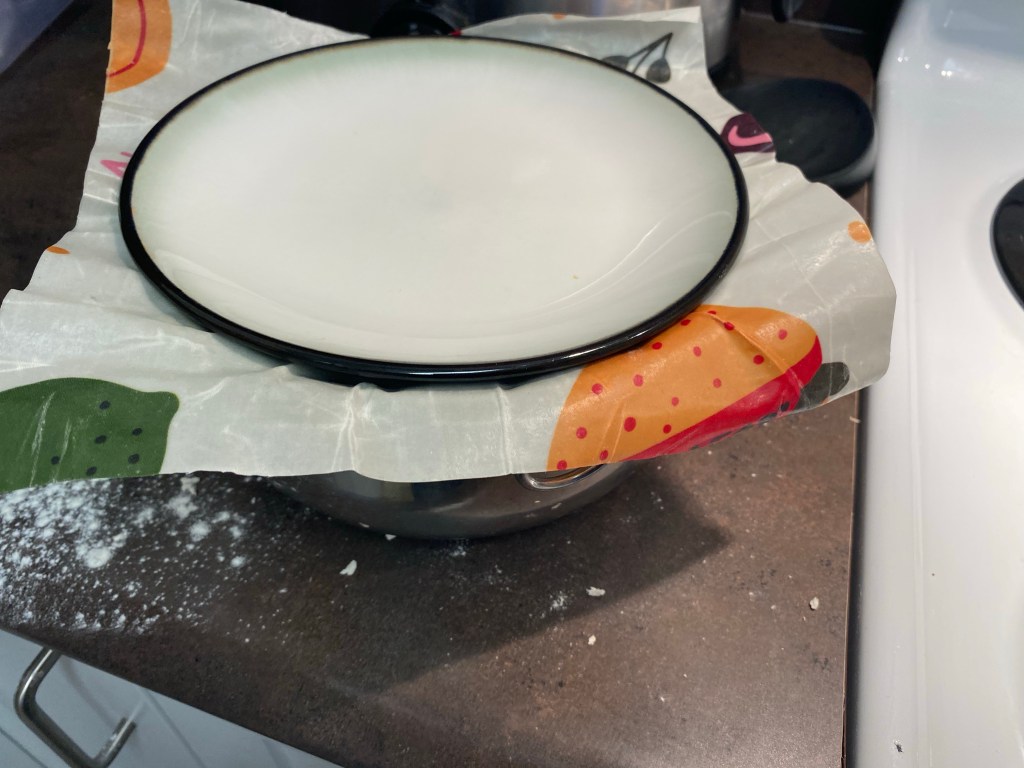
Mix the flour and salt together in a larger bowl, then add the wet ingredients and stir together until it forms a sticky ball. I find it easier to finish mixing it with my hands. If it is dry, resist the urge to add any water! Cover with beeswax cover or tea towel and plate and rest for 30 minutes.
3. Stretch & Fold: 1st Way
Wet one hand and gently loosen dough from edges of bowl. Take a handful of dough from the top of the bowl and pull towards you *See picture. Turn bowl 1/4 turn and repeat for a total of 4 stretch & folds to complete circle.
Cover and rest 20 minutes
Repeat stretch & fold full circle
Cover and rest 20 minutes
Repeat stretch & fold full circle
Cover and rest overnight 10-12 hours.
Directions: Day Two
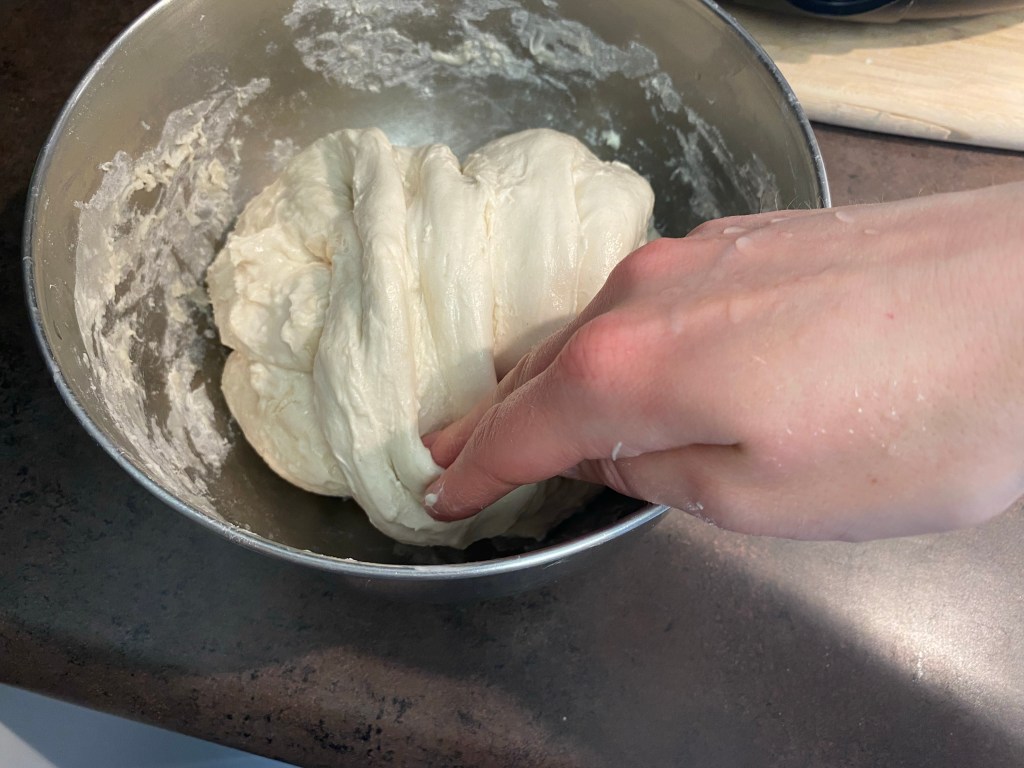
1. The next morning, lift & fold: 2nd way
Wet both hands and loosen dough from edges of bowl. Using both hands, pick up dough from middle and let it droop over the sides of your hands. *See picture. Gently lower into bowl and let it fold on top of itself. Turn bowl 1/4 turn and repeat for total of 4 to complete full circle.
Note: If it is stiff at first, you can pick it up and gently stretch a little with your wet hands to encourage the gluten. *See picture.
Cover and rest 20 minutes
Repeat lift & fold full circle
Cover and rest 20 minutes
2. Prepare dough & put in fridge
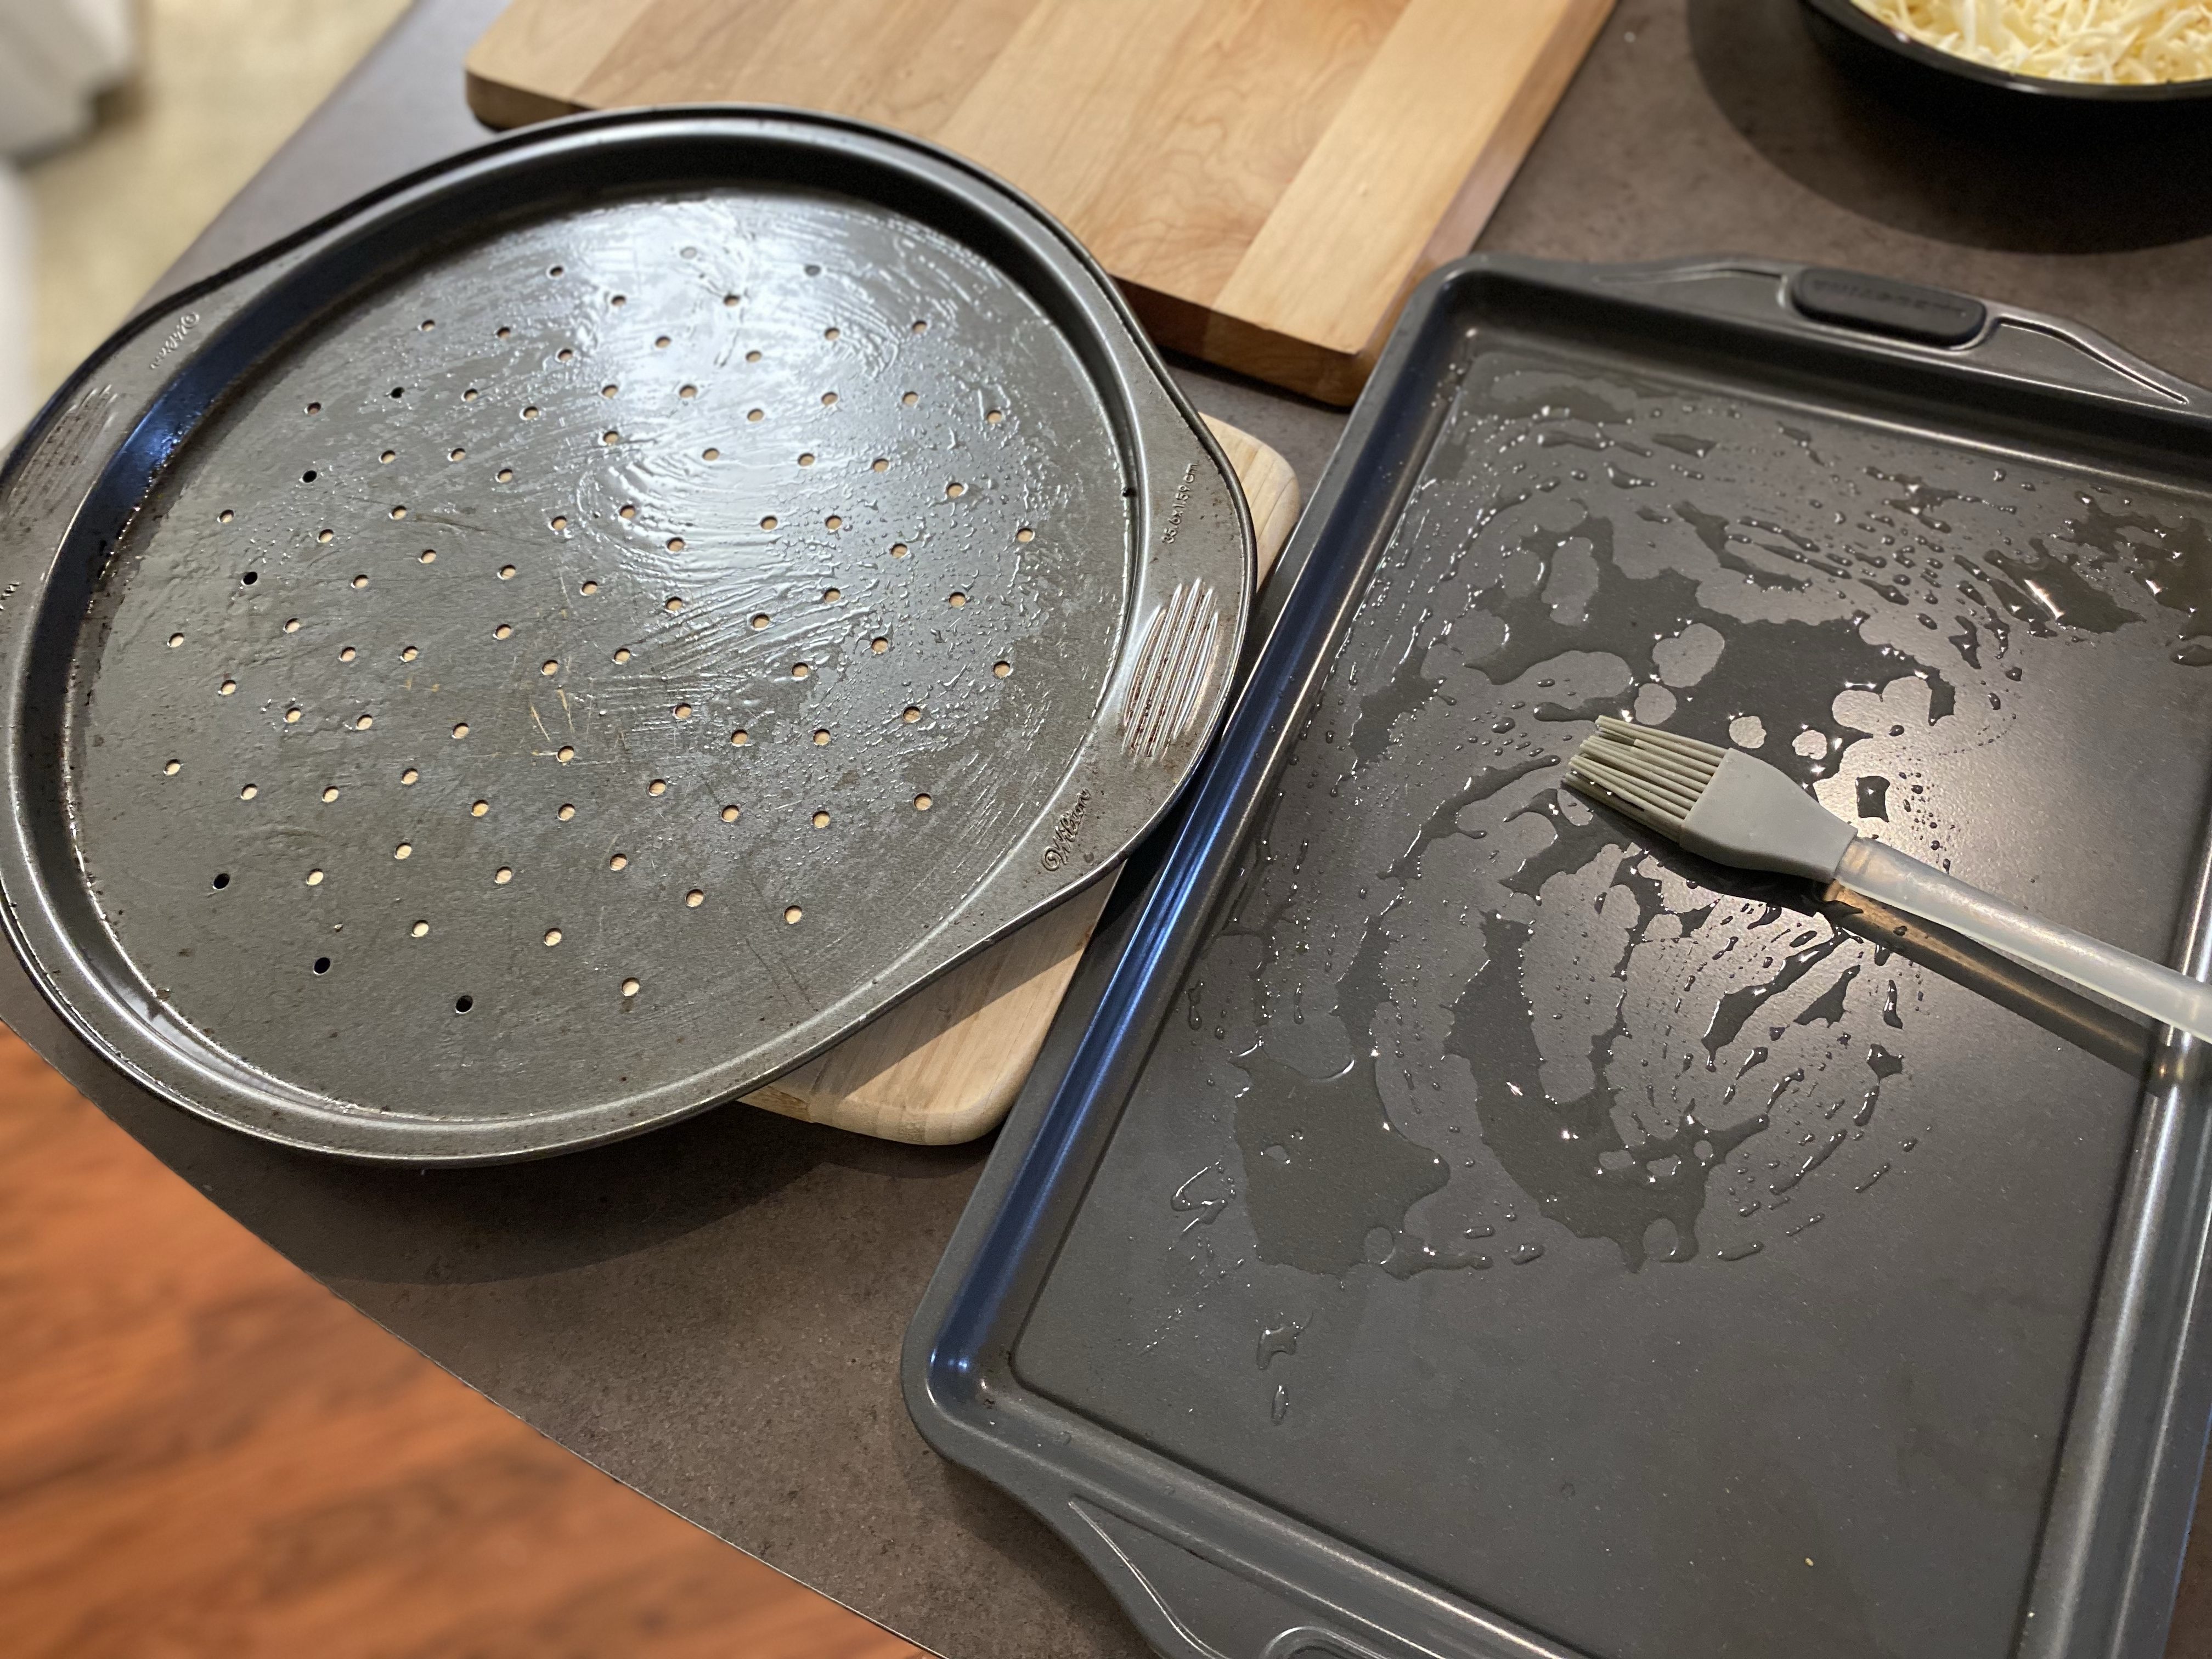
Grease pizza pans with olive oil, and sprinkle cornmeal onto it to help the bottom not to stick later.
Separate the dough into two balls. Roll out on lightly floured counter and press into prepared pizza pans.
Put pizza pans in the fridge for minimum 1 hour, or for several hours until closer to when you want to bake the pizzas off. I like to get it all prepped up to this point in the morning, then it’s just a quick decorate and bake before dinner.
3. Decorate dough
Preheat the oven to 425 degrees fahrenheit.
Rehydrate any dehydrated veggies in water prior to putting on the pizza: (mushrooms, peppers, onions, dried meats, etc)
Brush pizza sauce on top of dough.
Decorate pizza with desired toppings and cover with shredded cheese. Herbs are nice sprinkled on top (see above list of suggestions).
Optional: You can stuff the pizza crust with cheese if you want by pulling the dough edges outward, putting a wad of cheese into it and rolling and pinching it back.
Optional: A final touch that I like to do is brushing the crust with olive oil.
4. Bake the Pizza
Bake the pizzas for 15-20 minutes (depending on your oven!) until crust is hard and golden and cheese has browned on top. I usually take a peek of the underside to see if it looks doughy or cooked. You can also broil for a minute to crisp the top more if desired (but keep a close eye on it!)
Let cool for 5 minutes before slicing it up.
Other Tasty Sourdough Recipes to Check Out!
Hi, I’m Jessie!
I’m a Wife and Homeschooling Mom living in a remote town in Northern Ontario, Canada.I love making wholesome meals for my family from scratch, homeschooling our girls and learning more about natural living.
Subscribe to Northbird’s email list to get weekly posts on: tasty recipes, activity ideas for kids, natural living tips, and some genuine mom thoughts and encouragement!
If your starter takes less time to activate, then feed your starter in the early afternoon.
2. Mix your Dough in the Evening
Mix your active starter with the water and set aside. At this point if the measured starter floats on top of the measured water, you know it’s going to be a great rising pizza dough! Sometimes my timing has been a little off due to life getting crazy, and my starter doesn’t float (even though it looked bubbly and risen in the starter jar). If this happens to you, just add another 1-2 tablespoons of starter and it should still rise good.
Mix the flour and salt together in larger bowl, then add the wet ingredients and stir together until it forms a sticky ball. I find it easier to finish mixing it with my hands. If it is dry, resist the urge to add any water!
Cover with beeswax cover or plastic wrap and rest for 30 minutes.
3. Stretch & Fold: 1st Way
Wet one hand and gently loosen dough from edges of bowl. Take a handful of dough from the top of the bowl and pull towards you *See picture. Turn bowl 1/4 turn and repeat for a total of 4 stretch & folds to complete circle.
Cover and rest 20 minutes.
Repeat stretch and fold full circle.
Cover and rest 20 minutes.
Repeat stretch and fold full circle.
Cover and rest overnight 10-12 hours.
Directions: Day Two
1. Lift & Fold: 2nd Way
Wet both hands and loosen dough from edges of bowl. Using both hands, pick up dough from middle and let it droop over the sides of your hands. *See picture. Gently lower into bowl and let it fold on top of itself. Turn bowl 1/4 turn and repeat for total of 4 to complete full circle.
Note: If it is stiff at first, you can pick it up and gently stretch a little with your wet hands to encourage the gluten. *See picture.
Cover and rest 20 minutes
Repeat 2nd way of stretch & fold full circle
Cover and rest 20 minutes
2. Prepare dough & put in fridge
Grease pizza pans with olive oil, and sprinkle cornmeal onto it to help the bottom not to stick later.
Separate the dough into two balls. Roll out on lightly floured counter and press into prepared pizza pans.
Put pizza pans in the fridge for minimum 1 hour, or for several until closer to when you want to bake the pizzas off. I like to get it all prepped up to this point in the morning, then it’s just a quick decorate and bake before dinner.
3. Decorate dough
Preheat the oven to 425 degrees fahrenheit.
Rehydrate any dehydrated veggies in water prior to putting on the pizza: (mushrooms, peppers, onions, dried meats, etc)
Brush pizza sauce on top of dough.
Decorate pizza with desired toppings and cover with shredded cheese. Herbs are nice sprinkled on top (see above list of suggestions).
Optional: You can stuff the pizza crust with cheese if you want by pulling the dough edges outward, putting a wad of cheese into it and rolling and pinching it back.
Optional: A final touch that I like to do is brushing the crust with olive oil.
4. Bake the Pizza
Bake the pizzas for 15-20 minutes (depending on your oven!) until crust is hard and golden and cheese has browned on top. I usually take a peek of the underside to see if it looks doughy or cooked. You can also broil for a minute to crisp the top more if desired (but keep a close eye on it!)
Let cool for 5 minutes before slicing it up.
Nutrition
For 1 of 16 pizza slices, crust only: 121.6 calories; 1 g fat; 23.8 g carbohydrates;
3.2 g protein; 290 mg sodium.
This post contains affiliate links. As an Amazon associate, I earn from qualifying purchases. This means that I make a small commission at no extra cost to you. You can read my full disclosure HERE.
I was honestly asking myself this a year ago, and never really looked into it because we had so many transitions in our life: A new baby, moving OUT of the north, buying a house, moving BACK to the north…you get the idea.
We were way too busy for me to start a new hobby and spend the time to learn something new. And “sourdough” was a complicated process, right? Or so I thought!
We were out for dinner at another family’s house and my friend P had some fresh sourdough bread. She encouraged me to try it and gave some starter with instructions and a website to check out.
I was apprehensive and unsure if I was up for the challenge, but wanted to give it a try. After researching and building up my tiny starter for a few days, I made my first loaf. I was amazed at HOW EASY it really was!
After that, I decided that we would no longer buy bread, but would make it ourselves as much as possible. And the result: I learned to make and create a few different sourdough recipes, my tummy was happier because it could digest the fermented bread better and it largely cut down on our grocery bill. Not to mention the pride I felt in serving my family fresh baking made from scratch!
What is Sourdough Bread?
Sourdough bread is a natural leavening bread, which means that it rises without the use of commercial yeast. It is made using a fermented mixture of flour and water, called the starter, and mixed with more water, flour, and usually salt. The bread naturally rises as the dough ferments during resting stages. There are hundreds of variations of sourdough bread with different flavourings, texture and shapes.
Is Sourdough Good for You?
Yes! I have a sensitive tummy when it comes to bread products, and although I’m sure those struggling with celiac would still find sourdough bread hard to digest, I personally have no digestive problems with sourdough, compared to the traditional yeasted store-bought breads.
1. Sourdough bread is easier to digest than other breads. The fermenting that takes place while making sourdough breads produces amino acids, which in turn produces enzymes that help to break down proteins and lower the overall gluten levels in the bread (making it easier to digest).
2. Whole grain sourdough breads have a lower glycemic index than other types of bread, specifically white flour breads that have been processed and are packed full of preservatives. This means that sourdough breads have less of a glycemic spike, and more of a gradual release on the glycemic scale, making it a healthier option for those struggling with balancing blood sugar levels.
3. Sourdough bread contains higher levels of protein, fibre and nutrientsthan most breads.
Sourdough bread still contains many of the natural nutrients that are processed out of the majority of other kinds of breads.
It contains lower levels of phytate, which helps your body to absorb the nutrients easier than other breads.
Whole grain sourdough is considered a high-fiber food, which feeds the good bacteria in your gut and digestive system.
Common vitamins and minerals found in sourdough bread: Calcium, Iron, Manganese, B1-B6, B12, Potassium, Magnesium, Folate, Niacin, Zinc, Thiamin, Riboflavin, Selenium, Phosphorus, and Vitamin E.
What is a Sourdough Starter?
A sourdough starter is basically a fermented mixture of flour and water. Every day it is “fed” flour and water, and within several hours it becomes bubbly and the amount doubles in size. This is now called “active starter”. The “active” timing depends on your kitchen’s temperature and humidity, and also the feeding ratio of flour and water.
HOW & WHAT do I feed a Sourdough Starter?
The current starter I use every day is mostly made from all purpose flour. I have used bread flour, spelt flour and whole wheat flour to feed it in the past, but now I find it is easiest to use basic all purpose flour for feeding it with the ratio I have developed, (and can also better predict the bubbling up timing!) I am sure there is more science behind using different flours and ratio of starter/new flour/new water, so when I have learned and researched more then I will share this with you.
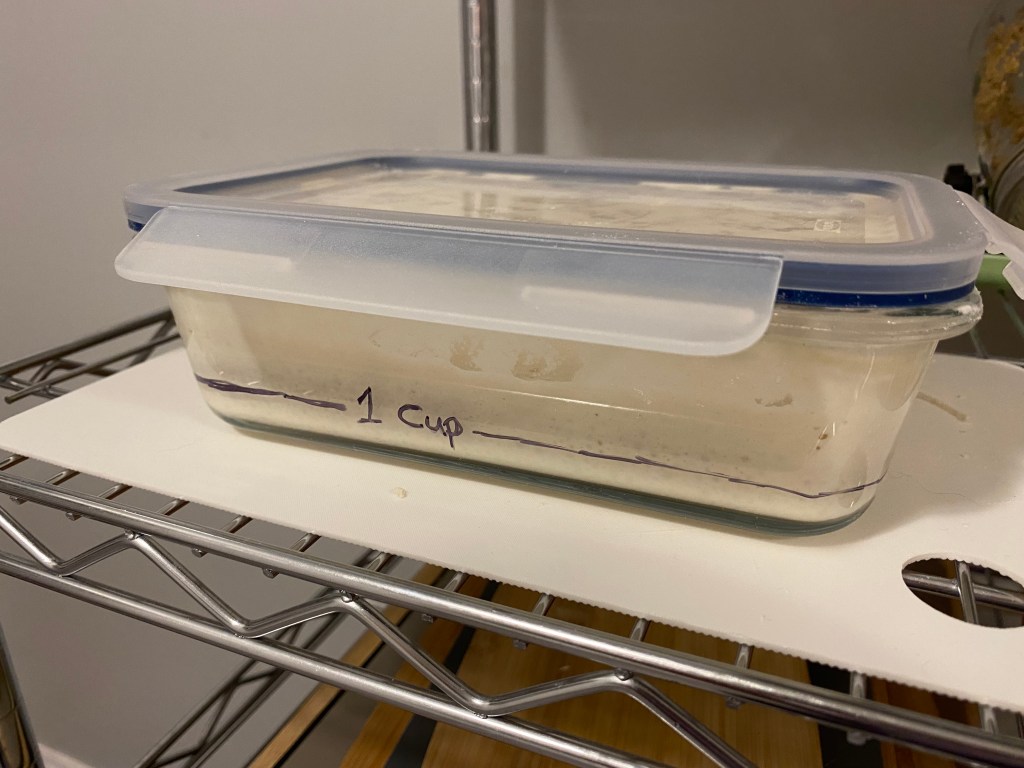
When I first started “sourdoughing”, I used a glass jar to store my starter, but have since started using a glass rectangle dish with clamp on lid. I was inspired by my friend R’s sourdough dish when I looked after it for a week, and loved how easy it was to measure amounts and stir.
I got this particular glass container from Ikea, and wrote on the side a “1 Cup” marking line with permanent marker that I use as a baseline to determine how much to feed it.
On the days that I plan on feeding it (because it’s not every day!) I will usually discard (spoon out/skim off the top) until I reach the 1 cup measuring line.
With 1 cup of starter in there, I will then add about 2/3 cup of all purpose flour and 1/3 cup of lukewarm/room temperature water. I have read that it’s best to use well water or distilled water instead of “town water” for feeding your starter, but have also had great results with unfiltered town water. Typically we use filtered water for feeding and recipes.
General feeding rule of thumb that I use: 1:1 ratio of {1 PART current starter : 1 PART added flour+added water}
After a good stir, the starter rests in a warm area of the kitchen on the counter (not in a cupboard!) and within 4-8 hours is bubbly, more than doubled in size, and ready. A great test is to take a cup of water and put a tiny spot of starter in it to see if it floats. If it floats, then it is ready!
As mentioned above, the timing of active starter readiness will be determined by the warmth and humidity of your kitchen. I have also found the active timing to change with the seasons.
Here in Northern Ontario we get temperatures nearing -50 degrees Celsius in the winter months, and our old kitchen has the furnace contained on one side of it. This means that when the other rooms of the house get chillier, the air vents in the kitchen will tend to come on more frequently and blast hot air into an already warm kitchen (especially if I am already cooking or baking that day!). On those days, the sourdough starter doesn’t take too long to bubble up for me.
I don’t have time to feed it and bake with it every day. What should I do?
I don’t make bread or other sourdough stuff everyday, so as soon as I’ve measured out the active starter I need for a recipe, I’ll put my starter container in the fridge with the lid clamps on. This will slow down the fermenting process and let it go a little dormant in the fridge until I’m ready to feed it and make something else again in a few days.
When in the fridge, the typical rule is to feed it once a week. To maintain a consistent amount of starter while in the fridge, then you will need to discard/spoon out some of the inactive starter until you reach your base amount. (for example, I always try to keep a minimum of 1 cup of starter when it is taking a break in the fridge.
How does the timing work?
There are so many ways of doing it, and honestly everyone does it a little differently! The routine that has worked for me is as follows for most of my sourdough recipes:
Feed the starter in the morning…(somewhere between getting the kids breakfast and sitting down to coffee!)
Sometime after lunch or mid afternoon I’ll check on it and if its ready then I’ll mix up the dough. (And put the rest of my starter in the fridge to go dormant for a few days)
Depending on the recipe, it may need a few extra stretches (like for bread) that I’ll do while making dinner.
Bulk fermenting overnight. Usually this is easier to do overnight and the timing can be very forgiving for generally most sourdough recipes.
Next morning, depending on the recipe there may need to be more stretches (bread), or rolling out, shaping, letting rise for a few hours, putting in fridge, etc. Most timing is quite forgiving and I try to plan the baking part of the recipe according to what that day holds.
I accidently used too much starter in a recipe and am only left with a few tablespoons. How do I build it back up?
I have definitely done this a few times, for example doubling a recipe then forgetting that I actually need 1 CUP of starter instead of 1/2 CUP. Ooops.
To build your starter back up when it has settled back down from the active stage, you can simply measure the amount you currently have, then add an equal amount of flour and water. For example, If you have 3 tablespoons of starter, you can add 2 tablespoons of flour and 1 tablespoon of water.
Oops, I missed the active timing and it has started to bubble down again! Can I still use it?
Sometimes my timing gets off if we have a busy morning, or (as mentioned above) it bubbles up faster than I anticipated or had planned, and has already started to shrink down again. It still looks bubbly but doesn’t float. When this happens (and yes, has happened many times!), I still use the starter, but just add another 1-2 tablespoons of starter to the regular recipe.
What can I do with the Sourdough Discard?
The idea of “discarding” your starter is there for a reason: if you never discard or remove a portion of your starter from the jar, but keep feeding it and never take any out for baking in recipes, then if you are following the 1:1 feeding ratio it will quickly multiply and you will have to keep feeding it higher quantities of flour/water each day!
As a result of this multiplying “problem” there are now oodles of “sourdough discard” recipes and ideas to be found on the internet, to incorporate the inactive starter into a recipe instead of throwing it in the trash.
How can I get a Sourdough Starter?
There are dehydrated sourdough starters that you can purchase online, or you can make your own from scratch (it takes about 10 days, I am still developing a post post to follow soon with instructions), or if possible, see if a friend can give you a portion of theirs.
Sourdough starters that have been fed and cultured for years are pure gold to beginners!
How to Make Sourdough Bread
This recipe’s timing has been written to bake the loaf off on the 2nd day late morning. Adjust the start time to bake off in the evening.
You can read above HERE for more suggestions on feeding your starter.
If your kitchen is more humid and warmer, than your starter may take less time to activate. You could feed your starter in the early afternoon instead to keep with this recipe’s timing.
2. Mix your Dough in the Evening
Mix your active starter with the water and set aside. Mix the flour and salt together in larger bowl, then add the wet ingredients and stir together until it forms a sticky ball.
I find it easier to finish mixing it with my hands. If it is dry, resist the urge to add any water! Cover with beeswax cover/plastic wrap/tea towel and rest for 30 minutes.
3. Stretch & Fold: 1st Way
Wet one hand and gently loosen dough from edges of bowl. Take a handful of dough from the top of the bowl and pull towards you *See picture. Turn bowl 1/4 turn and repeat for a total of 4 stretch & folds to complete circle.
Cover and rest 20 minutes
Repeat stretch & fold full circle
Cover and rest 20 minutes
Repeat stretch & fold full circle
Cover and rest overnight 10-12 hours.
Day Two:
4. Lift & Fold: 2nd Way
Wet both hands and loosen dough from edges of bowl. Using both hands, pick up dough from middle and let it droop over the sides of your hands. *See picture. Gently lower into bowl and let it fold on top of itself. Turn bowl 1/4 turn and repeat for total of 4 to complete full circle.
Note: If it is stiff at first, you can pick it up and gently stretch a little with your wet hands to encourage the gluten. *See picture.
Cover and rest 20 minutes
Repeat lift & fold full circle
Cover and rest 20 minutes
5. Transfer to Fridge
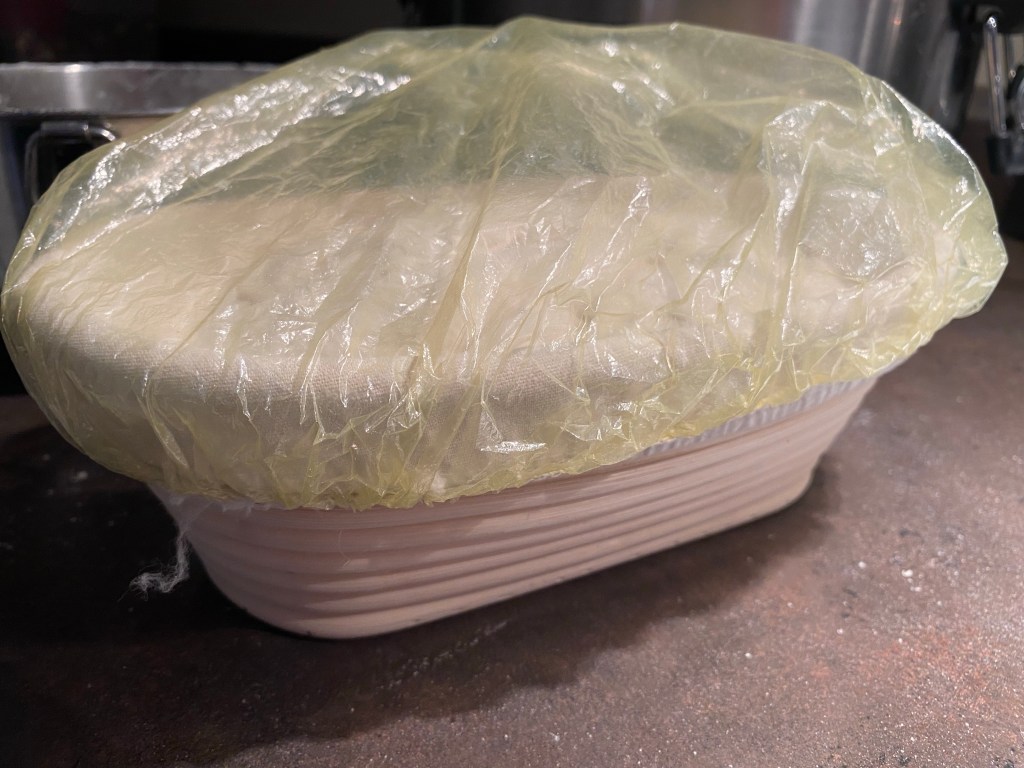
Put on floured surface and form into soft ball with floured hands. Put into banneton basket with smoothest side down and cover OR into a clean bowl lined with parchment paper, smoothest side up.
Cover and place in fridge for 1-24 hours. *This step is great, because you can keep the bread dough in there until you are ready to use it. It will continue cold fermenting and “proofing” during this time.
Note: If in fridge for longer than 1 hour, start preheating 1 hour from when you plan to bake.
6. Bake
Put your dutch oven or roasting pan in oven with lid on and preheat oven to 450 degrees.
Approximately 1 hour from the time you turned the oven on, take dough out of the fridge.
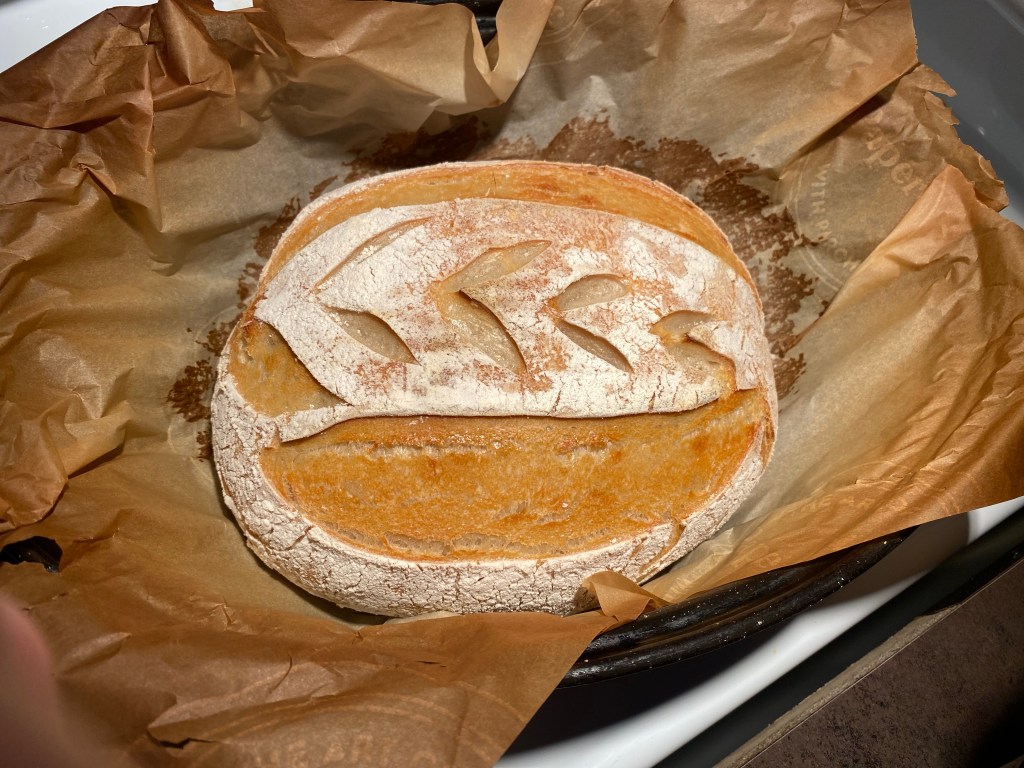
If using a banneton, transfer to parchment lined baking sheet. (I like to place a big piece of parchment on top of banneton, place cookie sheet upside down on top of parchment, then flip it right side up and gently pull banneton off, revealing the smooth side of the dough).
If desired, lightly dust the top of the bread with flour.
Proceed to score the top with sharp knife, razor blade or baking “lame”.
If using a bowl already lined with parchment, continue to score.
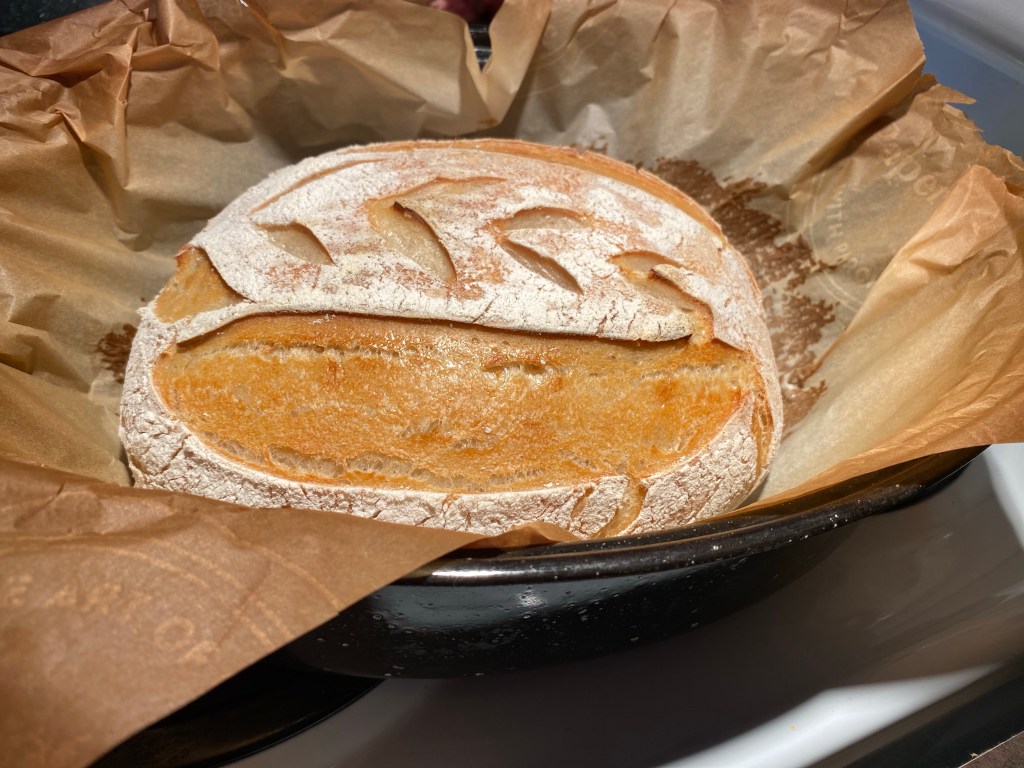
Take dutch oven or roaster out of oven, take lid off, and transfer dough by lifting up the parchment corners. Put lid back on and bake for 20 minutes.
After 20 minutes, take lid off and continue to bake for another 15-20 minutes or until golden and crusty.
7. Cool
Cool on wire rack, and let air harden the crust a little as desired. Store in airtight container or ziplock bag at room temperature to maintain freshness.
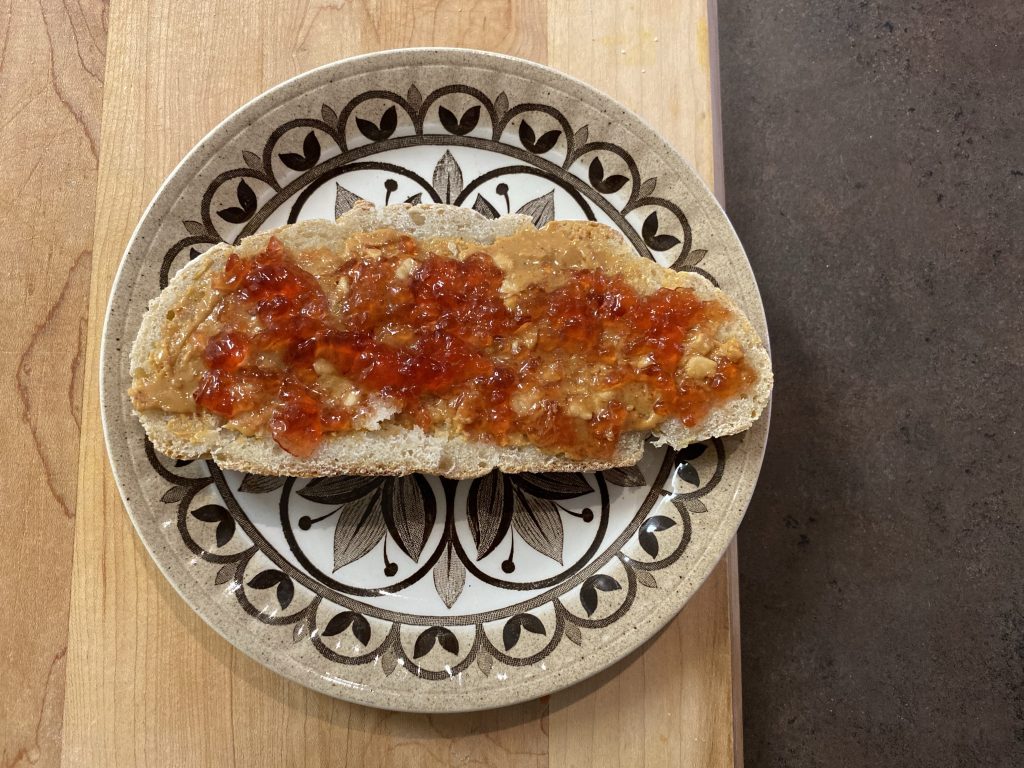
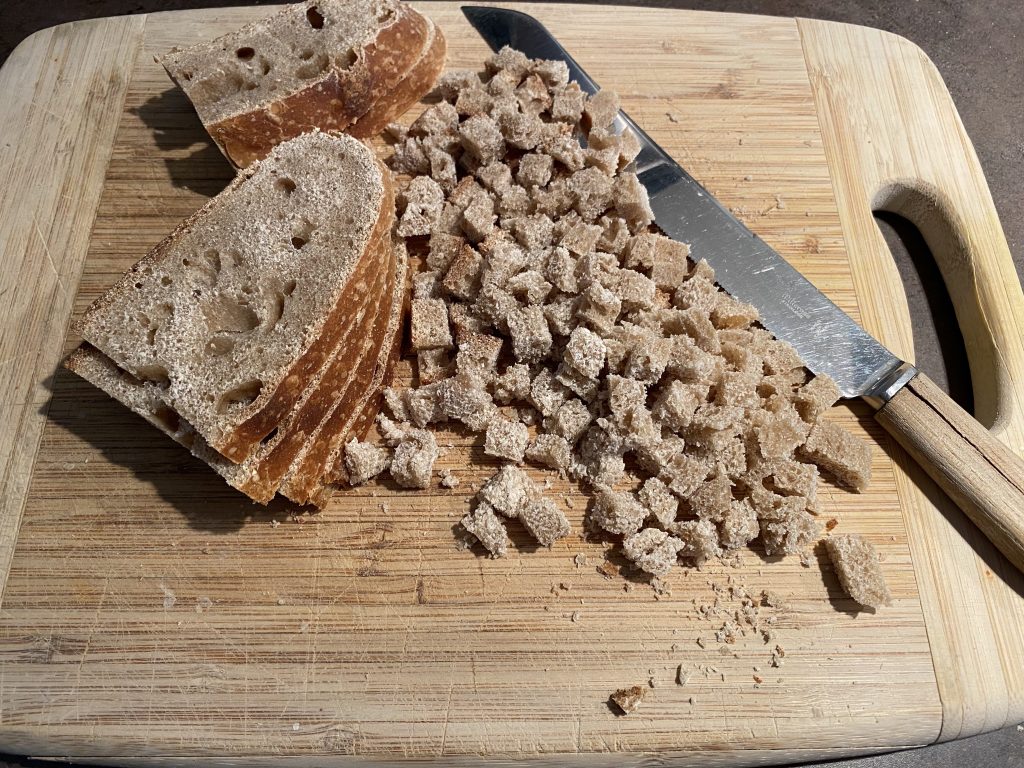
These are some of my favourite ways to eat Sourdough Bread:
Peanut butter and homemade jamSlathered in butter and dipped into a hearty soupDiced and toasted up into croutons for a saladToasted and blended into bread crumb for breaded chicken
Other Tasty Sourdough Recipes to Check Out!
Hi, I’m Jessie!
I’m a Wife and Homeschooling Mom living in a remote town in Northern Ontario, Canada.I love making wholesome meals for my family from scratch, homeschooling our girls and learning more about natural living.
Subscribe to Northbird’s email list to get weekly posts on: tasty recipes, activity ideas for kids, natural living tips, and some genuine mom thoughts and encouragement!
Please Note: This recipe’s timing has been written to bake the loaf off on the 2nd day late morning. Adjust the start time to bake off in the evening.
Directions: Day One
1. Feed Your Starter In the Morning
You can read above HERE for more suggestions on feeding your starter.
If your kitchen is more humid and warmer, than your starter may take less time to activate. You could feed your starter in the early afternoon instead to keep with this recipe’s timing.
2. Mix your Dough in the Evening
Mix your active starter with the water and set aside. Mix the flour and salt together in larger bowl, then add the wet ingredients and stir together until it forms a sticky ball. I find it easier to finish mixing it with my hands. If it is dry, resist the urge to add any water!
Cover with beeswax cover/plastic wrap/tea towel and rest for 30 minutes.
3. Stretch & Fold: 1st Way
Wet one hand and gently loosen dough from edges of bowl. Take a handful of dough from the top of the bowl and pull towards you *See picture. Turn bowl 1/4 turn and repeat for a total of 4 stretch & folds to complete circle.
Cover and rest 20 minutes.
Repeat stretch and fold full circle.
Cover and rest 20 minutes.
Repeat stretch and fold full circle.
Cover and rest overnight 10-12 hours.
Directions: Day Two
4. Lift & Fold: 2nd Way
Wet both hands and loosen dough from edges of bowl. Using both hands, pick up dough from middle and let it droop over the sides of your hands. *See picture. Gently lower into bowl and let it fold on top of itself. Turn bowl 1/4 turn and repeat for total of 4 to complete full circle.
Note: If it is stiff at first, you can pick it up and gently stretch a little with your wet hands to encourage the gluten. *See picture.
Cover and rest 20 minutes
Repeat 2nd way of stretch & fold full circle
Cover and rest 20 minutes
5. Transfer to Fridge
Put on floured surface and form into soft ball with floured hands. Put into banneton basket with smoothest side down and cover OR into a clean bowl lined with parchment paper, smoothest side up.
Cover and place in fridge for 1-24 hours.
Note: If in fridge for longer than 1 hour, start preheating 1 hour from when you plan to bake.
6. Bake
Put your dutch oven or roasting pan in oven with lid on and preheat oven to 450 degrees.
Approximately 1 hour from the time you turned the oven on, take dough out of the fridge.
If using a banneton, transfer to parchment lined baking sheet. (I like to place big piece of parchment on top of banneton, place cookie sheet upside down on top of parchment, then flip it rightside up and gently pull banneton off, revealing the smooth side of the dough).
If desired, lightly dust the top of the bread with flour.
Proceed to score the top with sharp knife, razor blade or baking “lame”.
If using a bowl already lined with parchment, continue to score.
Take dutch oven or roaster out of oven, take lid off, and transfer dough by lifting up the parchment corners. Put lid back on and bake for 20 minutes.
After 20 minutes, take lid off and continue to bake for another 15-20 minutes or until golden and crusty.
7. Cool
Cool on wire rack, and let air harden the crust a little as desired. Store in airtight container or ziplock bag at room temperature to maintain freshness.
Nutrition
Per 2 slices: 190 calories; 0.5 g fat; 40 g carbohydrates;
5.4 g protein; 465 mg sodium.
This post contains affiliate links. As an Amazon associate, I earn from qualifying purchases. This means that I make a small commission at no extra cost to you. You can read my full disclosureHERE.
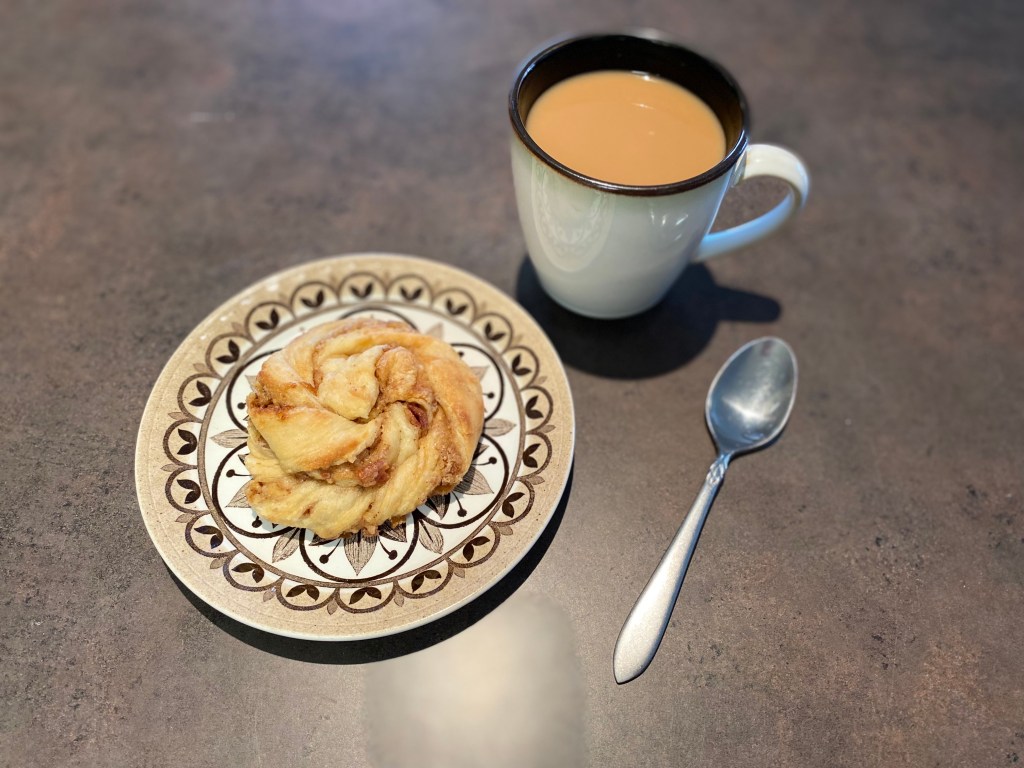
Smoky and salty with earthy sweetness, it can’t get better than that! This delicious Sourdough Cinnamon Bun recipe has been changed and tweaked for a few weeks now, and after playing around for a few batches, the kids and my husband confirmed that perfection was nailed.
I had never seen Cinnamon buns twisted like this until a few weeks ago and love how it adds a new flair to a classic recipe. They are soft and buttery and because they are rolled and twisted, there is more of the yummy cinnamon/butter/sugar mix dispersed through the roll. And did I forget to say BACON?!
These take longer to make as it goes through a fermenting process with the sourdough starter. I like to mix it up in the morning and then finish them off before dinner so they are warm for desert! But you can also mix it up in the evening and finish them off the next morning when you have time.
As long as the dough has between 8-12 hours to rise, and the sourdough starter is active when you start mixing your recipe (was fed 4-12 hours earlier, is bubbly and has doubled in size), then your sourdough cinnamon buns will fluff up nicely. If you are new to “sourdoughing” then all that may sound confusing to you! Below I’ll lay out the recipe step-by-step so it is easy to follow along:
New to Sourdough? This recipe calls for active sourdough starter that has been fed within the past 4-12 hours, and is bubbly and doubled in size. The “active” timing depends on your kitchen’s temperature and humidity, and also the feeding ratio of flour and water.
There are sourdough starters that you can purchase online, or you can make your own from scratch (it takes about 10 days), or if possible, see if a friend can give you a portion of theirs. Sourdough starters that have been fed and cultured for years are pure gold to beginners!
Directions:
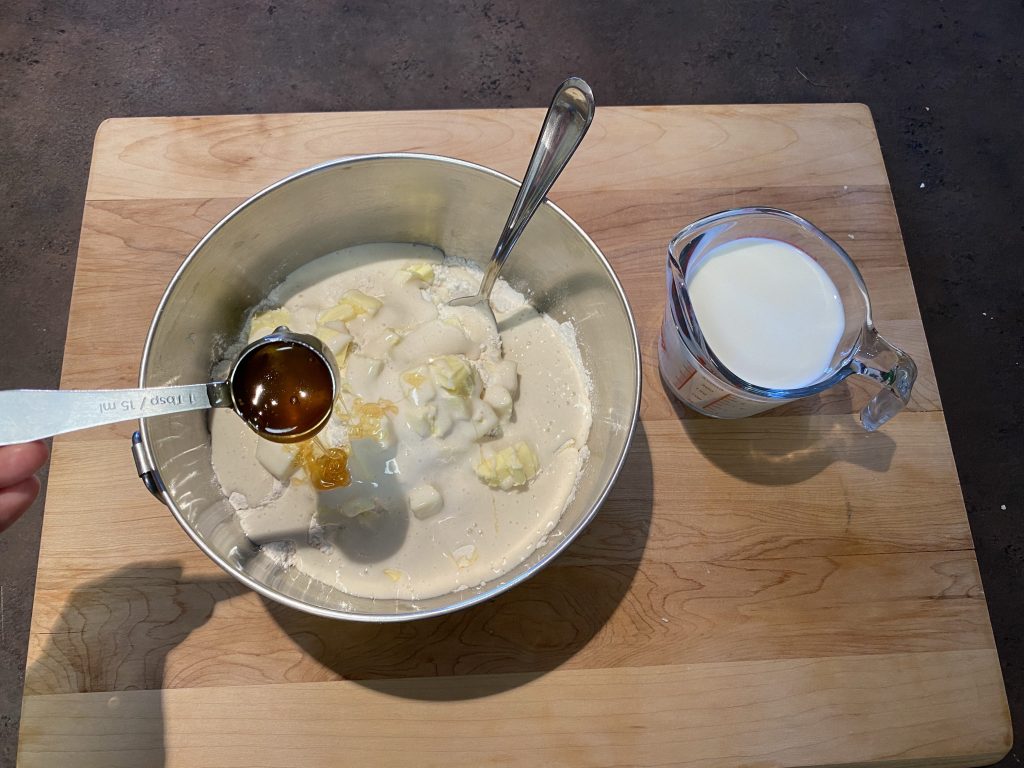
1. Mix butter, flour, starter, sweetener and milk/yogurt together in bowl until it comes together to form a sticky ball.
2. Let sit well covered with plastic wrap, a plate, or beeswax cover for 8-12 hours at room temperature.
3. Cook Bacon strips and (when cool) put in fridge until ready to use.
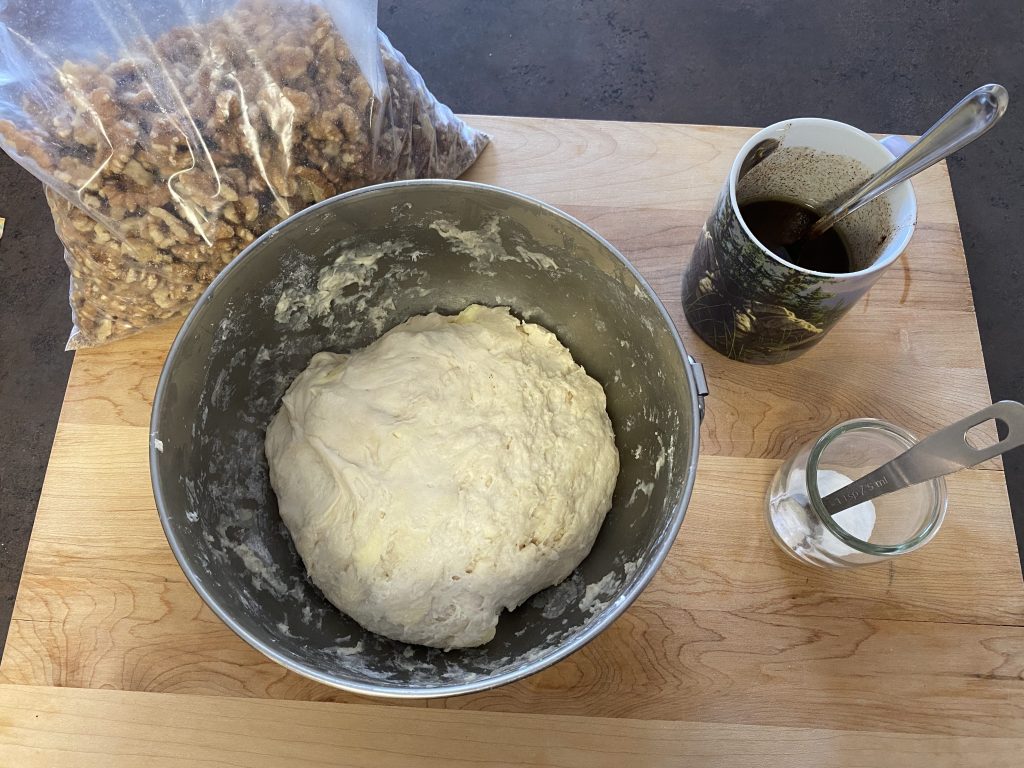
4. When dough is done, mix salt, baking powder and baking soda together in a small cup.
5. Pour on top of dough and gently mix it in.
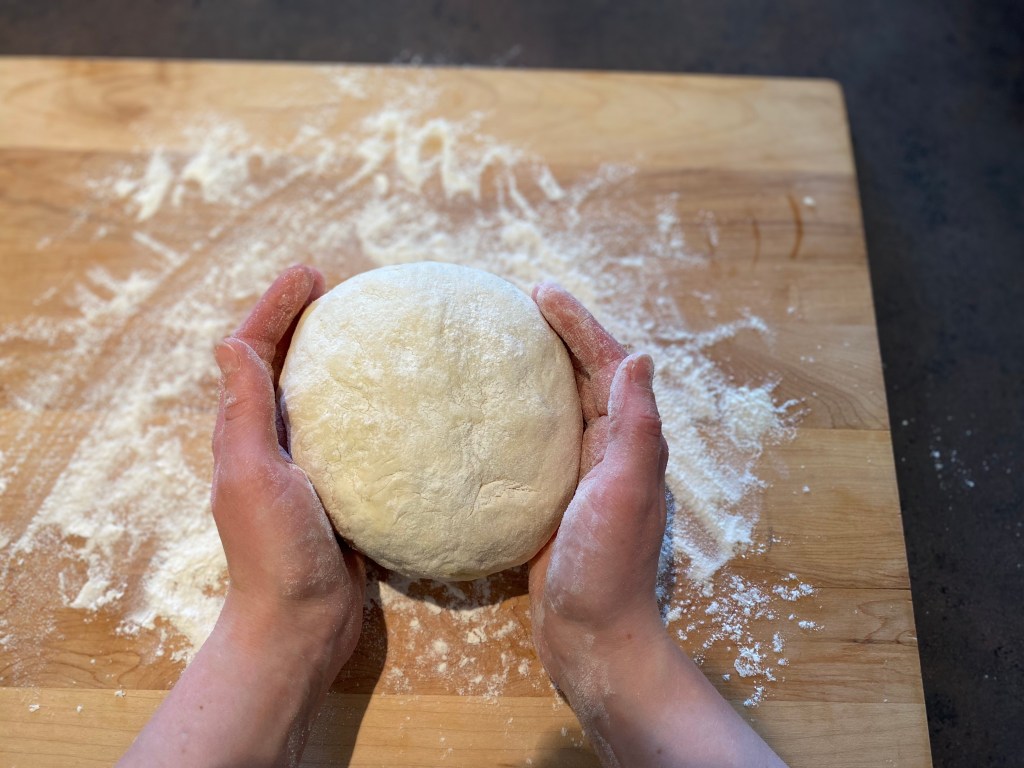
6. Knead dough gently on lightly floured clean surface until soft.
7. Preheat oven to 350 degrees Fahrenheit.
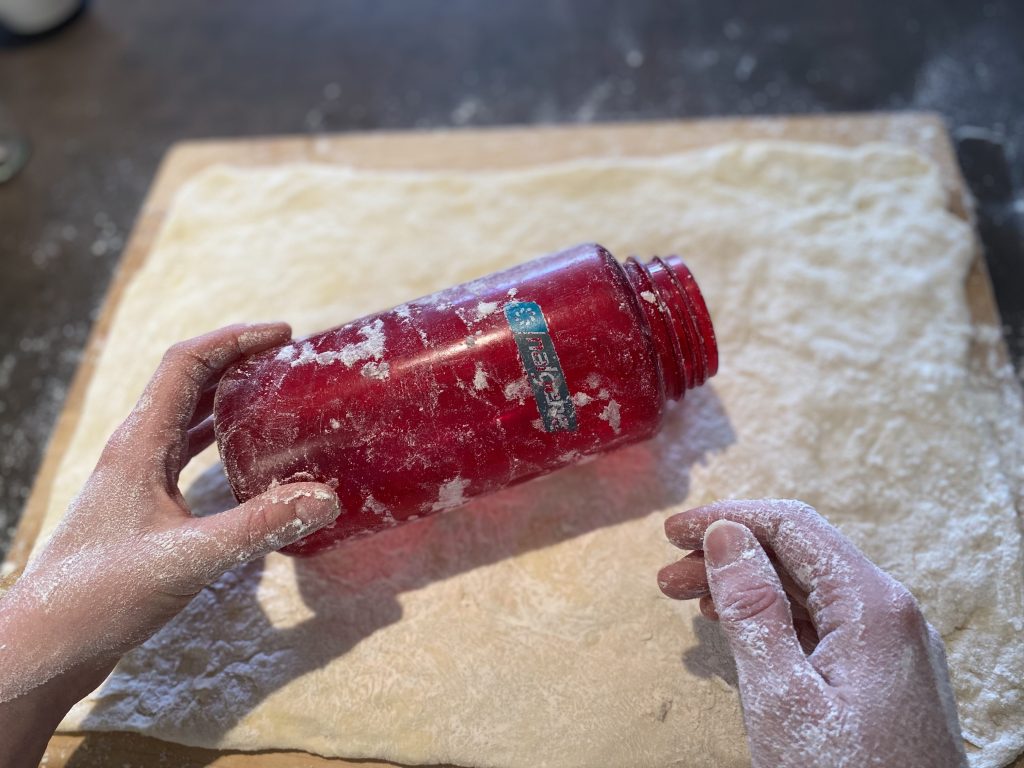
8. Roll out into large rectangle approximately 12”x18” and 1/4-1/2” thick. (Yes, I am improvising with my Nalgene waterbottle because we had just moved and I couldn’t find the rolling pin!)
9. Mix together melted butter, brown sugar, cinnamon and maple syrup together.
10. Pour and spread evenly on top of dough. Spread with spatula so that it is completely covered.
11. Sprinkle chopped walnuts and bacon pieces on top.
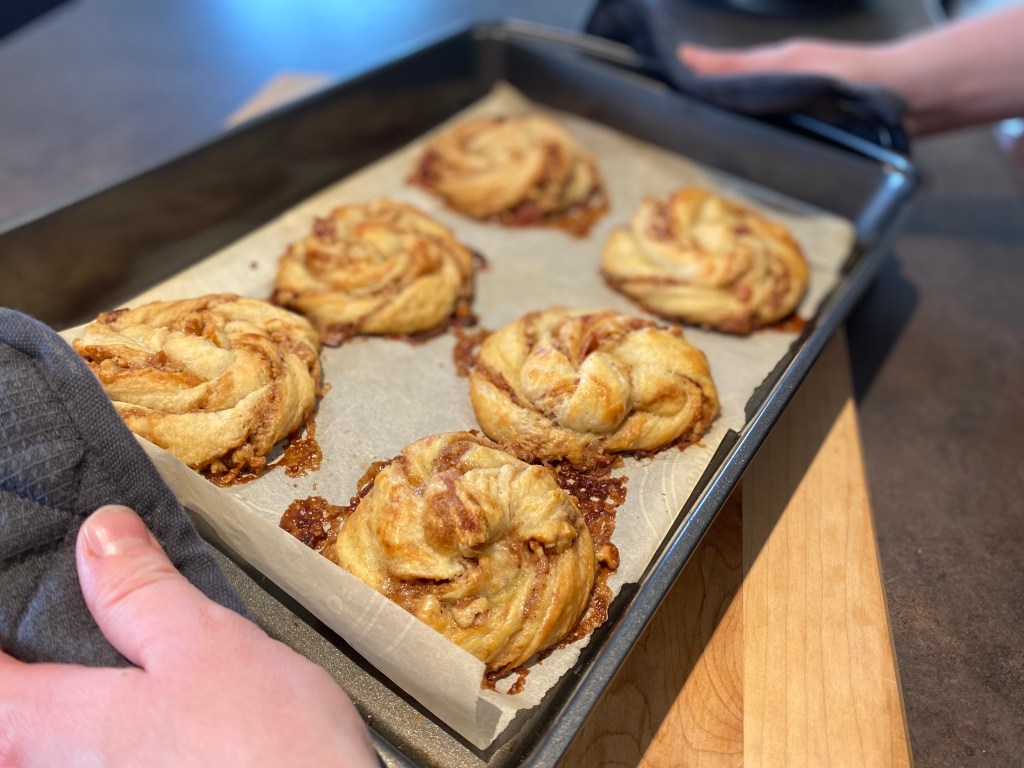
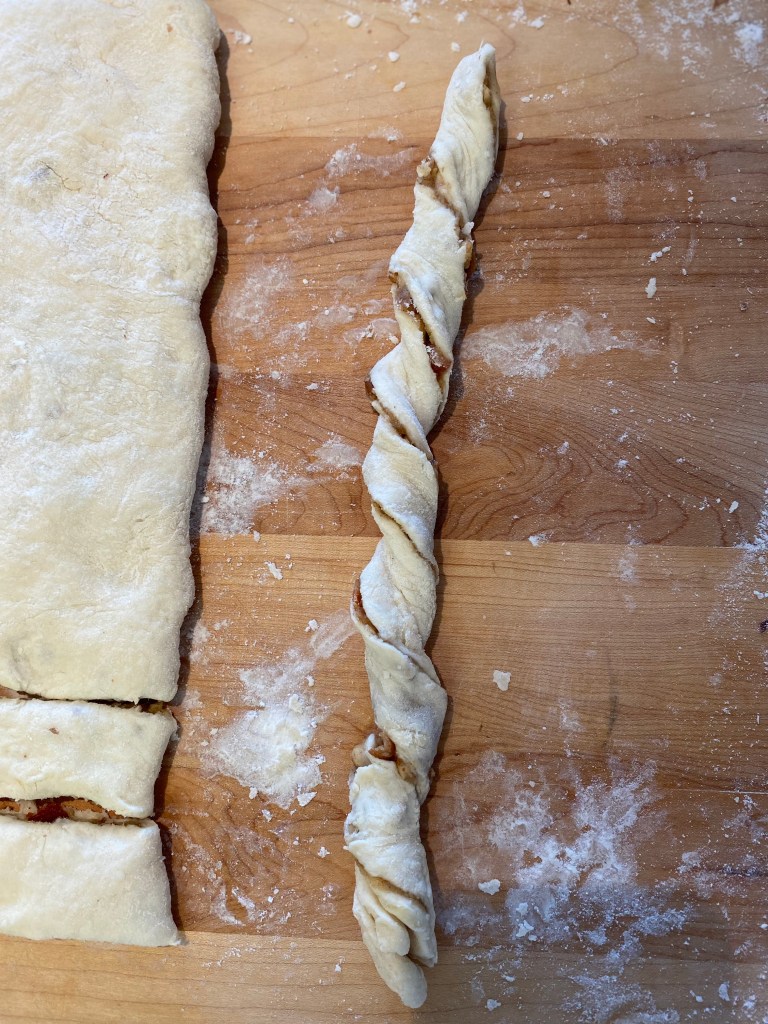
12. Fold the long sides of the rectangle together. Cut into 1″ strips with the folded part at one end.
14. Twist strip, then start to spin from one side and tuck the edges in as you go.
15. Tuck the end part underneath and pinch so it doesn’t come undone.
16. Put pieces on cookie sheets with parchment paper, space out evenly as they will still expand!
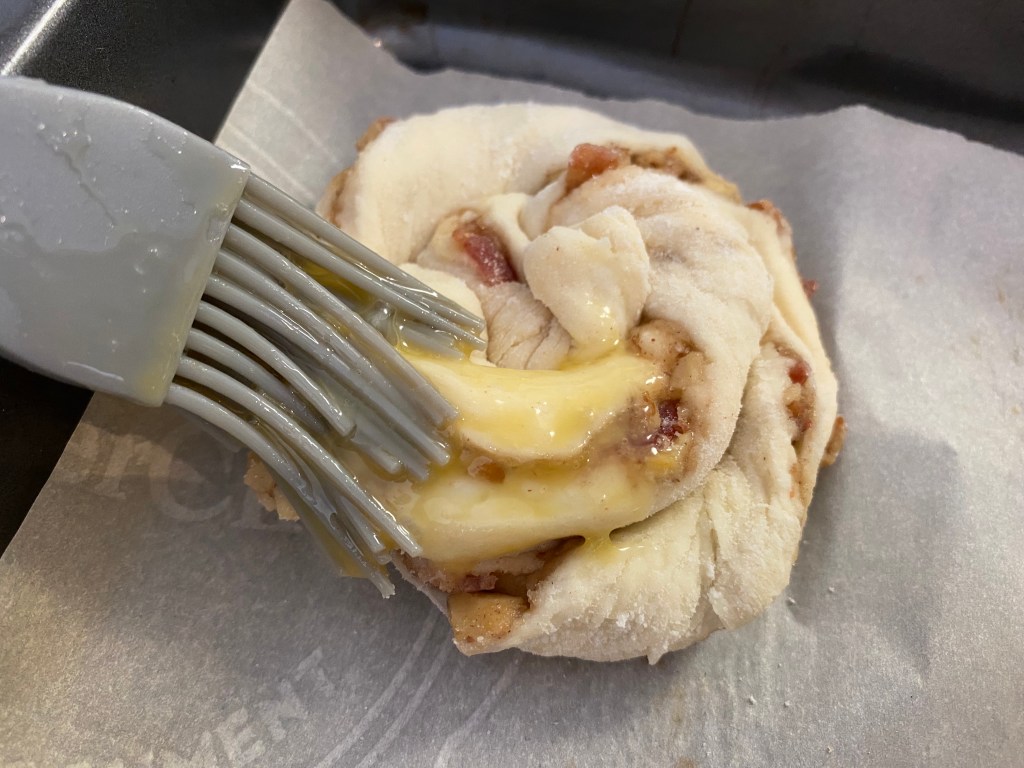
17. Whisk egg with 1 Tablespoon of pure maple syrup and brush on tops and sides of each Cinnamon Bun.
18. Bake at 350 degrees Fahrenheit on the middle rack for 20-25 minutes, until golden brown on top.
19. Cool on wire rack and enjoy! Store in airtight container in fridge (due to the bacon). A quick reheat makes the perfect combo with your morning coffee!
Other Tasty Sourdough Recipes to Check Out!
Subscribe to Northbird’s email list to get weekly posts on: tasty recipes, activity ideas for kids, natural living tips, and some genuine mom thoughts and encouragement!
More Desert & Snack Recipes:
Hi, I’m Jessie!
I’m a Wife and Homeschooling Mom living in a remote town in Northern Ontario, Canada.I love making wholesome meals for my family from scratch, homeschooling our girls and learning more about natural living.
Mix butter, flour, active sourdough starter, sweetener and milk/yogurt together in bowl until it comes together to form a sticky ball.
Let sit well covered with plastic wrap, a plate, or beeswax cover for 8-12 hours at room temperature.
Cook Bacon strips and (when cool) put in fridge until ready to use.
When dough is done, mix salt, baking powder and baking soda together in a small cup.
Pour on top of dough and gently mix it in.
Knead dough gently on lightly floured clean surface until soft.
Preheat oven to 350 degrees Fahrenheit.
Roll out into large rectangle approximately 12”x18” and 1/4-1/2” thick.
Mix together melted butter, brown sugar, cinnamon and maple syrup together.
Pour and spread evenly on top of dough. Spread with spatula so that it is completely covered.
Sprinkle chopped walnuts and bacon pieces on top.
Fold the long sides of the rectangle together (see pictures above for help).
Cut into strips with the folded part at one end.
Twist strip, then start to spin from one side and tuck the edges in as you go (see pic).
Tuck the end part underneath and pinch so it doesn’t come undone.
Put pieces on cookie sheets with parchment paper, space out evenly as they will still expand!
Whisk egg with 1 Tablespoon of pure maple syrup and brush on tops & sides of each Cinnamon Bun.
Bake at 350 degrees Fahrenheit on the middle rack for 20-25 minutes, until golden brown on top.
Cool on wire rack and enjoy! Store in airtight container in fridge (due to the bacon). A quick reheat makes the perfect combo with your morning coffee!
Nutrition
Per 1 Serving: 284 calories; 16.5 g fat; 22.7 g carbohydrates;
4.5 g protein; 37.2 mg cholesterol; 143.6 mg sodium.